Garmin eTrex Summit Owner's Manual (Software Version 3.00 and above) &nbs - Page 48
To create a route, To activate a route - accessories
 |
View all Garmin eTrex Summit manuals
Add to My Manuals
Save this manual to your list of manuals |
Page 48 highlights
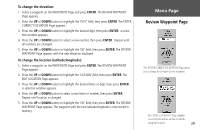
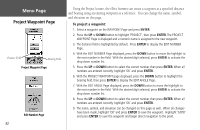
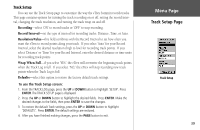
Menu Page Routes Page Use existing waypoints to create a route. Press 'FOLLOW' to activate a route. 34 To create a route: 1. Choose 'ROUTES' on the MENU Page, then highlight 'NEW ROUTE' and press ENTER. An empty route page appears with the first field of the route highlighted. 2. Press ENTER. The ADD WAYPOINT TO ROUTE Page appears. 3. Press the UP or DOWN button to select the waypoint of your choice and press ENTER. The waypoint you selected is placed in the first field of the route, and the second field of the route is highlighted. 4. Repeat Steps 2-3 until all of the desired waypoints are entered into the route. 5. After you have entered all the desired waypoints into your route, press PAGE. Your new route is saved and displayed on the ROUTES Page. The route name is based on the first and last points in your route. You can also plan a route using Garmin MapSource on a PC and upload the route to the eTrex Summit. See your Garmin dealer for more information on using MapSource (MapSource is an optional accessory and is not included with the eTrex Summit). To activate a route: 1. From the ROUTES Page, press the UP or DOWN button to select the route that you wish to follow and press ENTER. 2. Press the UP or DOWN button, highlight 'FOLLOW' and press ENTER. You are prompted to select the destination waypoint. The choices are the beginning waypoint and the ending waypoint in the route list. 3. Press the UP or DOWN button to select the desired destination waypoint, then press ENTER. The eTrex Summit assumes you are at the first waypoint in the route list, and the POINTER Page appears giving you steering guidance to the next waypoint in the route list.
-
 1
1 -
2
-
3
-
4
-
5
-
6
-
7
-
8
-
9
-
10
-
11
-
12
-
13
-
14
-
15
-
16
-
17
-
18
-
19
-
20
-
21
-
22
-
23
-
24
-
25
-
26
-
27
-
28
-
29
-
30
-
31
-
32
-
33
-
34
-
35
-
36
-
37
-
38
-
39
-
40
-
41
-
42
-
 43
43 -
 44
44 -
 45
45 -
 46
46 -
 47
47 -
 48
48 -
 49
49 -
 50
50 -
 51
51 -
 52
52 -
 53
53 -
54
-
55
-
56
-
57
-
58
-
59
-
60
-
61
-
62
-
63
-
64
-
65
-
66
-
67
-
68
-
69
-
70
-
71
-
72
-
73
-
74
-
75
-
76
-
77
-
78
-
79
-
80
 |
 |