Garmin eTrex Summit Owner's Manual (Software Version 3.00 and above) &nbs - Page 53
Track Setup
 |
View all Garmin eTrex Summit manuals
Add to My Manuals
Save this manual to your list of manuals |
Page 53 highlights
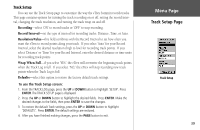
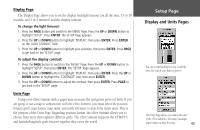
Track Setup You can use the Track Setup page to customize the way the eTrex Summit records tracks. This page contains options for turning the track recording on or off, setting the record interval, changing the track resolution, and turning the track wrap on and off. Recording-select 'ON' to record tracks or 'OFF' to stop recording. Record Interval-set the type of interval for recording tracks: Distance, Time, or Auto. Resolution/Value-this field combines with the Record Interval to set how often you want the eTrex to record points along your track. If you select 'Auto' for your Record Interval, select the desired resolution (high to low) for recording track points. If you select 'Distance' or 'Time' for your Record Interval, enter the desired distance or time units for recording track points. Wrap When Full-if you select 'YES,' the eTrex will overwrite the beginning track points when the Track Log is full. If you select 'NO,' the eTrex will stop recording new track points when the Track Log is full. Defaults-select this option to restore the factory default track settings. To use the Track Setup screen: 1. From the TRACK LOG page, press the UP or DOWN button to highlight 'SETUP'. Press ENTER. The TRACK SETUP page is displayed. 2. Press the UP or DOWN button to highlight the desired fields. Press ENTER. Make the desired changes to the fields, then press ENTER to save the changes. 3 To restore the default Track settings, press the UP or DOWN button to highlight 'DEFAULTS'. Press ENTER. The default settings are restored. 4. After you have finished making changes, press the PAGE button to exit. Menu Page Track Setup Page Track Setup 39
-
 1
1 -
2
-
3
-
4
-
5
-
6
-
7
-
8
-
9
-
10
-
11
-
12
-
13
-
14
-
15
-
16
-
17
-
18
-
19
-
20
-
21
-
22
-
23
-
24
-
25
-
26
-
27
-
28
-
29
-
30
-
31
-
32
-
33
-
34
-
35
-
36
-
37
-
38
-
39
-
40
-
41
-
42
-
43
-
44
-
45
-
46
-
47
-
 48
48 -
 49
49 -
 50
50 -
 51
51 -
 52
52 -
 53
53 -
 54
54 -
 55
55 -
 56
56 -
 57
57 -
 58
58 -
59
-
60
-
61
-
62
-
63
-
64
-
65
-
66
-
67
-
68
-
69
-
70
-
71
-
72
-
73
-
74
-
75
-
76
-
77
-
78
-
79
-
80
 |
 |