Garmin eTrex Summit Owner's Manual (Software Version 3.00 and above) &nbs - Page 47
Routes
 |
View all Garmin eTrex Summit manuals
Add to My Manuals
Save this manual to your list of manuals |
Page 47 highlights
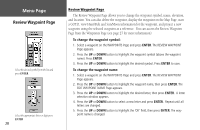
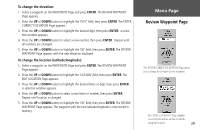
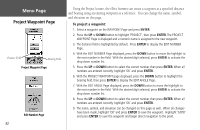
Routes Page The eTrex Summit allows you to navigate using one of three methods: GOTO (discussed on page 11-12 and page 30), TracBack (discussed on page 38), and routes. A route is a path of travel between two or more waypoints. The route feature allows the eTrex Summit to guide you from the first waypoint in the route to each successive waypoint until you reach your final destination. The route feature and the GOTO feature are comparable in that they both guide you to destination waypoints. However, the route feature is more useful for navigating to multiple points along a path. When you reach one waypoint, the eTrex Summit automatically guides you to the next waypoint along the route. When you use the 'GOTO' feature you have to stop and select the next waypoint before you start moving. When creating a route, you select waypoints from the waypoint list and place them into a route in the sequence that you want to navigate to them. You need at least two waypoints (up to a maximum of 125) linked together to form a route. You can create and store up to 20 individual routes in your eTrex Summit. Your saved routes are automatically named based on the first and last waypoints in the route. Saved routes are listed on the Routes Page, with an arrow indicating which route (if any) is currently active. When you start your trip, you activate the route feature and the receiver begins navigation toward the first waypoint in the route. You can then use the Pointer Page to give you steering guidance. Menu Page Routes Page The 'ROUTES feature is found on the Menu Page. Active route Saved routes The Routes Page 33
-
 1
1 -
2
-
3
-
4
-
5
-
6
-
7
-
8
-
9
-
10
-
11
-
12
-
13
-
14
-
15
-
16
-
17
-
18
-
19
-
20
-
21
-
22
-
23
-
24
-
25
-
26
-
27
-
28
-
29
-
30
-
31
-
32
-
33
-
34
-
35
-
36
-
37
-
38
-
39
-
40
-
41
-
 42
42 -
 43
43 -
 44
44 -
 45
45 -
 46
46 -
 47
47 -
 48
48 -
 49
49 -
 50
50 -
 51
51 -
 52
52 -
53
-
54
-
55
-
56
-
57
-
58
-
59
-
60
-
61
-
62
-
63
-
64
-
65
-
66
-
67
-
68
-
69
-
70
-
71
-
72
-
73
-
74
-
75
-
76
-
77
-
78
-
79
-
80
 |
 |
