HTC Touch Diamond2 User Manual - WM 6.1 - Page 25
Installing the SIM Card, Battery, and Storage Card, SIM card - support
 |
View all HTC Touch Diamond2 manuals
Add to My Manuals
Save this manual to your list of manuals |
Page 25 highlights
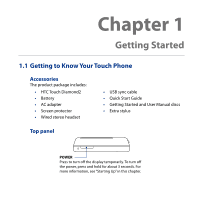
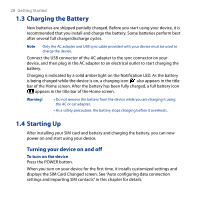
Getting Started 25 1.2 Installing the SIM Card, Battery, and Storage Card You need to remove the back cover before you can install the SIM card, battery, and storage card. Also, make sure to always turn off the power before installing or replacing the SIM card and battery. To remove the back cover 1. Make sure your device is turned off. 2. Firmly hold the device with both hands and the front panel facing down. 3. Push the back cover up with your thumbs until it disengages from the device and then slide it up to remove. SIM card The SIM card contains your phone number, service details, and phonebook/ message memory. Your device supports both 1.8V and 3V SIM cards. Note Some legacy SIM cards may not function with your device. You should consult with your service provider for a replacement SIM card. There may be fees for this service. To install the SIM card 1. Remove the battery if it is installed. 2. Locate the SIM card slot, then insert the SIM card with its gold contacts facing down and its cut-off corner facing out the card slot. 3. Slide the SIM card completely into the slot. Cut-off corner
-
 1
1 -
2
-
3
-
4
-
5
-
6
-
7
-
8
-
9
-
10
-
11
-
12
-
13
-
14
-
15
-
16
-
17
-
18
-
19
-
 20
20 -
 21
21 -
 22
22 -
 23
23 -
 24
24 -
 25
25 -
 26
26 -
 27
27 -
 28
28 -
 29
29 -
 30
30 -
31
-
32
-
33
-
34
-
35
-
36
-
37
-
38
-
39
-
40
-
41
-
42
-
43
-
44
-
45
-
46
-
47
-
48
-
49
-
50
-
51
-
52
-
53
-
54
-
55
-
56
-
57
-
58
-
59
-
60
-
61
-
62
-
63
-
64
-
65
-
66
-
67
-
68
-
69
-
70
-
71
-
72
-
73
-
74
-
75
-
76
-
77
-
78
-
79
-
80
-
81
-
82
-
83
-
84
-
85
-
86
-
87
-
88
-
89
-
90
-
91
-
92
-
93
-
94
-
95
-
96
-
97
-
98
-
99
-
100
-
101
-
102
-
103
-
104
-
105
-
106
-
107
-
108
-
109
-
110
-
111
-
112
-
113
-
114
-
115
-
116
-
117
-
118
-
119
-
120
-
121
-
122
-
123
-
124
-
125
-
126
-
127
-
128
-
129
-
130
-
131
-
132
-
133
-
134
-
135
-
136
-
137
-
138
-
139
-
140
-
141
-
142
-
143
-
144
-
145
-
146
-
147
-
148
-
149
-
150
-
151
-
152
-
153
-
154
-
155
-
156
-
157
-
158
-
159
-
160
-
161
-
162
-
163
-
164
-
165
-
166
-
167
-
168
-
169
-
170
-
171
-
172
-
173
-
174
-
175
-
176
-
177
-
178
-
179
-
180
-
181
-
182
-
183
-
184
-
185
-
186
-
187
-
188
-
189
-
190
-
191
-
192
-
193
-
194
-
195
-
196
-
197
-
198
-
199
-
200
-
201
-
202
-
203
-
204
-
205
-
206
-
207
-
208
-
209
-
210
-
211
-
212
-
213
-
214
-
215
-
216
-
217
-
218
-
219
-
220
-
221
-
222
-
223
-
224
-
225
-
226
-
227
-
228
-
229
-
230
-
231
-
232
 |
 |
