HP CM1015 HP Color LaserJet CM1015/CM1017 MFP Series - User Guide - Page 150
Clean the scanner glass, Change MFP toner warnings, Calibrate the MFP, HP ToolboxFX. - mfp toner cartridge
 |
UPC - 882780579576
View all HP CM1015 manuals
Add to My Manuals
Save this manual to your list of manuals |
Page 150 highlights
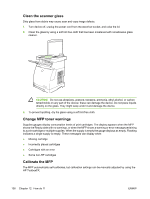
Clean the scanner glass Dirty glass from debris may cause scan and copy image defects. 1. Turn device off, unplug the power cord from the electrical socket, and raise the lid. 2. Clean the glass by using a soft lint-free cloth that has been moistened with nonabrasive glass cleaner. CAUTION Do not use abrasives, acetone, benzene, ammonia, ethyl alcohol, or carbon tetrachloride on any part of the device; these can damage the device. Do not place liquids directly on the glass. They might seep under it and damage the device. 3. To prevent spotting, dry the glass using a soft lint-free cloth. Change MFP toner warnings Supplies gauges display consumption levels of print cartridges. The display appears when the MFP shows the Ready state with no warnings, or when the MFP shows a warning or error message pertaining to a print cartridge or multiple supplies. When the supply is empty the gauge displays as empty. Flashing indicates a single supply is empty. These messages can display when: ● Missing cartridge ● Incorrectly placed cartridges ● Cartridges with an error ● Some non-HP cartridges Calibrate the MFP The MFP automatically self-calibrates, but calibration settings can be manually adjusted by using the HP ToolboxFX. 136 Chapter 12 How do I? ENWW
-
 1
1 -
2
-
3
-
4
-
5
-
6
-
7
-
8
-
9
-
10
-
11
-
12
-
13
-
14
-
15
-
16
-
17
-
18
-
19
-
20
-
21
-
22
-
23
-
24
-
25
-
26
-
27
-
28
-
29
-
30
-
31
-
32
-
33
-
34
-
35
-
36
-
37
-
38
-
39
-
40
-
41
-
42
-
43
-
44
-
45
-
46
-
47
-
48
-
49
-
50
-
51
-
52
-
53
-
54
-
55
-
56
-
57
-
58
-
59
-
60
-
61
-
62
-
63
-
64
-
65
-
66
-
67
-
68
-
69
-
70
-
71
-
72
-
73
-
74
-
75
-
76
-
77
-
78
-
79
-
80
-
81
-
82
-
83
-
84
-
85
-
86
-
87
-
88
-
89
-
90
-
91
-
92
-
93
-
94
-
95
-
96
-
97
-
98
-
99
-
100
-
101
-
102
-
103
-
104
-
105
-
106
-
107
-
108
-
109
-
110
-
111
-
112
-
113
-
114
-
115
-
116
-
117
-
118
-
119
-
120
-
121
-
122
-
123
-
124
-
125
-
126
-
127
-
128
-
129
-
130
-
131
-
132
-
133
-
134
-
135
-
136
-
137
-
138
-
139
-
140
-
141
-
142
-
143
-
144
-
 145
145 -
 146
146 -
 147
147 -
 148
148 -
 149
149 -
 150
150 -
 151
151 -
 152
152 -
 153
153 -
 154
154 -
 155
155 -
156
-
157
-
158
-
159
-
160
-
161
-
162
-
163
-
164
-
165
-
166
-
167
-
168
-
169
-
170
-
171
-
172
-
173
-
174
-
175
-
176
-
177
-
178
-
179
-
180
-
181
-
182
-
183
-
184
-
185
-
186
-
187
-
188
-
189
-
190
-
191
-
192
-
193
-
194
-
195
-
196
-
197
-
198
-
199
-
200
-
201
-
202
-
203
-
204
-
205
-
206
-
207
-
208
-
209
-
210
-
211
-
212
-
213
-
214
-
215
-
216
-
217
-
218
-
219
-
220
-
221
-
222
-
223
-
224
-
225
-
226
-
227
-
228
-
229
-
230
-
231
-
232
-
233
-
234
-
235
-
236
-
237
-
238
-
239
-
240
-
241
-
242
-
243
-
244
-
245
-
246
-
247
-
248
-
249
-
250
-
251
-
252
-
253
-
254
-
255
-
256
-
257
-
258
-
259
-
260
-
261
-
262
-
263
-
264
 |
 |
