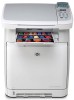
HP CM1015 HP Color LaserJet CM1015/CM1017 MFP Series - User Guide - Page 53
Install Macintosh printing system software for direct connections (USB), Installer, Show Info
 |
UPC - 882780579576
View all HP CM1015 manuals
Add to My Manuals
Save this manual to your list of manuals |
Page 53 highlights
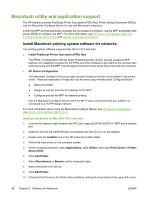
Install Macintosh printing system software for direct connections (USB) Install the Apple PostScript driver that came with the Macintosh computer to use the PPD files. To install the printing system software 1. Connect a USB cable between the USB port on the MFP and the USB port on the computer. Use a standard 5-meter (16.4 feet) or less, certified USB cable. 2. Insert the MFP CD into the CD-ROM drive and run the installer. Double-click the CD icon on the desktop. 3. Double-click the Installer icon in the HP LaserJet Installer folder. 4. Follow the instructions on the computer screen. NOTE For Mac OS X v10.3 and later: USB queues are created automatically when the MFP is attached to the computer. However, the queue uses a generic PPD if the installer has not been run before the USB cable is connected. To change the queue PPD, open the Print Center or MFP Setup Utility, select the correct MFP queue, then click Show Info to open the Printer Info dialog box. In the pop-up menu, select Printer Model, then, in the pop-up menu in which Generic is selected, select the correct PPD for the MFP. 5. Print a test page or a page from any software program to make sure that the software is correctly installed. ENWW Macintosh utility and application support 39
-
 1
1 -
2
-
3
-
4
-
5
-
6
-
7
-
8
-
9
-
10
-
11
-
12
-
13
-
14
-
15
-
16
-
17
-
18
-
19
-
20
-
21
-
22
-
23
-
24
-
25
-
26
-
27
-
28
-
29
-
30
-
31
-
32
-
33
-
34
-
35
-
36
-
37
-
38
-
39
-
40
-
41
-
42
-
43
-
44
-
45
-
46
-
47
-
 48
48 -
 49
49 -
 50
50 -
 51
51 -
 52
52 -
 53
53 -
 54
54 -
 55
55 -
 56
56 -
 57
57 -
 58
58 -
59
-
60
-
61
-
62
-
63
-
64
-
65
-
66
-
67
-
68
-
69
-
70
-
71
-
72
-
73
-
74
-
75
-
76
-
77
-
78
-
79
-
80
-
81
-
82
-
83
-
84
-
85
-
86
-
87
-
88
-
89
-
90
-
91
-
92
-
93
-
94
-
95
-
96
-
97
-
98
-
99
-
100
-
101
-
102
-
103
-
104
-
105
-
106
-
107
-
108
-
109
-
110
-
111
-
112
-
113
-
114
-
115
-
116
-
117
-
118
-
119
-
120
-
121
-
122
-
123
-
124
-
125
-
126
-
127
-
128
-
129
-
130
-
131
-
132
-
133
-
134
-
135
-
136
-
137
-
138
-
139
-
140
-
141
-
142
-
143
-
144
-
145
-
146
-
147
-
148
-
149
-
150
-
151
-
152
-
153
-
154
-
155
-
156
-
157
-
158
-
159
-
160
-
161
-
162
-
163
-
164
-
165
-
166
-
167
-
168
-
169
-
170
-
171
-
172
-
173
-
174
-
175
-
176
-
177
-
178
-
179
-
180
-
181
-
182
-
183
-
184
-
185
-
186
-
187
-
188
-
189
-
190
-
191
-
192
-
193
-
194
-
195
-
196
-
197
-
198
-
199
-
200
-
201
-
202
-
203
-
204
-
205
-
206
-
207
-
208
-
209
-
210
-
211
-
212
-
213
-
214
-
215
-
216
-
217
-
218
-
219
-
220
-
221
-
222
-
223
-
224
-
225
-
226
-
227
-
228
-
229
-
230
-
231
-
232
-
233
-
234
-
235
-
236
-
237
-
238
-
239
-
240
-
241
-
242
-
243
-
244
-
245
-
246
-
247
-
248
-
249
-
250
-
251
-
252
-
253
-
254
-
255
-
256
-
257
-
258
-
259
-
260
-
261
-
262
-
263
-
264
 |
 |
