HP CM1015 HP Color LaserJet CM1015/CM1017 MFP Series - User Guide - Page 221
Install memory DIMMs
 |
UPC - 882780579576
View all HP CM1015 manuals
Add to My Manuals
Save this manual to your list of manuals |
Page 221 highlights
Install memory DIMMs When installing more memory for the MFP, it is possible to install a DIMM to print characters for languages such as Chinese, or for the Cyrillic alphabet. CAUTION Static electricity can damage DIMMs. When handling DIMMs, wear an antistatic wrist strap, or frequently touch the surface of the DIMM antistatic package then touch bare metal on the MFP. 1. Print a Configuration page by pressing OK and Cancel simultaneously. (A Supplies Status page may also print.) If the Configuration page does not print in your language, see Information pages. 2. After the Configuration page prints, turn the MFP off and disconnect the power cable. 3. On the left rear side of the MFP, open the DIMM door. ENWW Install memory DIMMs 207
-
 1
1 -
2
-
3
-
4
-
5
-
6
-
7
-
8
-
9
-
10
-
11
-
12
-
13
-
14
-
15
-
16
-
17
-
18
-
19
-
20
-
21
-
22
-
23
-
24
-
25
-
26
-
27
-
28
-
29
-
30
-
31
-
32
-
33
-
34
-
35
-
36
-
37
-
38
-
39
-
40
-
41
-
42
-
43
-
44
-
45
-
46
-
47
-
48
-
49
-
50
-
51
-
52
-
53
-
54
-
55
-
56
-
57
-
58
-
59
-
60
-
61
-
62
-
63
-
64
-
65
-
66
-
67
-
68
-
69
-
70
-
71
-
72
-
73
-
74
-
75
-
76
-
77
-
78
-
79
-
80
-
81
-
82
-
83
-
84
-
85
-
86
-
87
-
88
-
89
-
90
-
91
-
92
-
93
-
94
-
95
-
96
-
97
-
98
-
99
-
100
-
101
-
102
-
103
-
104
-
105
-
106
-
107
-
108
-
109
-
110
-
111
-
112
-
113
-
114
-
115
-
116
-
117
-
118
-
119
-
120
-
121
-
122
-
123
-
124
-
125
-
126
-
127
-
128
-
129
-
130
-
131
-
132
-
133
-
134
-
135
-
136
-
137
-
138
-
139
-
140
-
141
-
142
-
143
-
144
-
145
-
146
-
147
-
148
-
149
-
150
-
151
-
152
-
153
-
154
-
155
-
156
-
157
-
158
-
159
-
160
-
161
-
162
-
163
-
164
-
165
-
166
-
167
-
168
-
169
-
170
-
171
-
172
-
173
-
174
-
175
-
176
-
177
-
178
-
179
-
180
-
181
-
182
-
183
-
184
-
185
-
186
-
187
-
188
-
189
-
190
-
191
-
192
-
193
-
194
-
195
-
196
-
197
-
198
-
199
-
200
-
201
-
202
-
203
-
204
-
205
-
206
-
207
-
208
-
209
-
210
-
211
-
212
-
213
-
214
-
215
-
 216
216 -
 217
217 -
 218
218 -
 219
219 -
 220
220 -
 221
221 -
 222
222 -
 223
223 -
 224
224 -
 225
225 -
 226
226 -
227
-
228
-
229
-
230
-
231
-
232
-
233
-
234
-
235
-
236
-
237
-
238
-
239
-
240
-
241
-
242
-
243
-
244
-
245
-
246
-
247
-
248
-
249
-
250
-
251
-
252
-
253
-
254
-
255
-
256
-
257
-
258
-
259
-
260
-
261
-
262
-
263
-
264
 |
 |

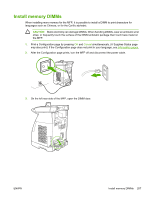
Install memory DIMMs
When installing more memory for the MFP, it is possible to install a DIMM to print characters for
languages such as Chinese, or for the Cyrillic alphabet.
CAUTION
Static electricity can damage DIMMs. When handling DIMMs, wear an antistatic wrist
strap, or frequently touch the surface of the DIMM antistatic package then touch bare metal on
the MFP.
1.
Print a Configuration page by pressing
OK
and
Cancel
simultaneously. (A Supplies Status page
may also print.) If the Configuration page does not print in your language, see
Information pages
.
2.
After the Configuration page prints, turn the MFP off and disconnect the power cable.
3.
On the left rear side of the MFP, open the DIMM door.
ENWW
Install memory DIMMs
207