HP ProBook 6550b HP ProBook User Guide - Windows XP - Page 97
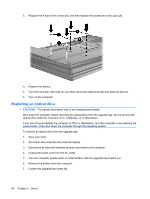
Remove the protective screw caps, and then remove the 4 hard drive screws
 |
View all HP ProBook 6550b manuals
Add to My Manuals
Save this manual to your list of manuals |
Page 97 highlights
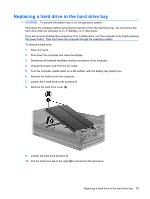
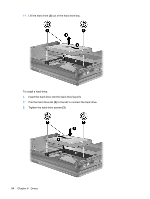
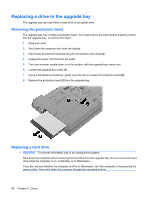
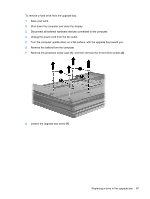
To remove a hard drive from the upgrade bay: 1. Save your work. 2. Shut down the computer and close the display. 3. Disconnect all external hardware devices connected to the computer. 4. Unplug the power cord from the AC outlet. 5. Turn the computer upside down on a flat surface, with the upgrade bay toward you. 6. Remove the battery from the computer. 7. Remove the protective screw caps (1), and then remove the 4 hard drive screws (2). 8. Loosen the upgrade bay screw (1). Replacing a drive in the upgrade bay 87
-
 1
1 -
2
-
3
-
4
-
5
-
6
-
7
-
8
-
9
-
10
-
11
-
12
-
13
-
14
-
15
-
16
-
17
-
18
-
19
-
20
-
21
-
22
-
23
-
24
-
25
-
26
-
27
-
28
-
29
-
30
-
31
-
32
-
33
-
34
-
35
-
36
-
37
-
38
-
39
-
40
-
41
-
42
-
43
-
44
-
45
-
46
-
47
-
48
-
49
-
50
-
51
-
52
-
53
-
54
-
55
-
56
-
57
-
58
-
59
-
60
-
61
-
62
-
63
-
64
-
65
-
66
-
67
-
68
-
69
-
70
-
71
-
72
-
73
-
74
-
75
-
76
-
77
-
78
-
79
-
80
-
81
-
82
-
83
-
84
-
85
-
86
-
87
-
88
-
89
-
90
-
91
-
 92
92 -
 93
93 -
 94
94 -
 95
95 -
 96
96 -
 97
97 -
 98
98 -
 99
99 -
 100
100 -
 101
101 -
 102
102 -
103
-
104
-
105
-
106
-
107
-
108
-
109
-
110
-
111
-
112
-
113
-
114
-
115
-
116
-
117
-
118
-
119
-
120
-
121
-
122
-
123
-
124
-
125
-
126
-
127
-
128
-
129
-
130
-
131
-
132
-
133
-
134
-
135
-
136
-
137
-
138
-
139
-
140
-
141
-
142
-
143
-
144
-
145
-
146
-
147
-
148
-
149
-
150
-
151
-
152
-
153
-
154
-
155
-
156
-
157
-
158
-
159
-
160
-
161
-
162
-
163
-
164
-
165
-
166
-
167
-
168
-
169
-
170
-
171
-
172
-
173
-
174
-
175
 |
 |
To remove a hard drive from the upgrade bay:
1.
Save your work.
2.
Shut down the computer and close the display.
3.
Disconnect all external hardware devices connected to the computer.
4.
Unplug the power cord from the AC outlet.
5.
Turn the computer upside down on a flat surface, with the upgrade bay toward you.
6.
Remove the battery from the computer.
7.
Remove the protective screw caps
(1)
, and then remove the 4 hard drive screws
(2)
.
8.
Loosen the upgrade bay screw
(1)
.
Replacing a drive in the upgrade bay
87