HP StorageWorks 2/32 SAN switch 2/32 version 4.0.x installation guide - Page 32
Installing the Slide Rail Assemblies to the Switch
 |
View all HP StorageWorks 2/32 manuals
Add to My Manuals
Save this manual to your list of manuals |
Page 32 highlights
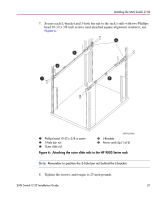
Installing the SAN Switch 2/32 Installing the Slide Rail Assemblies to the Switch The SAN Switch 2/32 Rack Mount Kit consists of two slide rail assemblies consisting of an inner slide rail attached to an outer slide rail. Read the following sections for complete instructions on first separating, then installing the Slide Rail Assemblies. Separating the Inner Slide Rail Assembly from the Outer Slide Rail Assembly Separate the two inner (smaller) slide rails from the two outer (larger) slide rails as follows. 1. Holding one slide rail assembly horizontally, pull the inner slide rails out of the outer slide rail until the lock release lever engages. 2. Press the lock release lever located on the inner slide rails. The inner slide rail separates from the outer slide rail. 3. Repeat steps 1 and 2 to separate the second slide rail assembly. 4. Put the outer slide rails aside. Follow the steps in the next section, "Attaching the Inner Slide Rails to the Switch." Attaching the Inner Slide Rails to the Switch Use the following steps to secure each inner slide rail to the switch chassis. Caution: It is important to install the inner slide rails using the Phillips head, 8-32 x 3/16 inch screws supplied in the Rack Mount Kit. Installing screws longer than 3/16 inch can damage the switch. 1. Position the inner slide rails with the flat side against the switch, oriented in one of the following two ways: 32 SAN Switch 2/32 Installation Guide
-
 1
1 -
2
-
3
-
4
-
5
-
6
-
7
-
8
-
9
-
10
-
11
-
12
-
13
-
14
-
15
-
16
-
17
-
18
-
19
-
20
-
21
-
22
-
23
-
24
-
25
-
26
-
 27
27 -
 28
28 -
 29
29 -
 30
30 -
 31
31 -
 32
32 -
 33
33 -
 34
34 -
 35
35 -
 36
36 -
 37
37 -
38
-
39
-
40
-
41
-
42
-
43
-
44
-
45
-
46
-
47
-
48
-
49
-
50
-
51
-
52
-
53
-
54
-
55
-
56
-
57
-
58
-
59
-
60
-
61
-
62
-
63
-
64
-
65
-
66
-
67
-
68
-
69
-
70
-
71
-
72
-
73
-
74
-
75
-
76
-
77
-
78
-
79
-
80
-
81
-
82
-
83
-
84
-
85
-
86
-
87
-
88
-
89
-
90
-
91
-
92
-
93
-
94
-
95
-
96
-
97
-
98
-
99
-
100
-
101
-
102
-
103
-
104
-
105
-
106
-
107
-
108
-
109
-
110
-
111
-
112
-
113
-
114
-
115
-
116
-
117
-
118
-
119
-
120
-
121
-
122
-
123
-
124
-
125
-
126
 |
 |
