HP StorageWorks 2/32 SAN switch 2/32 version 4.0.x installation guide - Page 41
rack in the top and bottom positions of the three-hole EIA pattern as shown
 |
View all HP StorageWorks 2/32 manuals
Add to My Manuals
Save this manual to your list of manuals |
Page 41 highlights
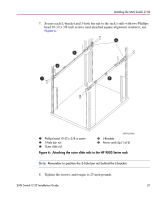
Installing the SAN Switch 2/32 2. Choose a mounting location in the rack for the switch. 3. Install each of the two mounting brackets with (1) M5 Torx head screw with captive lock washers as shown in Figure 8. SHR-2581A Figure 8: Installing the mounting brackets 4. Install (2) M5 U-type Tinnerman clips for each of the front columns of the rack in the top and bottom positions of the three-hole EIA pattern as shown in Figure 9. SAN Switch 2/32 Installation Guide 41
-
 1
1 -
2
-
3
-
4
-
5
-
6
-
7
-
8
-
9
-
10
-
11
-
12
-
13
-
14
-
15
-
16
-
17
-
18
-
19
-
20
-
21
-
22
-
23
-
24
-
25
-
26
-
27
-
28
-
29
-
30
-
31
-
32
-
33
-
34
-
35
-
 36
36 -
 37
37 -
 38
38 -
 39
39 -
 40
40 -
 41
41 -
 42
42 -
 43
43 -
 44
44 -
 45
45 -
 46
46 -
47
-
48
-
49
-
50
-
51
-
52
-
53
-
54
-
55
-
56
-
57
-
58
-
59
-
60
-
61
-
62
-
63
-
64
-
65
-
66
-
67
-
68
-
69
-
70
-
71
-
72
-
73
-
74
-
75
-
76
-
77
-
78
-
79
-
80
-
81
-
82
-
83
-
84
-
85
-
86
-
87
-
88
-
89
-
90
-
91
-
92
-
93
-
94
-
95
-
96
-
97
-
98
-
99
-
100
-
101
-
102
-
103
-
104
-
105
-
106
-
107
-
108
-
109
-
110
-
111
-
112
-
113
-
114
-
115
-
116
-
117
-
118
-
119
-
120
-
121
-
122
-
123
-
124
-
125
-
126
 |
 |

Installing the SAN Switch 2/32
41
SAN Switch 2/32 Installation Guide
2.
Choose a mounting location in the rack for the switch.
3.
Install each of the two mounting brackets with (1) M5 Torx head screw with
captive lock washers as shown in
Figure 8
.
Figure 8:
Installing the mounting brackets
4.
Install (2) M5 U-type Tinnerman clips for each of the front columns of the
rack in the top and bottom positions of the three-hole EIA pattern as shown in
Figure 9
.
SHR-2581A