HP StorageWorks 2/32 SAN switch 2/32 version 4.0.x installation guide - Page 38
Finalizing the Rack Mounting Procedure, Positioning the Switch in the HP 9000 Series Rack
 |
View all HP StorageWorks 2/32 manuals
Add to My Manuals
Save this manual to your list of manuals |
Page 38 highlights
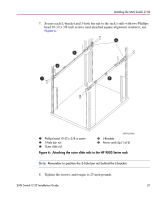
Installing the SAN Switch 2/32 9. Repeat steps 5 through 7 to secure the other end of the outer slide rail. 10. Repeat steps 3 through 7 to install the second outer slide rail. Finalizing the Rack Mounting Procedure Read this section to finalize the rack mount procedure. Positioning the Switch in the HP 9000 Series Rack Follow these steps to install the switch in the rack. Note: If installing more than one SAN Switch 2/32 directly on top of one another (in a 3U space), you must mount the slide rails attached to the switch using the set of holes on the top of the switch, and the bottom using the set of holes on the bottom of the switch. 1. Depending on the type of install (front or rear access), slide the outer slide rails all the way toward the front or back of the rack. 2. Carefully lift the switch into the rear of the rack, inserting the inner slide rails (attached to the switch) into the outer slide rails (attached to the rack). 3. Slide the switch into the rack; see Figure 7. 38 SAN Switch 2/32 Installation Guide
-
 1
1 -
2
-
3
-
4
-
5
-
6
-
7
-
8
-
9
-
10
-
11
-
12
-
13
-
14
-
15
-
16
-
17
-
18
-
19
-
20
-
21
-
22
-
23
-
24
-
25
-
26
-
27
-
28
-
29
-
30
-
31
-
32
-
 33
33 -
 34
34 -
 35
35 -
 36
36 -
 37
37 -
 38
38 -
 39
39 -
 40
40 -
 41
41 -
 42
42 -
 43
43 -
44
-
45
-
46
-
47
-
48
-
49
-
50
-
51
-
52
-
53
-
54
-
55
-
56
-
57
-
58
-
59
-
60
-
61
-
62
-
63
-
64
-
65
-
66
-
67
-
68
-
69
-
70
-
71
-
72
-
73
-
74
-
75
-
76
-
77
-
78
-
79
-
80
-
81
-
82
-
83
-
84
-
85
-
86
-
87
-
88
-
89
-
90
-
91
-
92
-
93
-
94
-
95
-
96
-
97
-
98
-
99
-
100
-
101
-
102
-
103
-
104
-
105
-
106
-
107
-
108
-
109
-
110
-
111
-
112
-
113
-
114
-
115
-
116
-
117
-
118
-
119
-
120
-
121
-
122
-
123
-
124
-
125
-
126
 |
 |
