HP StorageWorks 2/32 SAN switch 2/32 version 4.0.x installation guide - Page 58
Installing Multiple Switches into an Existing SAN, through a workstation and to set the IP address.
 |
View all HP StorageWorks 2/32 manuals
Add to My Manuals
Save this manual to your list of manuals |
Page 58 highlights
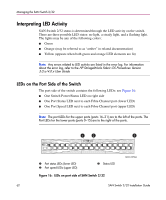
Installing the SAN Switch 2/32 Installing Multiple Switches into an Existing SAN Use these steps to set up more than one SAN Switch 2/32 in an existing SAN. 1. Connect the appropriate components as outlined in the installation section of this chapter. 2. Connect the power cord to the AC connector on the switch. The switch performs POST. If a malfunction occurs during POST, error messages are written to the switch error log and can be viewed by a telnet or terminal session when the POST session completes. If the malfunction prohibits the switch from completing the boot process (fatal error), the switch stops the boot process. If the switch does not fully boot, the switch prompt will not be displayed when the Serial port is connected. 3. Connect the Serial cable, provided in the package contents, between a host computer and the Serial port of the switch. See "Setting Network Addresses via a Serial Connection," earlier in this chapter, to make a Serial connection through a workstation and to set the IP address. 4. Set the switch Domain Address using the configure command to the next unused domain in the SAN. The default domain setting is 1. Note: If a switch boot failure occurs, the switch must be taken offline for repair or replacement. Contact your HP Technical Support for assistance. 5. Power off the new switch and connect one Fibre Channel cable from the SAN to the new switch. 58 SAN Switch 2/32 Installation Guide
-
 1
1 -
2
-
3
-
4
-
5
-
6
-
7
-
8
-
9
-
10
-
11
-
12
-
13
-
14
-
15
-
16
-
17
-
18
-
19
-
20
-
21
-
22
-
23
-
24
-
25
-
26
-
27
-
28
-
29
-
30
-
31
-
32
-
33
-
34
-
35
-
36
-
37
-
38
-
39
-
40
-
41
-
42
-
43
-
44
-
45
-
46
-
47
-
48
-
49
-
50
-
51
-
52
-
 53
53 -
 54
54 -
 55
55 -
 56
56 -
 57
57 -
 58
58 -
 59
59 -
 60
60 -
 61
61 -
 62
62 -
 63
63 -
64
-
65
-
66
-
67
-
68
-
69
-
70
-
71
-
72
-
73
-
74
-
75
-
76
-
77
-
78
-
79
-
80
-
81
-
82
-
83
-
84
-
85
-
86
-
87
-
88
-
89
-
90
-
91
-
92
-
93
-
94
-
95
-
96
-
97
-
98
-
99
-
100
-
101
-
102
-
103
-
104
-
105
-
106
-
107
-
108
-
109
-
110
-
111
-
112
-
113
-
114
-
115
-
116
-
117
-
118
-
119
-
120
-
121
-
122
-
123
-
124
-
125
-
126
 |
 |
