HP StorageWorks 4/16 HP StorageWorks DC and DC04 SAN Backbone Director Switche - Page 172
Removing a blade
 |
View all HP StorageWorks 4/16 manuals
Add to My Manuals
Save this manual to your list of manuals |
Page 172 highlights
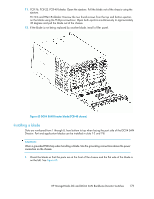
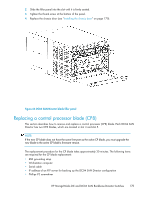
WARNING! A filler panel should be removed only when being replaced with a Director blade, or a filler panel. Any slot that is not occupied by a Director blade should be occupied by a filler panel to ensure correct cooling of the chassis and protection from dust. Removing a blade CAUTION: Wear a grounded ESD strap when handling a DC04 SAN Director blade. Use the grounding connections above the power connectors on the chassis. 1. Remove the chassis door. See "Removing the chassis door" on page 169. 2. A failed port or blade can be identified by inspecting the LEDs on the front panel of each blade. Check the power LED, status LED, and port status LED to identify any possible problems. See "Monitoring DC04 Director system components" on page 153 for LED locations. 3. Establish a Telnet or console session. Before replacing a blade, establish a Telnet or console connection to identify a failure and verify operation after replacement. Use the switchShow command to view the status of blades. 4. Check for adequate cable slack. Ensure that there is plenty of cable slack to remove a blade without cable obstruction. 5. Ensure that the part number on the unit being replaced matches the replacement part number. Use the chassisShow command to display information about the blades, including part numbers (xx-000xxxx-xx), serial numbers, and additional status. 6. Ensure that traffic is not flowing through the blade (port status LED should be "off") prior to disconnecting cables. NOTE: Before removing any cables from a blade, note the cable by identifying each cable by its physical port. If multiple blades are being replaced, replace one blade at a time. 7. Ensure that traffic is not flowing through the blade. 8. Disconnect all cables and SFP or XFP transceivers from the blade. 9. FC8-16, FC8-32, FC8-48 blades: Adjust the ejectors to the open position. Unscrew the two thumb screws from the top and bottom ejectors on the blade using the Phillips screwdriver. See Figure 65. Unscrew the top thumb screw until it pops out. This initiates a hot-swap request. FC10-6 and FR4-18i blades: Turn the blade off by sliding the slider switch in the top ejector down, to the off position. This initiates a hot-swap request. 10. Wait for the power LED to turn off in response to the hot-swap request before removing the blade. 172 Replacing DC04 SAN Director field-replaceable units (FRUs)
-
 1
1 -
2
-
3
-
4
-
5
-
6
-
7
-
8
-
9
-
10
-
11
-
12
-
13
-
14
-
15
-
16
-
17
-
18
-
19
-
20
-
21
-
22
-
23
-
24
-
25
-
26
-
27
-
28
-
29
-
30
-
31
-
32
-
33
-
34
-
35
-
36
-
37
-
38
-
39
-
40
-
41
-
42
-
43
-
44
-
45
-
46
-
47
-
48
-
49
-
50
-
51
-
52
-
53
-
54
-
55
-
56
-
57
-
58
-
59
-
60
-
61
-
62
-
63
-
64
-
65
-
66
-
67
-
68
-
69
-
70
-
71
-
72
-
73
-
74
-
75
-
76
-
77
-
78
-
79
-
80
-
81
-
82
-
83
-
84
-
85
-
86
-
87
-
88
-
89
-
90
-
91
-
92
-
93
-
94
-
95
-
96
-
97
-
98
-
99
-
100
-
101
-
102
-
103
-
104
-
105
-
106
-
107
-
108
-
109
-
110
-
111
-
112
-
113
-
114
-
115
-
116
-
117
-
118
-
119
-
120
-
121
-
122
-
123
-
124
-
125
-
126
-
127
-
128
-
129
-
130
-
131
-
132
-
133
-
134
-
135
-
136
-
137
-
138
-
139
-
140
-
141
-
142
-
143
-
144
-
145
-
146
-
147
-
148
-
149
-
150
-
151
-
152
-
153
-
154
-
155
-
156
-
157
-
158
-
159
-
160
-
161
-
162
-
163
-
164
-
165
-
166
-
 167
167 -
 168
168 -
 169
169 -
 170
170 -
 171
171 -
 172
172 -
 173
173 -
 174
174 -
 175
175 -
 176
176 -
 177
177 -
178
-
179
-
180
-
181
-
182
-
183
-
184
-
185
-
186
-
187
-
188
-
189
-
190
-
191
-
192
-
193
-
194
-
195
-
196
-
197
-
198
-
199
-
200
-
201
-
202
-
203
-
204
-
205
-
206
-
207
-
208
-
209
-
210
-
211
-
212
-
213
-
214
-
215
-
216
-
217
-
218
-
219
-
220
-
221
-
222
-
223
-
224
-
225
-
226
-
227
-
228
-
229
-
230
-
231
-
232
-
233
-
234
-
235
-
236
-
237
-
238
-
239
-
240
-
241
-
242
-
243
-
244
-
245
-
246
-
247
-
248
-
249
-
250
-
251
-
252
-
253
-
254
-
255
-
256
 |
 |
