HP StorageWorks 4/16 HP StorageWorks DC and DC04 SAN Backbone Director Switche - Page 42
Powering on the DC SAN Director, Port numbering
 |
View all HP StorageWorks 4/16 manuals
Add to My Manuals
Save this manual to your list of manuals |
Page 42 highlights
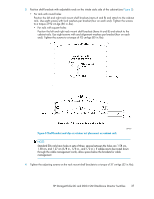
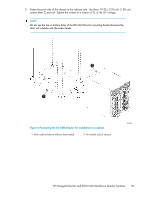
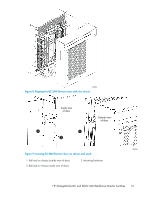
Powering on the DC SAN Director To power on the DC SAN Director: CAUTION: Use the supplied power cords. Ensure the facility power receptacle is the correct type, supplies the required voltage, and is properly grounded. 1. Connect the AC power cords to the power supply assemblies. One to four power cords are required depending on electrical service. 2. Connect the power cords to a power source with voltage of 200 to 240 VAC, 47 to 63 Hz (normally two power cords) or to a power source with voltage of 110 to 120 VAC, 47 to 63 Hz (two to four power cords). TIP: Use of the high-voltage line (200 to 240 VAC) is highly recommended due to better power-conversion efficiency 3. Turn the AC power switches on the power supplies to ON (I). The AC power switches light green when switched on and power is supplied. 4. The DC SAN Director performs a Power-on Self-Test (POST) each time it is powered on. POST takes approximately 10 minutes and is complete when indicator light activity indicates the operational state. For information about LED patterns, see "Monitoring DC Director system components" on page 57. You can bypass POST by using the fastBoot command. You can also disable POST for successive reboots on the DC SAN Director using the diagDisablePost command. NOTE: To prevent a potential IP address conflict, do not connect the DC SAN Director to the network until the IP addresses are configured. See "DC Director log in and configuration" on page 49. Port numbering The DC SAN Director uses the following port numbering method (see "Port numbering templates" on page 239). IMPORTANT: Slots are numbered 1 through 12, from left to right when facing the port side of the DC SAN Director. Control Processor blades (CP8) can be installed only in slots 6 and 7. Core switch blades (CR8) can be installed only in slots 5 and 8. • FC8-16 port blade-ports are numbered from 0 through 15 from bottom to top. 42 DC SAN Director Installation
-
 1
1 -
2
-
3
-
4
-
5
-
6
-
7
-
8
-
9
-
10
-
11
-
12
-
13
-
14
-
15
-
16
-
17
-
18
-
19
-
20
-
21
-
22
-
23
-
24
-
25
-
26
-
27
-
28
-
29
-
30
-
31
-
32
-
33
-
34
-
35
-
36
-
 37
37 -
 38
38 -
 39
39 -
 40
40 -
 41
41 -
 42
42 -
 43
43 -
 44
44 -
 45
45 -
 46
46 -
 47
47 -
48
-
49
-
50
-
51
-
52
-
53
-
54
-
55
-
56
-
57
-
58
-
59
-
60
-
61
-
62
-
63
-
64
-
65
-
66
-
67
-
68
-
69
-
70
-
71
-
72
-
73
-
74
-
75
-
76
-
77
-
78
-
79
-
80
-
81
-
82
-
83
-
84
-
85
-
86
-
87
-
88
-
89
-
90
-
91
-
92
-
93
-
94
-
95
-
96
-
97
-
98
-
99
-
100
-
101
-
102
-
103
-
104
-
105
-
106
-
107
-
108
-
109
-
110
-
111
-
112
-
113
-
114
-
115
-
116
-
117
-
118
-
119
-
120
-
121
-
122
-
123
-
124
-
125
-
126
-
127
-
128
-
129
-
130
-
131
-
132
-
133
-
134
-
135
-
136
-
137
-
138
-
139
-
140
-
141
-
142
-
143
-
144
-
145
-
146
-
147
-
148
-
149
-
150
-
151
-
152
-
153
-
154
-
155
-
156
-
157
-
158
-
159
-
160
-
161
-
162
-
163
-
164
-
165
-
166
-
167
-
168
-
169
-
170
-
171
-
172
-
173
-
174
-
175
-
176
-
177
-
178
-
179
-
180
-
181
-
182
-
183
-
184
-
185
-
186
-
187
-
188
-
189
-
190
-
191
-
192
-
193
-
194
-
195
-
196
-
197
-
198
-
199
-
200
-
201
-
202
-
203
-
204
-
205
-
206
-
207
-
208
-
209
-
210
-
211
-
212
-
213
-
214
-
215
-
216
-
217
-
218
-
219
-
220
-
221
-
222
-
223
-
224
-
225
-
226
-
227
-
228
-
229
-
230
-
231
-
232
-
233
-
234
-
235
-
236
-
237
-
238
-
239
-
240
-
241
-
242
-
243
-
244
-
245
-
246
-
247
-
248
-
249
-
250
-
251
-
252
-
253
-
254
-
255
-
256
 |
 |
