HP StorageWorks 4/16 HP StorageWorks DC and DC04 SAN Backbone Director Switche - Page 73
Replacing DC SAN Director field-replaceable units (FRUs), Replacing the chassis door, Removing
 |
View all HP StorageWorks 4/16 manuals
Add to My Manuals
Save this manual to your list of manuals |
Page 73 highlights
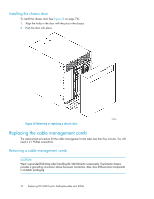
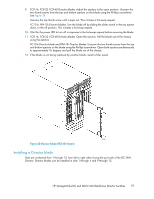
5 Replacing DC SAN Director field-replaceable units (FRUs) This chapter provides information for replacing the following components: IMPORTANT: The FRUs in the DC SAN Director can be removed and replaced without special tools. The DC SAN Director can continue operating during many of the FRU replacements if the conditions specified in the procedure are followed. • "Replacing the chassis door" on page 73 • "Replacing the cable management comb" on page 74 • "Replacing a Director blade" on page 75 • "Replacing a Director blade filler panel" on page 78 • "Replacing a control processor blade (CP8)" on page 79 • "Replacing a core switch blade (CR8)" on page 86 • "Replacing a power supply" on page 88 • "Replacing a blower assembly" on page 89 • "Replacing the WWN bezel (logo plate) and WWN card" on page 91 • "Replacing SFPs and XFPs" on page 96 • "Replacing the DC SAN Director chassis" on page 97 Replacing the chassis door The chassis door must be installed to ensure the DC SAN Director meets EMI and other regulatory certifications. The replacement procedure for the chassis door takes less than 5 minutes. Removing the chassis door To remove the chassis door (see Figure 26 on page 74): NOTE: The door is not hinged. It installs straight on the chassis by snapping four ball studs located on the chassis into receiving hardware on the door in the cabinet. 1. Grip the side of the door. 2. Gently pull the door straight out from the chassis until it snaps out of the ball studs on the chassis. HP StorageWorks DC and DC04 SAN Backbone Director Switches 73
-
 1
1 -
2
-
3
-
4
-
5
-
6
-
7
-
8
-
9
-
10
-
11
-
12
-
13
-
14
-
15
-
16
-
17
-
18
-
19
-
20
-
21
-
22
-
23
-
24
-
25
-
26
-
27
-
28
-
29
-
30
-
31
-
32
-
33
-
34
-
35
-
36
-
37
-
38
-
39
-
40
-
41
-
42
-
43
-
44
-
45
-
46
-
47
-
48
-
49
-
50
-
51
-
52
-
53
-
54
-
55
-
56
-
57
-
58
-
59
-
60
-
61
-
62
-
63
-
64
-
65
-
66
-
67
-
 68
68 -
 69
69 -
 70
70 -
 71
71 -
 72
72 -
 73
73 -
 74
74 -
 75
75 -
 76
76 -
 77
77 -
 78
78 -
79
-
80
-
81
-
82
-
83
-
84
-
85
-
86
-
87
-
88
-
89
-
90
-
91
-
92
-
93
-
94
-
95
-
96
-
97
-
98
-
99
-
100
-
101
-
102
-
103
-
104
-
105
-
106
-
107
-
108
-
109
-
110
-
111
-
112
-
113
-
114
-
115
-
116
-
117
-
118
-
119
-
120
-
121
-
122
-
123
-
124
-
125
-
126
-
127
-
128
-
129
-
130
-
131
-
132
-
133
-
134
-
135
-
136
-
137
-
138
-
139
-
140
-
141
-
142
-
143
-
144
-
145
-
146
-
147
-
148
-
149
-
150
-
151
-
152
-
153
-
154
-
155
-
156
-
157
-
158
-
159
-
160
-
161
-
162
-
163
-
164
-
165
-
166
-
167
-
168
-
169
-
170
-
171
-
172
-
173
-
174
-
175
-
176
-
177
-
178
-
179
-
180
-
181
-
182
-
183
-
184
-
185
-
186
-
187
-
188
-
189
-
190
-
191
-
192
-
193
-
194
-
195
-
196
-
197
-
198
-
199
-
200
-
201
-
202
-
203
-
204
-
205
-
206
-
207
-
208
-
209
-
210
-
211
-
212
-
213
-
214
-
215
-
216
-
217
-
218
-
219
-
220
-
221
-
222
-
223
-
224
-
225
-
226
-
227
-
228
-
229
-
230
-
231
-
232
-
233
-
234
-
235
-
236
-
237
-
238
-
239
-
240
-
241
-
242
-
243
-
244
-
245
-
246
-
247
-
248
-
249
-
250
-
251
-
252
-
253
-
254
-
255
-
256
 |
 |
