HP StorageWorks 4/16 HP StorageWorks DC and DC04 SAN Backbone Director Switche - Page 43
Managing cables, Using the optional HP StorageWorks DC SAN Director Inter-Chassis Link (ICL) cable
 |
View all HP StorageWorks 4/16 manuals
Add to My Manuals
Save this manual to your list of manuals |
Page 43 highlights
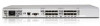
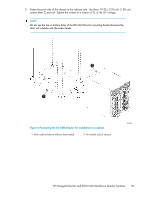
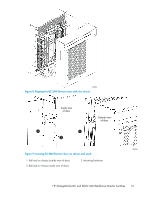
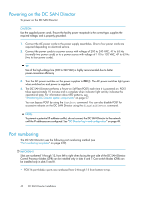
• FC8-32 port blade-ports are numbered from 0 through 15 from bottom to top on the left set of ports and 16 through 31 from bottom to top on the right set of ports. • FC8-48 port blade-ports are numbered from 0 through 23 from bottom to top on the left set of ports and 24 through 47 from bottom to top on the right set of ports. • FC10-6 port blade-ports are numbered from 0 through 5 from bottom to top. • FR4-18i router blade-the sixteen physical FC ports on this blade are numbered 0 through 15 from bottom to top. The two GbE ports are numbered from the bottom as Ge0 and Ge1. These ports, when fully configured, enable sixteen VE_Ports or VEX _Ports and appear in the switchShow command as ports 16 through 31. Managing cables The cable management comb (see Figure 1 on page 21) is attached to the chassis under the chassis door and allows for simple cable management. The comb can be installed without service disruption. Route cables down in front of the blades to keep LEDs visible. Leave at least one meter of slack for each fiber optic cable to provide room to remove and replace blades. IMPORTANT: Do not route the cables in front of the air exhaust vent, which is located at the top of the port side of the chassis. If ISL Trunking is in use, group the cables by trunking group. The ports are color-coded to indicate which ports can be used in the same ISL Trunking group: eight ports marked with solid black ovals alternate with eight ports marked with oval outlines. See Table 52 on page 222 for a listing of supported cable speeds and distances. Using the optional HP StorageWorks DC SAN Director Inter-Chassis Link (ICL) cable kit You can purchase the optional HP StorageWorks DC SAN Director Inter-Chassis Link (ICL) cable kit, HP part number AK862A. The kit increases the number of ports by interconnecting two DC SAN Director chassis. The ICL cables and the ICL connectors (see Figure 10) are color-coded and labeled for ease of installation. Figure 11 through Figure 14 show the acceptable cabling configurations for the option. Connect the ICL cables in one of the configurations shown. NOTE: Connect the cables from the top connectors (ICL 1) of the CR8 blades in the first chassis to the bottom connectors (ICL 0) of the CR8 blades in the second chassis. Similarly, connect the cables from the bottom connectors (ICL 0) of the CR8 blades in the first chassis to the top connectors (ICL 1) of the CR8 blades in the second chassis. The cables can cross between the slot 5 CR8 blade and the slot 8 CR8 blade as long as the top-to-bottom rule is followed. HP StorageWorks DC and DC04 SAN Backbone Director Switches 43
-
 1
1 -
2
-
3
-
4
-
5
-
6
-
7
-
8
-
9
-
10
-
11
-
12
-
13
-
14
-
15
-
16
-
17
-
18
-
19
-
20
-
21
-
22
-
23
-
24
-
25
-
26
-
27
-
28
-
29
-
30
-
31
-
32
-
33
-
34
-
35
-
36
-
37
-
 38
38 -
 39
39 -
 40
40 -
 41
41 -
 42
42 -
 43
43 -
 44
44 -
 45
45 -
 46
46 -
 47
47 -
 48
48 -
49
-
50
-
51
-
52
-
53
-
54
-
55
-
56
-
57
-
58
-
59
-
60
-
61
-
62
-
63
-
64
-
65
-
66
-
67
-
68
-
69
-
70
-
71
-
72
-
73
-
74
-
75
-
76
-
77
-
78
-
79
-
80
-
81
-
82
-
83
-
84
-
85
-
86
-
87
-
88
-
89
-
90
-
91
-
92
-
93
-
94
-
95
-
96
-
97
-
98
-
99
-
100
-
101
-
102
-
103
-
104
-
105
-
106
-
107
-
108
-
109
-
110
-
111
-
112
-
113
-
114
-
115
-
116
-
117
-
118
-
119
-
120
-
121
-
122
-
123
-
124
-
125
-
126
-
127
-
128
-
129
-
130
-
131
-
132
-
133
-
134
-
135
-
136
-
137
-
138
-
139
-
140
-
141
-
142
-
143
-
144
-
145
-
146
-
147
-
148
-
149
-
150
-
151
-
152
-
153
-
154
-
155
-
156
-
157
-
158
-
159
-
160
-
161
-
162
-
163
-
164
-
165
-
166
-
167
-
168
-
169
-
170
-
171
-
172
-
173
-
174
-
175
-
176
-
177
-
178
-
179
-
180
-
181
-
182
-
183
-
184
-
185
-
186
-
187
-
188
-
189
-
190
-
191
-
192
-
193
-
194
-
195
-
196
-
197
-
198
-
199
-
200
-
201
-
202
-
203
-
204
-
205
-
206
-
207
-
208
-
209
-
210
-
211
-
212
-
213
-
214
-
215
-
216
-
217
-
218
-
219
-
220
-
221
-
222
-
223
-
224
-
225
-
226
-
227
-
228
-
229
-
230
-
231
-
232
-
233
-
234
-
235
-
236
-
237
-
238
-
239
-
240
-
241
-
242
-
243
-
244
-
245
-
246
-
247
-
248
-
249
-
250
-
251
-
252
-
253
-
254
-
255
-
256
 |
 |
