Intel AFCSASRISER User Guide - Page 101
Intel, RAID Web Console 2 - Customer Information Screen, Setup Type Screen
 |
View all Intel AFCSASRISER manuals
Add to My Manuals
Save this manual to your list of manuals |
Page 101 highlights
Figure 40. Intel® RAID Web Console 2 - Customer Information Screen 4. Enter your user name and organization name. At the bottom of the screen, select an installation option: - If you select All users, any user with administrative privileges can view or change the RAID configurations. - If you select Only for current user (Administrator), only you can view or change the RAID configurations. 5. Click Next to continue. 6. Accept the default Destination Folder, or click Change to select a different destination folder. Click Next to continue. The Setup Type screen is displayed, as shown in Figure 41. Figure 41. Setup Type Screen 7. Select one of the following setup options. Intel® RAID Software User's Guide 89
-
 1
1 -
2
-
3
-
4
-
5
-
6
-
7
-
8
-
9
-
10
-
11
-
12
-
13
-
14
-
15
-
16
-
17
-
18
-
19
-
20
-
21
-
22
-
23
-
24
-
25
-
26
-
27
-
28
-
29
-
30
-
31
-
32
-
33
-
34
-
35
-
36
-
37
-
38
-
39
-
40
-
41
-
42
-
43
-
44
-
45
-
46
-
47
-
48
-
49
-
50
-
51
-
52
-
53
-
54
-
55
-
56
-
57
-
58
-
59
-
60
-
61
-
62
-
63
-
64
-
65
-
66
-
67
-
68
-
69
-
70
-
71
-
72
-
73
-
74
-
75
-
76
-
77
-
78
-
79
-
80
-
81
-
82
-
83
-
84
-
85
-
86
-
87
-
88
-
89
-
90
-
91
-
92
-
93
-
94
-
95
-
 96
96 -
 97
97 -
 98
98 -
 99
99 -
 100
100 -
 101
101 -
 102
102 -
 103
103 -
 104
104 -
 105
105 -
 106
106 -
107
-
108
-
109
-
110
-
111
-
112
-
113
-
114
-
115
-
116
-
117
-
118
-
119
-
120
-
121
-
122
-
123
-
124
-
125
-
126
-
127
-
128
-
129
-
130
-
131
-
132
-
133
-
134
-
135
-
136
-
137
-
138
-
139
-
140
-
141
-
142
-
143
-
144
-
145
-
146
-
147
-
148
-
149
-
150
-
151
-
152
-
153
-
154
-
155
-
156
-
157
-
158
-
159
-
160
-
161
-
162
-
163
-
164
-
165
-
166
-
167
-
168
-
169
-
170
-
171
-
172
-
173
-
174
-
175
-
176
-
177
-
178
-
179
-
180
-
181
-
182
-
183
-
184
-
185
-
186
-
187
-
188
-
189
-
190
-
191
-
192
 |
 |

Intel
®
RAID Software User’s Guide
89
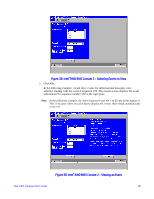
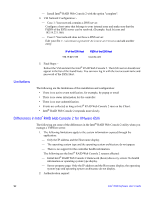
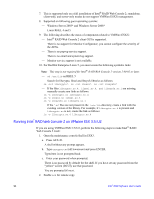
Figure 40. Intel
®
RAID Web Console 2 – Customer Information Screen
4.
Enter your user name and organization name. At the bottom of the screen, select an
installation option:
—
If you select
All users
, any user with administrative privileges can view or change
the RAID configurations.
—
If you select
Only for current user (Administrator)
, only you can view or change
the RAID configurations.
5.
Click
Next
to continue.
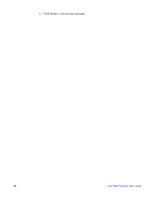
6.
Accept the default Destination Folder, or click
Change
to select a different destination
folder. Click
Next
to continue.
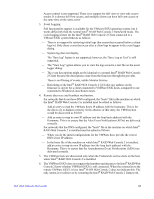
The Setup Type screen is displayed, as shown in
Figure 41
.
Figure 41. Setup Type Screen
7.
Select one of the following setup options.