Intel AFCSASRISER User Guide - Page 69
Creating a Second IS Volume, Create New Array Screen
 |
View all Intel AFCSASRISER manuals
Add to My Manuals
Save this manual to your list of manuals |
Page 69 highlights
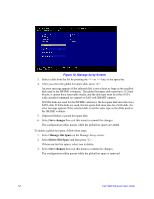
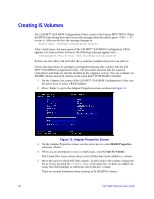
- All disks must be either SATA (with extended command set support) or SAS (with SMART support). - Disks must have 512 byte blocks and must not have removable media. - There must be at least two and no more than ten drives in a valid IS volume. Hot-spare drives are not allowed. Figure 14. Create New Array Screen 6. When you have added the desired number of disks to the array, press and then select Save changes. Then exit the menu to commit the changes. The configuration utility pauses while the array is created. Creating a Second IS Volume The Intel® IT/IR RAID Controllers allow you to configure two IS volumes, or an IS volume and an IM/IME volume. If one volume is already configured, and if there are available disk drives, there are two ways to add a second volume. Option 1: Perform the following steps: 1. In the LSI MPT* SAS BIOS Configuration Utility select an adapter from the Adapter List. Select the RAID Properties option. The current volume will be displayed. 2. Press to create a new volume. 3. Continue with Step 4 of "Creating IS Volumes," to create a second IS volume. Option 2: Perform the following steps: 1. On the Adapter List screen, use the arrow keys to select an Intel® IT/IR RAID Controller. 2. Press to go to the Adapter Properties screen, shown in Figure 13. Intel® RAID Software User's Guide 57
-
 1
1 -
2
-
3
-
4
-
5
-
6
-
7
-
8
-
9
-
10
-
11
-
12
-
13
-
14
-
15
-
16
-
17
-
18
-
19
-
20
-
21
-
22
-
23
-
24
-
25
-
26
-
27
-
28
-
29
-
30
-
31
-
32
-
33
-
34
-
35
-
36
-
37
-
38
-
39
-
40
-
41
-
42
-
43
-
44
-
45
-
46
-
47
-
48
-
49
-
50
-
51
-
52
-
53
-
54
-
55
-
56
-
57
-
58
-
59
-
60
-
61
-
62
-
63
-
 64
64 -
 65
65 -
 66
66 -
 67
67 -
 68
68 -
 69
69 -
 70
70 -
 71
71 -
 72
72 -
 73
73 -
 74
74 -
75
-
76
-
77
-
78
-
79
-
80
-
81
-
82
-
83
-
84
-
85
-
86
-
87
-
88
-
89
-
90
-
91
-
92
-
93
-
94
-
95
-
96
-
97
-
98
-
99
-
100
-
101
-
102
-
103
-
104
-
105
-
106
-
107
-
108
-
109
-
110
-
111
-
112
-
113
-
114
-
115
-
116
-
117
-
118
-
119
-
120
-
121
-
122
-
123
-
124
-
125
-
126
-
127
-
128
-
129
-
130
-
131
-
132
-
133
-
134
-
135
-
136
-
137
-
138
-
139
-
140
-
141
-
142
-
143
-
144
-
145
-
146
-
147
-
148
-
149
-
150
-
151
-
152
-
153
-
154
-
155
-
156
-
157
-
158
-
159
-
160
-
161
-
162
-
163
-
164
-
165
-
166
-
167
-
168
-
169
-
170
-
171
-
172
-
173
-
174
-
175
-
176
-
177
-
178
-
179
-
180
-
181
-
182
-
183
-
184
-
185
-
186
-
187
-
188
-
189
-
190
-
191
-
192
 |
 |
