Intel AFCSASRISER User Guide - Page 161
secured, Drive security, method, Drive Security Properties, Instant Erase
 |
View all Intel AFCSASRISER manuals
Add to My Manuals
Save this manual to your list of manuals |
Page 161 highlights
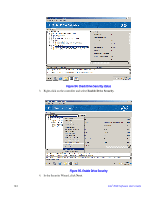
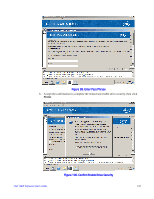
11. Follow same steps for creating a RAID virtual drive. After a virtual drive is created, Selecting this virtual drive in left panel shows its secured status and Drive security method status in the Drive Security Properties part in the right panel. Log information at the bottom of the window also indicates the virtual drive security status. Full Disk Encryption feature has now been enabled. Figure 103. Create RAID Virtual Drive with FDE enabled 12. (Optional) For Self-Encrypting Drives (SEDs) that need to have their data permanently erased for security reason, follow normal steps to delete the secured RAID virtual drive, and mark all SEDs as Unconfigured Good physical drives. Then select one SED, rightclick it and select Instant Erase. Intel® RAID Software User's Guide 149
-
 1
1 -
2
-
3
-
4
-
5
-
6
-
7
-
8
-
9
-
10
-
11
-
12
-
13
-
14
-
15
-
16
-
17
-
18
-
19
-
20
-
21
-
22
-
23
-
24
-
25
-
26
-
27
-
28
-
29
-
30
-
31
-
32
-
33
-
34
-
35
-
36
-
37
-
38
-
39
-
40
-
41
-
42
-
43
-
44
-
45
-
46
-
47
-
48
-
49
-
50
-
51
-
52
-
53
-
54
-
55
-
56
-
57
-
58
-
59
-
60
-
61
-
62
-
63
-
64
-
65
-
66
-
67
-
68
-
69
-
70
-
71
-
72
-
73
-
74
-
75
-
76
-
77
-
78
-
79
-
80
-
81
-
82
-
83
-
84
-
85
-
86
-
87
-
88
-
89
-
90
-
91
-
92
-
93
-
94
-
95
-
96
-
97
-
98
-
99
-
100
-
101
-
102
-
103
-
104
-
105
-
106
-
107
-
108
-
109
-
110
-
111
-
112
-
113
-
114
-
115
-
116
-
117
-
118
-
119
-
120
-
121
-
122
-
123
-
124
-
125
-
126
-
127
-
128
-
129
-
130
-
131
-
132
-
133
-
134
-
135
-
136
-
137
-
138
-
139
-
140
-
141
-
142
-
143
-
144
-
145
-
146
-
147
-
148
-
149
-
150
-
151
-
152
-
153
-
154
-
155
-
 156
156 -
 157
157 -
 158
158 -
 159
159 -
 160
160 -
 161
161 -
 162
162 -
 163
163 -
 164
164 -
 165
165 -
 166
166 -
167
-
168
-
169
-
170
-
171
-
172
-
173
-
174
-
175
-
176
-
177
-
178
-
179
-
180
-
181
-
182
-
183
-
184
-
185
-
186
-
187
-
188
-
189
-
190
-
191
-
192
 |
 |
