Intel AFCSASRISER User Guide - Page 65
Other Configuration Tasks, Viewing Volume Properties, Synchronizing an Array, Activating an Array
 |
View all Intel AFCSASRISER manuals
Add to My Manuals
Save this manual to your list of manuals |
Page 65 highlights
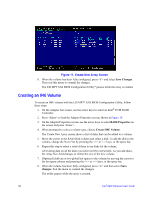
Other Configuration Tasks This section explains how to perform other configuration and maintenance tasks for IM and IME volumes. Viewing Volume Properties To view the properties of volumes, follow these steps: 1. In theLSI MPT* SAS BIOS Configuration Utility, select an adapter from the Adapter List. 2. Select the RAID Properties option. The properties of the current volume are displayed. If global hot spares are defined, they are also listed. Note: If you create one volume using SAS disks, another volume using SATA disks, and another using global hot-spare disks, the hot-spare disks will only appear when you view the volume that has the same type of disks as the hot-spare disks. 3. If two volumes are configured, press + to view the other array. 4. To manage the current array, select Manage Array and press < Enter>. Synchronizing an Array The Synchronize Array command forces the firmware to resynchronize the data on the mirrored disks in the array. It is seldom necessary to use this command, because the firmware automatically keeps the mirrored data synchronized during normal operation. When you use this command, one disk of the array is placed in a degraded state until the data on the mirrored disks has been resynchronized. To force the synchronization of a selected array, follow these steps: 1. Select Synchronize Array on the Manage Array screen. 2. Press to start the synchronization, or to cancel it. Activating an Array An array can become inactive if it is removed from one controller or computer and moved to another one. The Activate Array option allows you to reactivate an inactive array that has been added to a system. This option is only available when the selected array is currently inactive. To activate a selected array, follow these steps: 1. Select Activate Array on the Manage Array screen. Intel® RAID Software User's Guide 53
-
 1
1 -
2
-
3
-
4
-
5
-
6
-
7
-
8
-
9
-
10
-
11
-
12
-
13
-
14
-
15
-
16
-
17
-
18
-
19
-
20
-
21
-
22
-
23
-
24
-
25
-
26
-
27
-
28
-
29
-
30
-
31
-
32
-
33
-
34
-
35
-
36
-
37
-
38
-
39
-
40
-
41
-
42
-
43
-
44
-
45
-
46
-
47
-
48
-
49
-
50
-
51
-
52
-
53
-
54
-
55
-
56
-
57
-
58
-
59
-
 60
60 -
 61
61 -
 62
62 -
 63
63 -
 64
64 -
 65
65 -
 66
66 -
 67
67 -
 68
68 -
 69
69 -
 70
70 -
71
-
72
-
73
-
74
-
75
-
76
-
77
-
78
-
79
-
80
-
81
-
82
-
83
-
84
-
85
-
86
-
87
-
88
-
89
-
90
-
91
-
92
-
93
-
94
-
95
-
96
-
97
-
98
-
99
-
100
-
101
-
102
-
103
-
104
-
105
-
106
-
107
-
108
-
109
-
110
-
111
-
112
-
113
-
114
-
115
-
116
-
117
-
118
-
119
-
120
-
121
-
122
-
123
-
124
-
125
-
126
-
127
-
128
-
129
-
130
-
131
-
132
-
133
-
134
-
135
-
136
-
137
-
138
-
139
-
140
-
141
-
142
-
143
-
144
-
145
-
146
-
147
-
148
-
149
-
150
-
151
-
152
-
153
-
154
-
155
-
156
-
157
-
158
-
159
-
160
-
161
-
162
-
163
-
164
-
165
-
166
-
167
-
168
-
169
-
170
-
171
-
172
-
173
-
174
-
175
-
176
-
177
-
178
-
179
-
180
-
181
-
182
-
183
-
184
-
185
-
186
-
187
-
188
-
189
-
190
-
191
-
192
 |
 |
