Intel AFCSASRISER User Guide - Page 152
Scanning for New Drives, Rebuilding a Drive, Scan for Foreign Configuration, Go To, Controller
 |
View all Intel AFCSASRISER manuals
Add to My Manuals
Save this manual to your list of manuals |
Page 152 highlights
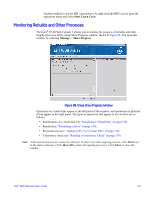
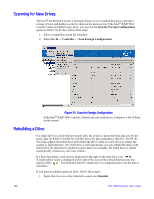
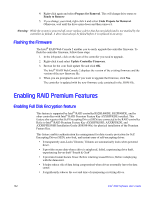
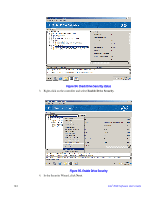
Scanning for New Drives The Intel® RAID Web Console 2 normally detects newly installed disk drives and other storage devices and displays icons for them on the main screen. If the Intel® RAID Web Console 2 does not detect a new drive, you can use the Scan for Foreign Configuration option to find it. To do this, follow these steps: 1. Select a controller icon in the left panel. 2. Select Go To -> Controller -> Scan Foreign Configuration. Figure 91. Scan for Foreign Configuration If the Intel® RAID Web Console 2 detects any new disk drives, it displays a list of them on the screen. Rebuilding a Drive If a single drive in a fault tolerant system fails, the system is protected from data loss by the parity data (in RAID 5, RAID 50, or RAID 60) or by data redundancy (RAID 1, RAID 10). You must replace the failed drive and rebuild the drive's data on a new drive to restore the system to fault tolerance. (Or, if the drive is still operational, you can rebuild the data on the failed drive.) If dedicated or global hot-spare disks are available, the failed drive is rebuilt automatically without any user intervention. If a drive has failed, a red circle is displayed to the right of the disk drive icon: . A small yellow circle is displayed to the right of the icon of the virtual disk that uses this physical disk: . This indicates that the virtual disk is in a degraded state, but the data is still intact. If you need to rebuild a physical drive, follow these steps: 1. Right click the icon of the failed drive and select Rebuild. 140 Intel® RAID Software User's Guide
-
 1
1 -
2
-
3
-
4
-
5
-
6
-
7
-
8
-
9
-
10
-
11
-
12
-
13
-
14
-
15
-
16
-
17
-
18
-
19
-
20
-
21
-
22
-
23
-
24
-
25
-
26
-
27
-
28
-
29
-
30
-
31
-
32
-
33
-
34
-
35
-
36
-
37
-
38
-
39
-
40
-
41
-
42
-
43
-
44
-
45
-
46
-
47
-
48
-
49
-
50
-
51
-
52
-
53
-
54
-
55
-
56
-
57
-
58
-
59
-
60
-
61
-
62
-
63
-
64
-
65
-
66
-
67
-
68
-
69
-
70
-
71
-
72
-
73
-
74
-
75
-
76
-
77
-
78
-
79
-
80
-
81
-
82
-
83
-
84
-
85
-
86
-
87
-
88
-
89
-
90
-
91
-
92
-
93
-
94
-
95
-
96
-
97
-
98
-
99
-
100
-
101
-
102
-
103
-
104
-
105
-
106
-
107
-
108
-
109
-
110
-
111
-
112
-
113
-
114
-
115
-
116
-
117
-
118
-
119
-
120
-
121
-
122
-
123
-
124
-
125
-
126
-
127
-
128
-
129
-
130
-
131
-
132
-
133
-
134
-
135
-
136
-
137
-
138
-
139
-
140
-
141
-
142
-
143
-
144
-
145
-
146
-
 147
147 -
 148
148 -
 149
149 -
 150
150 -
 151
151 -
 152
152 -
 153
153 -
 154
154 -
 155
155 -
 156
156 -
 157
157 -
158
-
159
-
160
-
161
-
162
-
163
-
164
-
165
-
166
-
167
-
168
-
169
-
170
-
171
-
172
-
173
-
174
-
175
-
176
-
177
-
178
-
179
-
180
-
181
-
182
-
183
-
184
-
185
-
186
-
187
-
188
-
189
-
190
-
191
-
192
 |
 |
