Intel AFCSASRISER User Guide - Page 153
Removing a Drive, Go To, Show Progress, Prepare for Removal, Make Drive Offline., Mark Drive
 |
View all Intel AFCSASRISER manuals
Add to My Manuals
Save this manual to your list of manuals |
Page 153 highlights
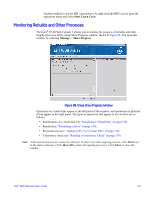
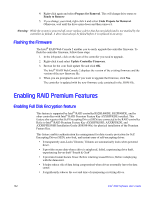
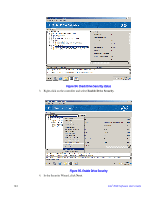
2. When the warning message displays, click Yes. If the drive is still good, a rebuild starts. You can monitor the progress of the rebuild in the Group Show Progress window by selecting Go To -> Show Progress. If the drive cannot be rebuilt, an error message is displayed, and you must replace the drive before a rebuild can occur. Continue with the next step. 3. Click the icon of the failed drive in the left panel. 4. Right-click and select Prepare for Removal. Figure 92. Preparing Drive for Removal 5. Physically remove the failed drive and replace it with a new drive of equal or greater capacity. When the new drive spins up, the drive icon changes to green, and the rebuild begins automatically. You can monitor the progress of the rebuild in the Group Show Progress window by selecting Manage -> Show Progress. Note: If you want to force a disk drive into Fail status to trigger a rebuild, right-click the drive icon and select Make Drive Offline. Removing a Drive You may sometimes need to remove a non-failed drive that is connected to the controller. For example, you may need to replace the drive with a larger drive. Follow these steps to remove a drive safely: 1. Click the icon of the drive in the left panel and right-click it. 2. Select Make Drive Offline. 3. Right-click again and select Mark Drive as Missing. Intel® RAID Software User's Guide 141
-
 1
1 -
2
-
3
-
4
-
5
-
6
-
7
-
8
-
9
-
10
-
11
-
12
-
13
-
14
-
15
-
16
-
17
-
18
-
19
-
20
-
21
-
22
-
23
-
24
-
25
-
26
-
27
-
28
-
29
-
30
-
31
-
32
-
33
-
34
-
35
-
36
-
37
-
38
-
39
-
40
-
41
-
42
-
43
-
44
-
45
-
46
-
47
-
48
-
49
-
50
-
51
-
52
-
53
-
54
-
55
-
56
-
57
-
58
-
59
-
60
-
61
-
62
-
63
-
64
-
65
-
66
-
67
-
68
-
69
-
70
-
71
-
72
-
73
-
74
-
75
-
76
-
77
-
78
-
79
-
80
-
81
-
82
-
83
-
84
-
85
-
86
-
87
-
88
-
89
-
90
-
91
-
92
-
93
-
94
-
95
-
96
-
97
-
98
-
99
-
100
-
101
-
102
-
103
-
104
-
105
-
106
-
107
-
108
-
109
-
110
-
111
-
112
-
113
-
114
-
115
-
116
-
117
-
118
-
119
-
120
-
121
-
122
-
123
-
124
-
125
-
126
-
127
-
128
-
129
-
130
-
131
-
132
-
133
-
134
-
135
-
136
-
137
-
138
-
139
-
140
-
141
-
142
-
143
-
144
-
145
-
146
-
147
-
 148
148 -
 149
149 -
 150
150 -
 151
151 -
 152
152 -
 153
153 -
 154
154 -
 155
155 -
 156
156 -
 157
157 -
 158
158 -
159
-
160
-
161
-
162
-
163
-
164
-
165
-
166
-
167
-
168
-
169
-
170
-
171
-
172
-
173
-
174
-
175
-
176
-
177
-
178
-
179
-
180
-
181
-
182
-
183
-
184
-
185
-
186
-
187
-
188
-
189
-
190
-
191
-
192
 |
 |
