Intel AFCSASRISER User Guide - Page 73
Intel® RAID BIOS Console 2 Utility, Quick Configuration Steps
 |
View all Intel AFCSASRISER manuals
Add to My Manuals
Save this manual to your list of manuals |
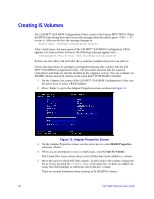
Page 73 highlights
7 Intel® RAID BIOS Console 2 Utility The Intel® RAID BIOS Console 2 utility provides a GUI utility to configure and manage RAID volumes. The utility configures disk groups and virtual drives. Because the utility resides in the RAID controller firmware, it is independent of the operating system. The Intel® RAID BIOS Console 2 utility: • Selects controller • Displays controller properties • Scans devices • Displays the physical properties of devices • Configures physical drives • Defines virtual drives • Displays virtual drive properties • Initializes virtual drives • Checks data for consistency The Intel® RAID BIOS Console 2 utility provides a Configuration Wizard to guide you through the configuration of virtual drives and physical arrays. Quick Configuration Steps This section provides the steps to configure arrays and disk groups, and virtual drives using the Intel® RAID BIOS Console 2 utility. The following sections describe how to perform each action using the Intel® RAID BIOS Console 2 utility. The steps are as follows: 1. Power on the system. 2. Press + to start the Intel® RAID BIOS Console 2 utility. Note: Some server boards have a BIOS SETUP option called "Port 60/64 Emulation" (or with other similar name). Please ensure this option is enabled in order to use Intel® RAID BIOS Console 2 successfully. 3. Start the Configuration Wizard. 4. Choose a configuration method. 5. Using the available physical drives, create arrays and disk groups. 6. Using the space in the arrays and disk groups, define the virtual drive(s). 7. Initialize the new virtual drives. Intel® RAID Software User's Guide 61
-
 1
1 -
2
-
3
-
4
-
5
-
6
-
7
-
8
-
9
-
10
-
11
-
12
-
13
-
14
-
15
-
16
-
17
-
18
-
19
-
20
-
21
-
22
-
23
-
24
-
25
-
26
-
27
-
28
-
29
-
30
-
31
-
32
-
33
-
34
-
35
-
36
-
37
-
38
-
39
-
40
-
41
-
42
-
43
-
44
-
45
-
46
-
47
-
48
-
49
-
50
-
51
-
52
-
53
-
54
-
55
-
56
-
57
-
58
-
59
-
60
-
61
-
62
-
63
-
64
-
65
-
66
-
67
-
 68
68 -
 69
69 -
 70
70 -
 71
71 -
 72
72 -
 73
73 -
 74
74 -
 75
75 -
 76
76 -
 77
77 -
 78
78 -
79
-
80
-
81
-
82
-
83
-
84
-
85
-
86
-
87
-
88
-
89
-
90
-
91
-
92
-
93
-
94
-
95
-
96
-
97
-
98
-
99
-
100
-
101
-
102
-
103
-
104
-
105
-
106
-
107
-
108
-
109
-
110
-
111
-
112
-
113
-
114
-
115
-
116
-
117
-
118
-
119
-
120
-
121
-
122
-
123
-
124
-
125
-
126
-
127
-
128
-
129
-
130
-
131
-
132
-
133
-
134
-
135
-
136
-
137
-
138
-
139
-
140
-
141
-
142
-
143
-
144
-
145
-
146
-
147
-
148
-
149
-
150
-
151
-
152
-
153
-
154
-
155
-
156
-
157
-
158
-
159
-
160
-
161
-
162
-
163
-
164
-
165
-
166
-
167
-
168
-
169
-
170
-
171
-
172
-
173
-
174
-
175
-
176
-
177
-
178
-
179
-
180
-
181
-
182
-
183
-
184
-
185
-
186
-
187
-
188
-
189
-
190
-
191
-
192
 |
 |
