Konica Minolta Kodak Truper 3610 User Guide
Konica Minolta Kodak Truper 3610 Manual
 |
View all Konica Minolta Kodak Truper 3610 manuals
Add to My Manuals
Save this manual to your list of manuals |
Konica Minolta Kodak Truper 3610 manual content summary:
- Konica Minolta Kodak Truper 3610 | User Guide - Page 1
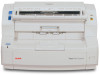
Tru¯per 3210 Scanner 3610 Scanner User's Guide A-61660 6J7207 - Konica Minolta Kodak Truper 3610 | User Guide - Page 2
odor, emits smoke, or makes unfamiliar noises. Immediately stop the scanner and disconnect the power cord from the power outlet. Contact Kodak Service. • Do not disassemble, service or modify the scanner except as explained in the User's Guide. • When using the flatbed for unbound or single pages - Konica Minolta Kodak Truper 3610 | User Guide - Page 3
service; follow local regulations or contact Kodak locally for more information. • The product packaging is recyclable. • Kodak Truper Scanners in accordance with the instruction manual, may cause harmful interference radio disturbance may arise. When such trouble occurs, the user may be required - Konica Minolta Kodak Truper 3610 | User Guide - Page 4
Peoples Republic of China WARNING: This is a Class A product. In a domestic environment this product may cause radio interference in which case the user may be required to take adequate measures. Korea Please note that this equipment has obtained EMC registration for commercial use. In the event - Konica Minolta Kodak Truper 3610 | User Guide - Page 5
OVERVIEW 1-1 INSTALLATION 2-1 USING THE SCANNER 3-1 ADVANCED FEATURES 4-1 USER UTILITY 5-1 MAINTENANCE 6-1 TROUBLESHOOTING 7-1 APPENDICIES A-E - Konica Minolta Kodak Truper 3610 | User Guide - Page 6
per minute in color, grayscale and black and white. NOTE: The procedures in this manual are the same for both scanners unless otherwise noted. The illustrations shown in this manual are for the Kodak Trūper 3610 Scanner. If the location of any parts, buttons, etc. are in a different position for the - Konica Minolta Kodak Truper 3610 | User Guide - Page 7
• Wire Frame (3610 Scanner only) • Shading Sheet • Starter Cleaning Kit • Kodak Trūper Quick Installation Guide • Installation Resource CD which includes the following: - User Utility - ISIS/TWAIN Driver - VRS Software - Kodak Trūper User's Guide (multiple languages) - VRS User Manual and Release - Konica Minolta Kodak Truper 3610 | User Guide - Page 8
view - Kodak Trūper 3610 Scanner ADF door Document guide Separation roller ADF door release Auto/Manual Feed selector Transport cover Feeder tray Feeder tray extension Power button Stop/Start Power indicator Exit tray Exit stopper Power indicator - lights when the power to the scanner is - Konica Minolta Kodak Truper 3610 | User Guide - Page 9
Front view - Kodak Trūper 3210 Scanner Document guide Separation roller Feeder tray Feeder tray extension Back stopper ADF door Exit stopper ADF door release Auto/Manual feed select Flatbed Transport cover Exit tray Power indicator Power switch Stop/Start Exit tray - collects the - Konica Minolta Kodak Truper 3610 | User Guide - Page 10
off. Stop/Start button - starts or stops scanning. Power indicator - indicates scanner status. See the section entitled, "Scanner LED status" in Chapter 7 for a description of the scanner states. Rear view - Kodak Trūper 3610 Scanner Imprinter door Vent Vent AC power input Exhaust fan USB port - Konica Minolta Kodak Truper 3610 | User Guide - Page 11
Rear view - Kodak Trūper 3210 Scanner Imprinter door AC power input Exhaust fan and vents USB port USB port - connects the USB 2.0 cable to the scanner. Exhaust fan and vents - clean these areas once a month for best scanner performance. AC power input - connects the power cord to the scanner - Konica Minolta Kodak Truper 3610 | User Guide - Page 12
Inside view - the internal components are the same for both scanner models. Background bar Release latch Imaging guide Background bar Imaging guide Imaging guides - the glass through which the scanner camera sees the document. Light from the lamps passes through this glass to illuminate the - Konica Minolta Kodak Truper 3610 | User Guide - Page 13
Viewing manuals 2-6 Installation checklist • After the scanner has scanner. See the section entitled, "Making connections" later in this chapter. • Install the software. See the section entitled, "Installing the software" later in this chapter. You are now ready to scan. Refer to the instructions - Konica Minolta Kodak Truper 3610 | User Guide - Page 14
pin with the hole. Making connections 1. Turn the host PC off. 2. Plug the power cord into the AC power input on the back of the scanner and connect the other end to a power outlet. 3. Connect the USB cable to an available USB 2.0 port on the host PC and connect the other - Konica Minolta Kodak Truper 3610 | User Guide - Page 15
on the host PC. For Windows 2000, Windows XP or Windows Vista: You must be logged in with Administrator privileges. Windows will detect the scanner and start the Found New Hardware Wizard. 3. At the Found New Hardware Wizard screen, click Next. 4. Select Search for a suitable driver for my device - Konica Minolta Kodak Truper 3610 | User Guide - Page 16
on it to open the Installation menu. 2. Select the desired language from the Language dialog box and click OK. 3. Click the Trūper Scanner image that you are installing software for from the Main menu. 4. Click Install Software. After these steps have been completed, continue with the installation - Konica Minolta Kodak Truper 3610 | User Guide - Page 17
support the recommended VRS-based ISIS driver. Check with your application reseller to determine if your scanning application is compatible with VRS or requires the use of a Direct ISIS driver. For Direct ISIS connectivity, select the following driver: • ISIS Application Scanner Selection: 3210/3610 - Konica Minolta Kodak Truper 3610 | User Guide - Page 18
Scanner Selection: 3210/3610. This is the certified TWAIN driver for direct connectivity. 1. Click Optional Utilities from the Install Software screen. 2. From the Optional Utilities screen, click ScanDemo to install this application. The Kodak Trūper 3210/3610 User's Guide and VRS manuals - Konica Minolta Kodak Truper 3610 | User Guide - Page 19
power indicator on the scanner is a steady green, turn on your PC. 3. Determine your feeding mode: Auto for batch scanning; Manual for feeding one document at guides, end stop, change the background plates, etc. to accommodate your document scanning needs. See the section entitled, "Making scanner - Konica Minolta Kodak Truper 3610 | User Guide - Page 20
scanner has an Auto/Manual feed selector switch. This switch must be placed in the correct position depending on your scanning needs. You can scan in Auto mode or Manual switch to Manual. The feeder will adjust automatically to the manual feed position. 2. Verify that the document guides are adjusted - Konica Minolta Kodak Truper 3610 | User Guide - Page 21
Making scanner adjustments Before scanning documents, you may need to adjust your document guides, feeder tray extension and 11 inches (279.4 mm), pull the feeder tray extension out. The feeder tray extension will support documents up to 15 inches (381 mm) long. • To handle longer paper in the exit - Konica Minolta Kodak Truper 3610 | User Guide - Page 22
Attaching the wire frame 1. Pull the exit door release lever and open the exit door. Exit door release lever 2. Attach the wire frame to both of the exit door release sides. 3. Hang the wire frame on the shaft of the exit door release. 4. Slowly pull the wire frame forward until it clicks into - Konica Minolta Kodak Truper 3610 | User Guide - Page 23
bars There are two background bars located inside of the scanner; an upper background bar and a lower background bar. must match the color of the background bars. To change the background bars: 1. Turn the scanner off and open the exit door. 2. Locate the lower background bar, place your finger - Konica Minolta Kodak Truper 3610 | User Guide - Page 24
side. The flatbed sheet color is initially set to black. To change the color of the flatbed sheet, do the following: 1. Turn the scanner off. 2. Raise the feeder tray to the upright position. 3. Open the flatbed cover. Flatbed sheet Stop/Start button functionality 4. Gently pull the magnetized - Konica Minolta Kodak Truper 3610 | User Guide - Page 25
not exceed the paper limit mark that appears on the right side of the document guide. The following chart indicates the maximum number of sheets that can be loaded on the be placed in the ADF manually, one sheet at a time, if you have a 3210 Scanner, you can use the flatbed. A-61660 April 2010 3-7 - Konica Minolta Kodak Truper 3610 | User Guide - Page 26
Curl must be less than 0.20 inches (5 mm) • Curled, wrinkled, or folded documents may not scan properly. Check the allowances for curl and fold in the following diagram: Feeding direction Fold must be less than 0.20 inches (5 mm) Feeding direction The following types of documents may cause jams - Konica Minolta Kodak Truper 3610 | User Guide - Page 27
exceed the Paper Limit mark on the feeder tray. • The guide on the ADF door provides a graphical document sizing scale and a instructions for your scanning application or document management software for more information. Scanner settings are available through the Properties window after the scanner - Konica Minolta Kodak Truper 3610 | User Guide - Page 28
) You can use the flatbed on the 3210 Scanner to scan a single sheet, exception documents or documents that you do not want to take apart before scanning (e.g., books, magazines). NOTE: Do not place floppy - Konica Minolta Kodak Truper 3610 | User Guide - Page 29
Image Processing tab 4-10 About tab 4-14 This chapter provides information about advanced features that can be used with the Kodak Truper 3210 and 3610 Scanners. The controls for operating the Advanced Features are accessible within the VirtualReScan® (VRS) Interactive Viewer. NOTES: • When VRS is - Konica Minolta Kodak Truper 3610 | User Guide - Page 30
VRS Professional software must be loaded on the host PC that the scanner is connected to. VRS Professional will be active when the scanning VRS ISIS-based Applications • VRS TWAIN-based Applications NOTE: This User's Guide only documents the VRS-based scanning setup. To open the VRS Test - Konica Minolta Kodak Truper 3610 | User Guide - Page 31
the Interactive Viewer, access the Advanced features by clicking the Scanner Driver Settings icon to display the Properties window. NOTE: right side of the VirtualRescan Interactive Viewer window can be found in the VRS Manual on the Installation CD. Some useful features to note are: • Auto - Konica Minolta Kodak Truper 3610 | User Guide - Page 32
Preset tab The Preset tab allows you to customize scanner settings and save them with a new preset name. 1. Click Save As to enter the name of your profile. 2. Proceed with clicking the other tabs to set up the properties for this profile. 4-4 A-61660 April 2010 - Konica Minolta Kodak Truper 3610 | User Guide - Page 33
image that you want to configure your page settings for. Options are: Both, Front or Back. Page Size - the default page size is set when a scanner is first selected. You can choose a different page size using the drop-down list. • Custom Page Width/Custom Page Length: if you select Custom from - Konica Minolta Kodak Truper 3610 | User Guide - Page 34
the shape of a conventional landscape painting, where width is greater than height. Feed - allows you to select the way you place your documents in the scanner, Top edge first, Bottom edge first, Left edge first or Right edge first. • Sub Area(W): this option is only available when Length Control in - Konica Minolta Kodak Truper 3610 | User Guide - Page 35
are present. If a double feed occurs, remove the document from the scanner and separate the double-fed pages, reinsert the document(s) into the feeder tray and press Stop/Start to resume scanning. NOTE: For instructions on removing document jams, see the section entitled, "Clearing a document jam - Konica Minolta Kodak Truper 3610 | User Guide - Page 36
, badly creased paper, fragile paper, etc. you can change the speed of the scanner. • Slow: this speed slows the documents that are fed through the ADF to in the Normal mode. • Normal: this is the normal speed of the scanner and is used for most document scanning. NOTE: At resolutions above 300 dpi - Konica Minolta Kodak Truper 3610 | User Guide - Page 37
- if you select this option, you will need to load the documents in the scanner and click Start Batch (or a button with similar name) in the scanning application to start scanning. • On - select On when manually feeding documents. This should be selected when feeding mixed document types that are - Konica Minolta Kodak Truper 3610 | User Guide - Page 38
Extra Features • White Level from Paper - check this option to reduce background noise. • Automatic Separation - check this option if you want the scanner to attempt to separate text and images, and apply dithering to only images. • Binary Dynamic Threshold - for documents with colored backgrounds - Konica Minolta Kodak Truper 3610 | User Guide - Page 39
JPEG Quality - select a compression value from 1 to 100. The lower the value will provide the maximum compression which produces the smallest image size. The higher the value will provide the least amount of compression which produces the largest image size. Image Processing - not available. Noise - Konica Minolta Kodak Truper 3610 | User Guide - Page 40
• Multiple Colors: allows you to remove up to 6 colors. To drop out multiple colors: 1. Click the Dropout button. The Multicolor Dropout dialog box will be displayed. 2. Click Selection 1. 4-12 3. Adjust the Hue Range, Saturation Range, and Value Range bars. Hue Range determines how many colors - Konica Minolta Kodak Truper 3610 | User Guide - Page 41
, Saturation and Value are typically accurate. However, if the dropout color requires adjusting, the Hue, Saturation and Value numbers can be modified manually. • Hue determines the color. Saturation defines the intensity of the color. Value controls the brightness of the color. 4. To add additional - Konica Minolta Kodak Truper 3610 | User Guide - Page 42
About screen The About screen displays the scanner version and copyright information. 4-14 A-61660 April 2010 - Konica Minolta Kodak Truper 3610 | User Guide - Page 43
5-1 The User Utility dialog box 5-1 The User Utility is a software program used to maintain and troubleshoot the Kodak Trūper 3210 and 3610 Scanners. The User Utility is installed as part of the scanner's software installation. If the Trūper User Utility icon is not on your desktop, see the - Konica Minolta Kodak Truper 3610 | User Guide - Page 44
enabled with a 15-minute wait time. This conserves energy and reduces operating costs. Sleep Mode will go into effect after 15 minutes after the last scanner operation. If you want to change these values, click Sleep Mode and make your selection. The wait time can be set from 1 to 60 minutes - Konica Minolta Kodak Truper 3610 | User Guide - Page 45
Shading on the User Utility. 2. Click Start Shading. The User Shading utility will guide you through the necessary steps. 3. Clean the inside of the scanner. See the section entitled, "Cleaning inside the scanner" in Chapter 6. When finished, click OK. 4. Turn over the upper and lower background - Konica Minolta Kodak Truper 3610 | User Guide - Page 46
the number of pages scanned after the rollers were last replaced that you want to be reminded that it is time to clean the rollers. Scanner Counter - the scanner counter can be used to keep track of the number of documents scanned. The counters also provide a reminder for roller cleaning and parts - Konica Minolta Kodak Truper 3610 | User Guide - Page 47
, click Clear Counter for After Replace Roller and reset the counter to zero. Help - opens the Kodak Trūper 3210 and 3610 Scanners User's Guide in PDF file format. Select Scanner(X) - opens the Select Scanner dialog box. If more than one scanner is connected to the computer, you can use the Select - Konica Minolta Kodak Truper 3610 | User Guide - Page 48
4. Click Save. Close - closes the User Utility. Check Version Information - right-click the title bar at the top of the display window and click About to view the version information. 5-6 A-61660 April 2010 - Konica Minolta Kodak Truper 3610 | User Guide - Page 49
6-1 Roller cleaning 6-2 Cleaning the outside of the scanner 6-2 Cleaning inside the scanner 6-2 Cleaning the rollers in the ADF area 6-3 Cleaning the rollers in the Exit area 6-5 Cleaning the background bars and imaging guides 6-6 Cleaning the sensors 6-6 Cleaning the flatbed 6-9 Replacing - Konica Minolta Kodak Truper 3610 | User Guide - Page 50
Data Sheet (MSDS). See the Kodak website at: www.kodak.com/go/msds. • Additional roller side on the back of the scanner. Cleaning inside the scanner If paper jamming, marking, or guides and the background bars as described in the section entitled, "Cleaning the background bars and imaging guides - Konica Minolta Kodak Truper 3610 | User Guide - Page 51
2. Push the ADF door release button to open the ADF. ADF door release 3. Use the roller cleaning pad to remove any dirt or grime from the surfaces of the paper feed roller and separation roller. Feeder roller 4. Open the separation roller cover by pulling up from the indent on the right side. A- - Konica Minolta Kodak Truper 3610 | User Guide - Page 52
5. Use the roller cleaning pad to remove the dirt from the surface of the separation roller. 6. Close the separation roller cover. Cleaning the drive rollers and free rollers in the ADF 7. Use the roller cleaning pad to remove the dirt from the surfaces of the four drive rollers. Drive rollers 8. - Konica Minolta Kodak Truper 3610 | User Guide - Page 53
pad to remove the dirt from the surfaces of the six free rollers. A-61660 April 2010 4. Gently close the exit door. 5. When finished, turn the scanner on. 6. After cleaning the rollers, open the User Utility and click Clear Counter to clear the roller counter. For more information, see the section - Konica Minolta Kodak Truper 3610 | User Guide - Page 54
off. 2. Pull the exit door release lever to open the exit door. 3. In the scanner base assembly, clean the upper and lower imaging guides and background bars with a Staticide wipe. Upper and lower imaging guides Cleaning the sensors 4. Gently close the exit door. Use the blower accessory to clean - Konica Minolta Kodak Truper 3610 | User Guide - Page 55
2. Use the blower accessory to blow off any dirt from the surface of the paper sensor and waiting sensor. Also, blow off any dirt from the surface of the metal reflector sheet used by the waiting sensor. Waiting sensor Reflector sheet for waiting sensor Paper sensor 3. Blow off any dirt from the - Konica Minolta Kodak Truper 3610 | User Guide - Page 56
Cleaning the starting, skew and ending sensors 1. Pull the exit door release lever to open the exit door. 2. Blow off any dirt from the surface of the starting sensor, right and left skew sensors and ending sensor. Ending sensor Skew sensor Starting sensor Skew sensor 3. Blow off any dirt from - Konica Minolta Kodak Truper 3610 | User Guide - Page 57
Cleaning the flatbed (3210 Scanner) 1. Raise the feeder tray until the tray clicks into place. 2. Open the document cover. Document cover Feeder tray Flatbed glass Document cover detector 3. Clean the - Konica Minolta Kodak Truper 3610 | User Guide - Page 58
module after 300,000 scans. Replace the roller modules more often if feeding problems continue after cleaning (i.e., paper jamming, slipping, multifeeding, marking, etc.) Replacing the paper feed roller module 1. Turn the scanner off. 2. Push the ADF door release button to open the ADF door. 3. Open - Konica Minolta Kodak Truper 3610 | User Guide - Page 59
Take care to match the gears on the roller module with the gears in the ADF door assembly. 6. Push up the roller module until it is locked in place. A-61660 April 2010 6-11 - Konica Minolta Kodak Truper 3610 | User Guide - Page 60
8. Remove the separation roller from the metal brackets by holding the ends of the roller shaft and pulling the roller up and out of the scanner. 6-12 9. Open the Roller Exchange Kit and take out the new separation roller. A-61660 April 2010 - Konica Minolta Kodak Truper 3610 | User Guide - Page 61
User Utility. 13. Gently close the ADF door and turn on the scanner. Contact your scanner supplier to order supplies or go to: www.scannerstore.kodak.com. Description Staticide Wipes for Kodak Scanners (qty 144) Kodak Digital Science Roller Cleaning Pads (qty 24) Roller Exchange Kit Shading Paper - Konica Minolta Kodak Truper 3610 | User Guide - Page 62
7 Troubleshooting Contents Clearing a document jam 7-1 Removing documents from the ADF area 7-1 Removing documents from the exit area 7-2 Problem solving 7-2 User Utility error codes 7-4 Scanner LED status 7-5 Contacting Service 7-5 Clearing a document Following are procedures for clearing - Konica Minolta Kodak Truper 3610 | User Guide - Page 63
solving Occasionally you may encounter a situation with your scanner where it may not function properly. Use the chart below as a guide to check possible solutions to help you resolve the situation before calling Technical Support. If a problem persists after you have checked the User Utility - Konica Minolta Kodak Truper 3610 | User Guide - Page 64
" in Chapter 3. (ADF) Double feeding or skewing problems occur frequently or the scanner stops feeding while scanning. • The rollers may be the document again. (ADF) Scanned image is skewed. • Be sure the document guides are adjusted to the size of the documents being scanned. • Verify that the - Konica Minolta Kodak Truper 3610 | User Guide - Page 65
for cleaning procedures. U30, U32, U34 • Securely close the ADF door. Scanner door is open. Please close the door. Fxx • Contact Technical Support. System error occurred. Please contact Technical Support. ***Warning*** Warning counter has expired The rollers need to be cleaned. The - Konica Minolta Kodak Truper 3610 | User Guide - Page 66
the status of the scanner using the User Utility. Contacting Service 1. Visit www.Kodak.com/go/dicontacts to obtain the most current phone number for your country. 2. When calling, please have the following information ready: • A description of your problem. • The scanner model and serial number - Konica Minolta Kodak Truper 3610 | User Guide - Page 67
(flatbed or ADF) Output options Image enhancement Document size Paper thickness Paper weight (ADF) Feeder capacity Scanner dimensions (unpacked) Scanner weight (unpacked) Interface Power requirements Power consumption Maximum (scanning) Minimum (standby) Sleep mode Specifications A-1 System - Konica Minolta Kodak Truper 3610 | User Guide - Page 68
USB Cable 2.0, Roller Cleaning Kit, CD-ROM (USer's Guide, VRS Professional, User Utility Software), Printed Documents (Quick requirements Following is the minimum recommended system configuration to run Kodak Trūper 3210 and 3610 Scanners: Minimum Requirements • Pentium 4, 1.4 GHz processor • - Konica Minolta Kodak Truper 3610 | User Guide - Page 69
Display: Resolution 1024 x 768 or more; 65,536 colors or more Interface: USB 2.0 (enhanced) NOTES: • Do not connect the scanner to a USB hub. • There must be 1 GB or more of free space on the hard drive. • Depending on the computer system and the scanning application - Konica Minolta Kodak Truper 3610 | User Guide - Page 70
B-6 Cleaning the print head automatically B-6 Cleaning the print head manually B-6 Removing the ink cartridge B-6 Ink cartridge specifications B-7 Setting up adjusting lever Installing the imprinter Carriage 1. Turn the scanner off. 2. Open the imprinter door. Scale A-61660 April 2010 B-1 - Konica Minolta Kodak Truper 3610 | User Guide - Page 71
on the imprinter cable connector with the slot on the scanner connector. 4. Insert the upper pins on the imprinter unit into the guides located on the bracket. Match the channels in the pins with the guides. 5. Insert the lower pins into the guides located on the bracket. Match the channels in the - Konica Minolta Kodak Truper 3610 | User Guide - Page 72
Ink cartridge installation and printing position Installing the ink cartridge Review the precautions below before installing the ink cartridge: • Do not touch the print head with your hands or with a dirty object. • If the date marked on the ink cartridge box has expired, or if the ink cartridge is - Konica Minolta Kodak Truper 3610 | User Guide - Page 73
3. Insert the ink cartridge into the carriage and lock the cartridge adjusting lever. Adjusting the printing position To add an imprint to the page that will appear on the scanned image, adjust the position of the carriage according to the size of the documents you want to scan. Move the carriage - Konica Minolta Kodak Truper 3610 | User Guide - Page 74
the printer position. To set other printing parameters, see the instructions for your scanning application or document management software. NOTE: With from the imprinter may stain the inside of the scanner. For example, ink may stain the scanner rollers. If this occurs, clean the areas by using - Konica Minolta Kodak Truper 3610 | User Guide - Page 75
Cleaning the ink cartridge Cleaning the print head automatically Cleaning the print head manually If the head of the ink cartridge is dirty or if the ink cartridge has not been used for a long period of time, it may - Konica Minolta Kodak Truper 3610 | User Guide - Page 76
optional pre-scan imprinter unit and replacement ink cartridges are available from resellers, web merchants and from the Kodak on-line store (http:/scannerstore.kodak.com). See the section entitled, "Supplies and consumables" in Chapter 6, Maintenance. Ink cartridge life Approximately 4,000,000 - Konica Minolta Kodak Truper 3610 | User Guide - Page 77
The Imprinter Settings dialog box will be displayed. 2. Click Enable. 3. If you want bold type, click Bold Font. 4. In the Imprinter String field, type in the character string to be printed. NOTE: The symbols and alphanumeric characters in the following table can be printed. In addition, other - Konica Minolta Kodak Truper 3610 | User Guide - Page 78
kit. If you are uncomfortable installing memory modules, contact your service provider or system administrator. CAUTION: This kit contains parts and by electrostatic discharge (ESD). Installing the DIMM module 1. Turn the scanner off. 2. Disconnect the power cord from the electrical outlet and - Konica Minolta Kodak Truper 3610 | User Guide - Page 79
connector to release the DIMM module, then carefully pull it out. 8. Slide the interface board back into the unit by guiding the board into place along the rails located inside the scanner. 9. Push the board in firmly until it locks into place. 10. Confirm that the interface board is fully inserted - Konica Minolta Kodak Truper 3610 | User Guide - Page 80
indicator. Error messages or indicators appear whenever the scanner determines that a problem exists. Flatbed sheet - adjustable component used in documents that are fed into the scanner transport. Manual mode - the scanner mode in which documents are manually fed by the operator, rather than - Konica Minolta Kodak Truper 3610 | User Guide - Page 81
and also looks this way when printed. To minimize skew, guide the document against the left document feed guide. Transport system. See Paper transport. USB (Universal Serial Bus) - a data transmission system that operates between the scanner and the host computer system. VRS (VirtualReScan) - VRS is - Konica Minolta Kodak Truper 3610 | User Guide - Page 82
to transport or ship the scanner, follow these repacking instructions. • Use the original scanner carton and packing materials. You will also need shipping tape and scissors. • Improper repacking of the scanner may cause damage during handling and shipment. • The scanner should always be handled in - Konica Minolta Kodak Truper 3610 | User Guide - Page 83
Eastman Kodak Company 343 State Street Rochester, NY 14650 U.S.A. © Kodak, 2010. All rights reserved. TM: Kodak, Truper
-
 1
1 -
 2
2 -
 3
3 -
 4
4 -
 5
5 -
 6
6 -
 7
7 -
8
-
9
-
10
-
11
-
12
-
13
-
14
-
15
-
16
-
17
-
18
-
19
-
20
-
21
-
22
-
23
-
24
-
25
-
26
-
27
-
28
-
29
-
30
-
31
-
32
-
33
-
34
-
35
-
36
-
37
-
38
-
39
-
40
-
41
-
42
-
43
-
44
-
45
-
46
-
47
-
48
-
49
-
50
-
51
-
52
-
53
-
54
-
55
-
56
-
57
-
58
-
59
-
60
-
61
-
62
-
63
-
64
-
65
-
66
-
67
-
68
-
69
-
70
-
71
-
72
-
73
-
74
-
75
-
76
-
77
-
78
-
79
-
80
-
81
-
82
-
83
 |
 |

User’s Guide
A-61660
6J7207
Truper
3210 Scanner
3610 Scanner
¯