Konica Minolta bizhub 25e bizhub 25e Printer Guide - Page 26
Installing printer drivers using the Add Printer wizard
 |
View all Konica Minolta bizhub 25e manuals
Add to My Manuals
Save this manual to your list of manuals |
Page 26 highlights
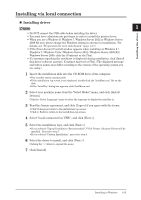
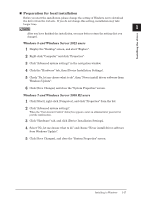
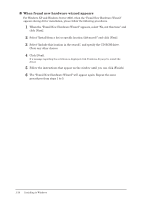
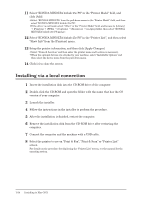
„„ Installing printer drivers using the "Add Printer" wizard We recommend you to install the printer drivers using the installer, however install the drivers using the "Add Printer" wizard in following cases: • To install multiple printer drivers on a computer while the computer and printer are connected with USB cable 1 • When you failed to install a correct printer driver by using plug-and-play while a network printer driver has already been installed Installing the driver To install multiple printer drivers on a computer while the computer and printer are connected with USB cable 1 Install the first printer driver using the installation disk. For details, see "Installing driver" (page 1-15). 2 Start the "Add Printer" wizard. • Windows 8 Right-click on the "Start" screen and click "All apps" "Control Panel" "Hardware and Sound" "Devices and Printers" "Add a printer". • Windows 7 Click [Devices and Printers] from the start menu, and click "Add a printer". • Windows Server 2012 Click "Control Panel" on the "Start" screen "Hardware" "Devices and Printers" "Add a printer". • Windows Vista / Windows Server 2008 R2 / Windows Server 2008 Click [Control Panel] from the start menu, and click "Hardware and Sound" "Printers" "Add a printer" in that order. When the control panel is at "Classic View", double-click "Printers" and then click "Add a printer". • Windows XP Professional / Windows Server 2003 Click [Printers and Faxes] from the start menu, and click [Add a printer] (on Windows Server 2003, double-click "Add printer"). Click [Next]. • Windows XP Home Edition Click [Control Panel] from the start menu, and click "Printers and Other Hardware" "Printers and Faxes" "Add a printer" in that order. 3 Select local printer as printer type. • Windows 8 and Windows Server 2012 Click "The printer that I want isn't listed", and then click "Add a local printer or network printer with manual settings." and click [Next] • Windows 7 / Windows Vista / Windows Server 2008 R2 / Windows Server 2008 Click "Add a local printer". • Windows XP / Windows Server 2003 Select "Local printer attached to this computer". Check to leave free the checkbox "Automatically detect and install my Plug and Play printer". Click [Next]. 4 Select the USB port to connect the printer, and click [Next]. • Windows 8 / Windows 7 / Windows Vista / Windows Server 2012 / Windows Server 2008 R2 / Windows Server 2008 Click "Use an existing port", and select the USB port. • Windows XP / Windows Server 2003 Click "Use the following port", and select the USB port. 5 Confirm that the installation disk is in the CD-ROM drive, and click [Have Disk]. Installing to Windows 1-19
-
 1
1 -
2
-
3
-
4
-
5
-
6
-
7
-
8
-
9
-
10
-
11
-
12
-
13
-
14
-
15
-
16
-
17
-
18
-
19
-
20
-
 21
21 -
 22
22 -
 23
23 -
 24
24 -
 25
25 -
 26
26 -
 27
27 -
 28
28 -
 29
29 -
 30
30 -
 31
31 -
32
-
33
-
34
-
35
-
36
-
37
-
38
-
39
-
40
-
41
-
42
-
43
-
44
-
45
-
46
-
47
-
48
-
49
-
50
-
51
-
52
-
53
-
54
-
55
-
56
-
57
-
58
-
59
-
60
-
61
-
62
-
63
-
64
-
65
-
66
-
67
-
68
-
69
-
70
-
71
-
72
-
73
-
74
-
75
-
76
-
77
-
78
-
79
-
80
-
81
-
82
-
83
-
84
-
85
-
86
-
87
-
88
-
89
-
90
-
91
-
92
-
93
-
94
-
95
-
96
-
97
-
98
-
99
-
100
-
101
-
102
-
103
-
104
-
105
-
106
-
107
-
108
-
109
-
110
-
111
-
112
-
113
-
114
-
115
-
116
-
117
-
118
-
119
-
120
 |
 |