Konica Minolta bizhub 25e bizhub 25e Printer Guide - Page 83
Printing with a margin, Specify the margin in Binding Width Front.
 |
View all Konica Minolta bizhub 25e manuals
Add to My Manuals
Save this manual to your list of manuals |
Page 83 highlights
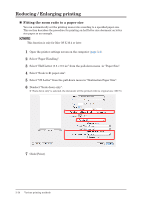
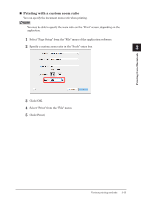
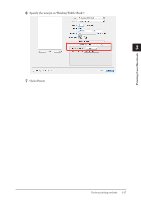
Printing with a margin You can set the binding position and margin for the paper. You can specify these settings for one side or both sides of the paper. ABCDEFGHIJKL ABCDEFGHIJKL ABCDEFGHIJKL ABCDEFGHIJKL ABCDEFGHIJKL ABCDEFGHIJKL ABCDEFGHIJKL ABCDEFGHIJKL ABCDEFGHIJKL ABCDEFGHIJKL ABCDEFGHIJKL ABCDEFGHIJKL ABCDEFGHIJKL ABCDEFGHIJKL ABCDEFGHIJKL ABCDEFGHIJKL ABCDEFGHIJKL ABCDEFGHIJKL ABCDEFGHIJKL ABCDEFGHIJKL ABCDEFGHIJKL ABCDEFGHIJKL NOTE The image is shifted according to the set margin, so a part of the image could run off the paper when the margin is added. 1 Open the printer settings screen on the computer (page 3-4). 2 Select "Printer Features". 3 Select "JCL1" in "Feature Sets". 4 Specify the margin in "Binding Width (Front)". 5 To add margin on the backside of the paper, select "JCL2". When you print only on the front side of the paper, proceed to step 7. 3-16 Various printing methods
-
 1
1 -
2
-
3
-
4
-
5
-
6
-
7
-
8
-
9
-
10
-
11
-
12
-
13
-
14
-
15
-
16
-
17
-
18
-
19
-
20
-
21
-
22
-
23
-
24
-
25
-
26
-
27
-
28
-
29
-
30
-
31
-
32
-
33
-
34
-
35
-
36
-
37
-
38
-
39
-
40
-
41
-
42
-
43
-
44
-
45
-
46
-
47
-
48
-
49
-
50
-
51
-
52
-
53
-
54
-
55
-
56
-
57
-
58
-
59
-
60
-
61
-
62
-
63
-
64
-
65
-
66
-
67
-
68
-
69
-
70
-
71
-
72
-
73
-
74
-
75
-
76
-
77
-
 78
78 -
 79
79 -
 80
80 -
 81
81 -
 82
82 -
 83
83 -
 84
84 -
 85
85 -
 86
86 -
 87
87 -
 88
88 -
89
-
90
-
91
-
92
-
93
-
94
-
95
-
96
-
97
-
98
-
99
-
100
-
101
-
102
-
103
-
104
-
105
-
106
-
107
-
108
-
109
-
110
-
111
-
112
-
113
-
114
-
115
-
116
-
117
-
118
-
119
-
120
 |
 |
