Konica Minolta bizhub C552 bizhub C452/C552/C552DS/C652/C652DS Print Operation - Page 103
Parameter details, Function Name, Option, Description
 |
View all Konica Minolta bizhub C552 manuals
Add to My Manuals
Save this manual to your list of manuals |
Page 103 highlights
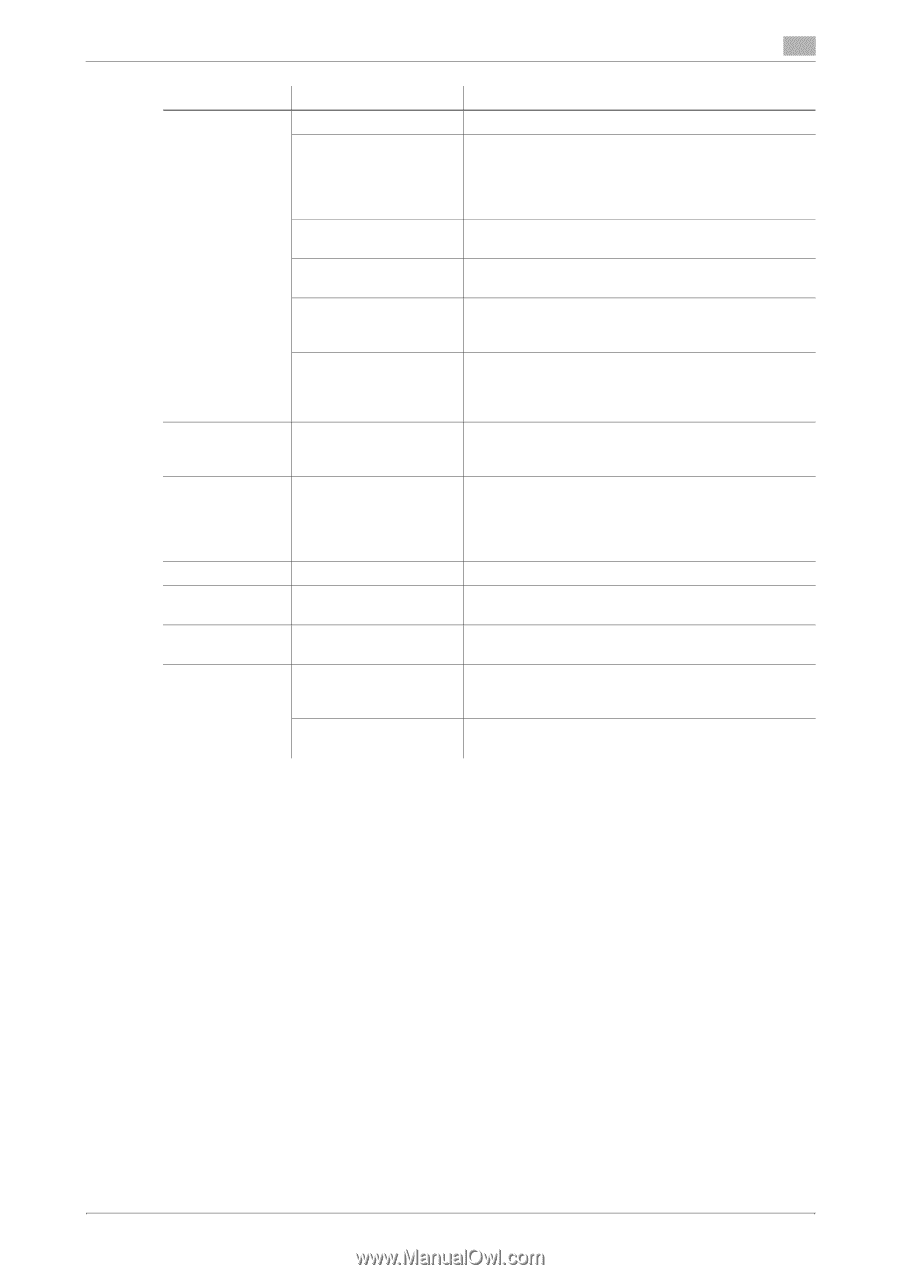
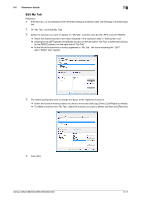
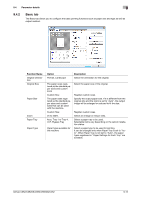
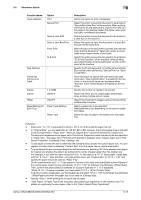
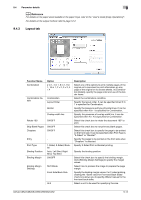
9.4 Parameter details 9 Function Name Output Method Option Print Secure Print Save in User BOX Save in User Box/Print Proof Print ID & Print User Settings - Authentica- - tion/Account Track Copies Collate 1 to 9999 ON/OFF Offset ON/OFF Paper Settings for Paper Type Settings Each Tray Paper Type Description Select this option to print immediately. Select this option to save the document to be printed in "Secure Print User Box" of the machine. When printing, entering the ID and password is required from the control panel of the machine. Select this option when printing highly confidential documents. Select this option to save the document to be printed in a User Box of the machine. Select this option to save the document in a User Box and print at the same time. After one copy of the document is printed, the machine stops printing temporarily. Select this option to avoid misprinting a large volume of print jobs. Select this option to save the document to be printed in "ID & Print User Box" of the machine. When printing, user authentication must be performed via the control panel of the machine. Specify the ID and password, or the file name and User Box number when performing "Secure Print" or "Save in User Box". Click this button to specify the user name and password when "User Authentication" is enabled on the machine, or the account name and password when "Account Track" authentication is enabled on the machine. Specify the number of copies to be printed. Select this check box to collate pages sequentially when printing multiple sets of copies. Select this check box to stagger each set when printing multiple sets of copies. Select a paper tray to be specified. Selectable items vary depending on the option installation status. Select the type of paper to be loaded onto the paper tray. Reference - Paper size "12 e 18" is equivalent to 304.8 e 457.2 mm that is slightly larger than A3. - In "Original Size", you can select A0, A1, A2, B1, B2, or B3; however, the printing paper size is reduced to the size specified in "Paper Size". "Same as Original Size" cannot be selected for a paper size. The large size registered for the paper set in Print Server Properties is also reduced to the size specified in "Paper Size". The paper set in Print Server Properties is available when "Display paper set in Print Server Properties" is selected in the "Settings" tab. - To use paper of which the size is other than the standard sizes, specify the custom paper size. You can register a custom size by selecting "Custom Size" from the paper size or original size option. - To print data of the size corresponding to the full standard size, selecting "W" of the standard size paper for original size enables the data to be printed at the center of paper larger than the original size. For example, if you want to center and print 8 1/2e 11 size data on a 11e 17 sized paper, create data with the "8 1/2e11" size, and then, using the printer driver, set "Original Size" to "8 1/2 e 11W" and specify the paper tray to be used as "Paper Tray". On the machine side, set 11 e 17 size paper on the tray to be used, and from [Basic screen (Paper)] of the control panel, select the tray and specify "8 1/2 e 11W" for [Change Tray Settings] - [Wide Paper]. Then, confirm that [Auto Detect] is selected for [Custom Size] and 11 e 17 is displayed. When 12 1/4 e 18 paper is loaded, you must select [12 1/4 e 18] for [Custom Size]. To print on custom sized paper, use the bypass tray and select "8 1/2 e 11W" for [Change Tray Settings] - [Wide Paper] and enter the paper size to be used for [Change Size]. - Specify "Side 2" when printing on the back side of paper. - "User Paper" of Paper Type is the frequently used paper type registered on the machine side. For details on registering the user paper, refer to the "User's Guide [Copy Operations]". bizhub C652/C652DS/C552/C552DS/C452 9-13
-
 1
1 -
2
-
3
-
4
-
5
-
6
-
7
-
8
-
9
-
10
-
11
-
12
-
13
-
14
-
15
-
16
-
17
-
18
-
19
-
20
-
21
-
22
-
23
-
24
-
25
-
26
-
27
-
28
-
29
-
30
-
31
-
32
-
33
-
34
-
35
-
36
-
37
-
38
-
39
-
40
-
41
-
42
-
43
-
44
-
45
-
46
-
47
-
48
-
49
-
50
-
51
-
52
-
53
-
54
-
55
-
56
-
57
-
58
-
59
-
60
-
61
-
62
-
63
-
64
-
65
-
66
-
67
-
68
-
69
-
70
-
71
-
72
-
73
-
74
-
75
-
76
-
77
-
78
-
79
-
80
-
81
-
82
-
83
-
84
-
85
-
86
-
87
-
88
-
89
-
90
-
91
-
92
-
93
-
94
-
95
-
96
-
97
-
 98
98 -
 99
99 -
 100
100 -
 101
101 -
 102
102 -
 103
103 -
 104
104 -
 105
105 -
 106
106 -
 107
107 -
 108
108 -
109
-
110
-
111
-
112
-
113
-
114
-
115
-
116
-
117
-
118
-
119
-
120
-
121
-
122
-
123
-
124
-
125
-
126
-
127
-
128
-
129
-
130
-
131
-
132
-
133
-
134
-
135
-
136
-
137
-
138
-
139
-
140
-
141
-
142
-
143
-
144
-
145
-
146
-
147
-
148
-
149
-
150
-
151
-
152
-
153
-
154
-
155
-
156
-
157
-
158
-
159
-
160
-
161
-
162
-
163
-
164
-
165
-
166
-
167
-
168
-
169
-
170
-
171
-
172
-
173
-
174
-
175
-
176
-
177
-
178
-
179
-
180
-
181
-
182
-
183
-
184
-
185
-
186
-
187
-
188
-
189
-
190
-
191
-
192
-
193
-
194
-
195
-
196
-
197
-
198
-
199
-
200
-
201
-
202
-
203
-
204
-
205
-
206
-
207
-
208
-
209
-
210
-
211
-
212
-
213
-
214
-
215
-
216
-
217
-
218
-
219
-
220
-
221
-
222
-
223
-
224
-
225
-
226
-
227
-
228
-
229
-
230
-
231
-
232
-
233
-
234
-
235
-
236
-
237
-
238
-
239
-
240
-
241
-
242
-
243
-
244
-
245
-
246
-
247
-
248
-
249
-
250
-
251
-
252
-
253
-
254
-
255
-
256
-
257
-
258
-
259
-
260
-
261
-
262
-
263
-
264
-
265
-
266
-
267
-
268
-
269
-
270
-
271
-
272
-
273
-
274
-
275
-
276
-
277
-
278
-
279
-
280
-
281
-
282
-
283
-
284
-
285
-
286
-
287
-
288
-
289
-
290
-
291
-
292
-
293
-
294
-
295
-
296
-
297
-
298
-
299
-
300
-
301
-
302
-
303
-
304
-
305
-
306
-
307
-
308
-
309
-
310
-
311
-
312
 |
 |