Konica Minolta bizhub C552 bizhub C452/C552/C552DS/C652/C652DS Print Operation - Page 48
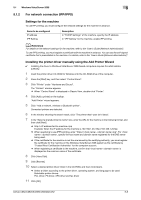
Installing the printer from the Network window, Installing the printer driver by specifying the IP
 |
View all Konica Minolta bizhub C552 manuals
Add to My Manuals
Save this manual to your list of manuals |
Page 48 highlights
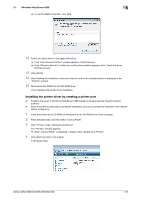
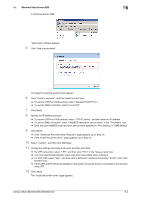
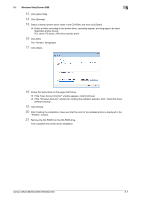
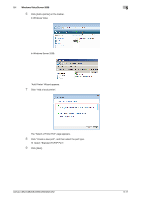
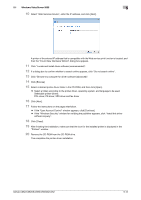
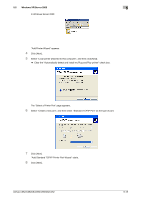
5.1 Windows Vista/Server 2008 5 Installing the printer from the Network window 0 Installing the driver to Windows Vista/Server 2008-based computers requires the administrator authority. 1 Turn on the power of the machine while it is connected to the network. Since the printer is searched for during the installation, be sure to connect the machine to the network. 2 To use the Web service print, check that "Network discovery" is enabled in "Network and Sharing Center" on the computer. 3 Insert the printer driver CD-ROM for Windows into the CD-ROM drive of the computer. 4 Press the [Start] key, and then select "Network". The "Network" window appears, starting to search for the computers and devices on the network. 5 Select the device name of the machine, and then click "Install" on the toolbar. % If the "User Account Control" window appears, click [Continue]. A printer compatible with the selected Web service print function is located, and then the "Found New Hardware Wizard" dialog box appears. 6 Follow the instructions on the pages that follow. % If the "User Account Control" window appears, click [Continue]. % If the "Windows Security" window for verifying the publisher appears, click "Install this driver software anyway". d Reference The operating steps in the "Found New Hardware Wizard" dialog box are the same as those described in "Installing the printer driver by specifying the IP address using the Add Printer Wizard". For details, refer to Steps 11 through 20 in the succeeding section. Installing the printer driver by specifying the IP address using the Add Printer Wizard 0 Installing the driver to Windows Vista/Server 2008-based computers requires the administrator authority. 0 Since the printer is searched for during the installation, be sure to connect the machine to the network before turning it on. 1 Turn on the power of the machine while it is connected to the network. Since the printer is searched for during the installation, be sure to connect the machine to the network. 2 To use the Web service print, check that "Network discovery" is enabled in "Network and Sharing Center" on the computer. 3 Insert the printer driver CD-ROM for Windows into the CD-ROM drive of the computer. 4 Press the [Start] key, and then select "Control Panel". 5 Click "Printer" under "Hardware and Sound". The "Printers" window appears. % When "Control Panel" is displayed in Classic View, double-click "Printers". bizhub C652/C652DS/C552/C552DS/C452 5-10
-
 1
1 -
2
-
3
-
4
-
5
-
6
-
7
-
8
-
9
-
10
-
11
-
12
-
13
-
14
-
15
-
16
-
17
-
18
-
19
-
20
-
21
-
22
-
23
-
24
-
25
-
26
-
27
-
28
-
29
-
30
-
31
-
32
-
33
-
34
-
35
-
36
-
37
-
38
-
39
-
40
-
41
-
42
-
 43
43 -
 44
44 -
 45
45 -
 46
46 -
 47
47 -
 48
48 -
 49
49 -
 50
50 -
 51
51 -
 52
52 -
 53
53 -
54
-
55
-
56
-
57
-
58
-
59
-
60
-
61
-
62
-
63
-
64
-
65
-
66
-
67
-
68
-
69
-
70
-
71
-
72
-
73
-
74
-
75
-
76
-
77
-
78
-
79
-
80
-
81
-
82
-
83
-
84
-
85
-
86
-
87
-
88
-
89
-
90
-
91
-
92
-
93
-
94
-
95
-
96
-
97
-
98
-
99
-
100
-
101
-
102
-
103
-
104
-
105
-
106
-
107
-
108
-
109
-
110
-
111
-
112
-
113
-
114
-
115
-
116
-
117
-
118
-
119
-
120
-
121
-
122
-
123
-
124
-
125
-
126
-
127
-
128
-
129
-
130
-
131
-
132
-
133
-
134
-
135
-
136
-
137
-
138
-
139
-
140
-
141
-
142
-
143
-
144
-
145
-
146
-
147
-
148
-
149
-
150
-
151
-
152
-
153
-
154
-
155
-
156
-
157
-
158
-
159
-
160
-
161
-
162
-
163
-
164
-
165
-
166
-
167
-
168
-
169
-
170
-
171
-
172
-
173
-
174
-
175
-
176
-
177
-
178
-
179
-
180
-
181
-
182
-
183
-
184
-
185
-
186
-
187
-
188
-
189
-
190
-
191
-
192
-
193
-
194
-
195
-
196
-
197
-
198
-
199
-
200
-
201
-
202
-
203
-
204
-
205
-
206
-
207
-
208
-
209
-
210
-
211
-
212
-
213
-
214
-
215
-
216
-
217
-
218
-
219
-
220
-
221
-
222
-
223
-
224
-
225
-
226
-
227
-
228
-
229
-
230
-
231
-
232
-
233
-
234
-
235
-
236
-
237
-
238
-
239
-
240
-
241
-
242
-
243
-
244
-
245
-
246
-
247
-
248
-
249
-
250
-
251
-
252
-
253
-
254
-
255
-
256
-
257
-
258
-
259
-
260
-
261
-
262
-
263
-
264
-
265
-
266
-
267
-
268
-
269
-
270
-
271
-
272
-
273
-
274
-
275
-
276
-
277
-
278
-
279
-
280
-
281
-
282
-
283
-
284
-
285
-
286
-
287
-
288
-
289
-
290
-
291
-
292
-
293
-
294
-
295
-
296
-
297
-
298
-
299
-
300
-
301
-
302
-
303
-
304
-
305
-
306
-
307
-
308
-
309
-
310
-
311
-
312
 |
 |