Konica Minolta bizhub C552 bizhub C452/C552/C552DS/C652/C652DS Print Operation - Page 190
Banner printing function
 |
View all Konica Minolta bizhub C552 manuals
Add to My Manuals
Save this manual to your list of manuals |
Page 190 highlights
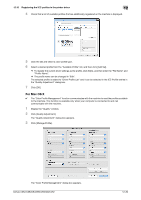
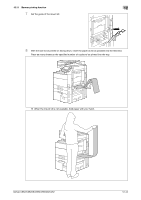
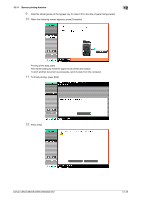
12.11 Banner printing function 12 12.11 Banner printing function On this machine, paper size up to 47-1/4 inches (1200 mm) in length can be loaded into the bypass tray for printing, by configuring on the control panel. In the following sections, loading long paper and printing on it are referred to as banner printing. 12.11.1 Paper Applicable paper Paper width 8-1/4 to 11-11/16 inches (210 to 297 mm) Paper length 18 to 47-1/4 inches (457.3 to 1200 mm) Paper weight 33-13/16 to 55-7/8 lb (127 g/m2 to 210 g/m2) (Select the paper type appropriate for the banner paper weight using the printer driver. 33-13/16 to 41-3/4 lb (127 to 157 g/m2): Thick 1+, Thick 1+ (Side 2) 42 to 55-5/8 lb (158 to 209 g/m2): Thick 2, Thick 2 (Side 2) 55-7/8 lb (210 g/m2): Thick 3, Thick 3 (Side 2)) 12.11.2 Printer drivers and supported operating systems The following drivers support banner printing. - KONICA MINOLTA PCL Driver for Windows (PCL driver) - KONICA MINOLTA PostScript Driver for Windows (PS driver) - KONICA MINOLTA XPS Printer Driver for Windows (XPS driver) - KONICA MINOLTA PostScript PPD Printer Driver for Mac OS X 12.11.3 Configuring the printer driver Specify the output paper size as a custom paper size. For Windows 0 If the finisher FS-526 is installed, banner printing cannot be enabled. 0 If the finisher FS-526 is set to the installed state for the printer driver properties, you cannot specify a paper length of more than 18 inches (457.3 mm) for the custom paper size. Select "None" for "Finisher" in the "Configure" tab of the printer driver. 1 Click the "Basic" tab. % With the KONICA MINOLTA PCL Driver, custom size setting can also be registered in advance on the "Settings" tab of the printer driver accessed from the Windows' "Printer" ("Printers and Faxes" for Windows XP/Server 2003) window. 2 Select "Custom Size" from "Original Size" or "Paper Size". The "Custom Size Settings" dialog box appears. 3 Select the width and the length of the custom size according to the unit you use and then click [OK]. The "Confirm settings changes" dialog box appears. 4 Click [Yes]. 5 If necessary, configure "Paper Settings for Each Tray", "Bypass Tray", "Paper Type", and other settings. 6 Click [OK]. bizhub C652/C652DS/C552/C552DS/C452 12-41
-
 1
1 -
2
-
3
-
4
-
5
-
6
-
7
-
8
-
9
-
10
-
11
-
12
-
13
-
14
-
15
-
16
-
17
-
18
-
19
-
20
-
21
-
22
-
23
-
24
-
25
-
26
-
27
-
28
-
29
-
30
-
31
-
32
-
33
-
34
-
35
-
36
-
37
-
38
-
39
-
40
-
41
-
42
-
43
-
44
-
45
-
46
-
47
-
48
-
49
-
50
-
51
-
52
-
53
-
54
-
55
-
56
-
57
-
58
-
59
-
60
-
61
-
62
-
63
-
64
-
65
-
66
-
67
-
68
-
69
-
70
-
71
-
72
-
73
-
74
-
75
-
76
-
77
-
78
-
79
-
80
-
81
-
82
-
83
-
84
-
85
-
86
-
87
-
88
-
89
-
90
-
91
-
92
-
93
-
94
-
95
-
96
-
97
-
98
-
99
-
100
-
101
-
102
-
103
-
104
-
105
-
106
-
107
-
108
-
109
-
110
-
111
-
112
-
113
-
114
-
115
-
116
-
117
-
118
-
119
-
120
-
121
-
122
-
123
-
124
-
125
-
126
-
127
-
128
-
129
-
130
-
131
-
132
-
133
-
134
-
135
-
136
-
137
-
138
-
139
-
140
-
141
-
142
-
143
-
144
-
145
-
146
-
147
-
148
-
149
-
150
-
151
-
152
-
153
-
154
-
155
-
156
-
157
-
158
-
159
-
160
-
161
-
162
-
163
-
164
-
165
-
166
-
167
-
168
-
169
-
170
-
171
-
172
-
173
-
174
-
175
-
176
-
177
-
178
-
179
-
180
-
181
-
182
-
183
-
184
-
 185
185 -
 186
186 -
 187
187 -
 188
188 -
 189
189 -
 190
190 -
 191
191 -
 192
192 -
 193
193 -
 194
194 -
 195
195 -
196
-
197
-
198
-
199
-
200
-
201
-
202
-
203
-
204
-
205
-
206
-
207
-
208
-
209
-
210
-
211
-
212
-
213
-
214
-
215
-
216
-
217
-
218
-
219
-
220
-
221
-
222
-
223
-
224
-
225
-
226
-
227
-
228
-
229
-
230
-
231
-
232
-
233
-
234
-
235
-
236
-
237
-
238
-
239
-
240
-
241
-
242
-
243
-
244
-
245
-
246
-
247
-
248
-
249
-
250
-
251
-
252
-
253
-
254
-
255
-
256
-
257
-
258
-
259
-
260
-
261
-
262
-
263
-
264
-
265
-
266
-
267
-
268
-
269
-
270
-
271
-
272
-
273
-
274
-
275
-
276
-
277
-
278
-
279
-
280
-
281
-
282
-
283
-
284
-
285
-
286
-
287
-
288
-
289
-
290
-
291
-
292
-
293
-
294
-
295
-
296
-
297
-
298
-
299
-
300
-
301
-
302
-
303
-
304
-
305
-
306
-
307
-
308
-
309
-
310
-
311
-
312
 |
 |