Konica Minolta bizhub C650 bizhub C650 Box Operations User Manual - Page 113
Adding a binding margin
 |
View all Konica Minolta bizhub C650 manuals
Add to My Manuals
Save this manual to your list of manuals |
Page 113 highlights
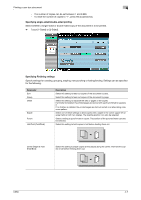
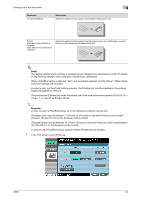
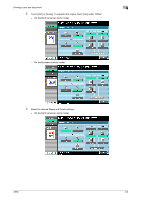
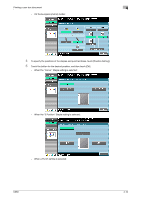
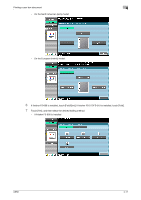
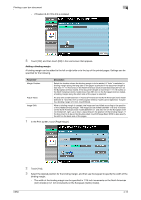
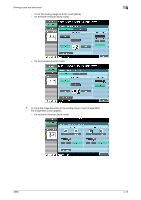
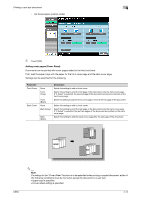
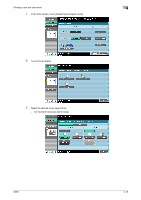
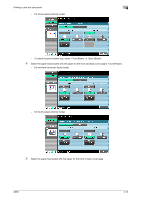
Printing a user box document 4 - If finisher FS-517/FS-518 is installed 8 Touch [OK], and then touch [OK] in the next screen that appears. Adding a binding margin A binding margin can be added to the left or right side or to the top of the printed pages. Settings can be specified for the following. Parameter Margin Position Adjust Value Image Shift Description Select the location where the binding margin is to be added. If "Auto" is selected, a binding margin along the long side of the paper is selected if the document length is less than 11-11/16 inches on the North American (inch) model (less than 297 mm on the European (metric) model). If the document length is more than 11-11/16 inches on the North American (inch) model (more than 297 mm on the European (metric) model), a binding margin along the short side of the paper is selected. An area with a width between 1/16 and 3/4 inches on the North American (inch) model (between 0.1 and 20.0 mm on the European (metric) model) can be specified. To specify a binding margin of 0 mm, touch [None]. When a binding margin is created, the image can be shifted according to the position of the created binding margin. The image can be shifted between 1/16 and 10 inches on the North American (inch) model (between 0.1 and 250 mm on the European (metric) model) left, right, up or down, depending on the position of the binding margin. If the document is to be printed double-sided, touch [Change Back Shift] to also specify the shift on the back side of the pages. 1 In the Print screen, touch [Page Margin]. 2 Touch [Yes]. 3 Select the desired position for the binding margin, and then use the keypad to specify the width of the binding margin. - The width of the binding margin can be specified in 1/16-inch increments on the North American (inch) model (in 0.1 mm increments on the European (metric) model). C650 4-12
-
 1
1 -
2
-
3
-
4
-
5
-
6
-
7
-
8
-
9
-
10
-
11
-
12
-
13
-
14
-
15
-
16
-
17
-
18
-
19
-
20
-
21
-
22
-
23
-
24
-
25
-
26
-
27
-
28
-
29
-
30
-
31
-
32
-
33
-
34
-
35
-
36
-
37
-
38
-
39
-
40
-
41
-
42
-
43
-
44
-
45
-
46
-
47
-
48
-
49
-
50
-
51
-
52
-
53
-
54
-
55
-
56
-
57
-
58
-
59
-
60
-
61
-
62
-
63
-
64
-
65
-
66
-
67
-
68
-
69
-
70
-
71
-
72
-
73
-
74
-
75
-
76
-
77
-
78
-
79
-
80
-
81
-
82
-
83
-
84
-
85
-
86
-
87
-
88
-
89
-
90
-
91
-
92
-
93
-
94
-
95
-
96
-
97
-
98
-
99
-
100
-
101
-
102
-
103
-
104
-
105
-
106
-
107
-
 108
108 -
 109
109 -
 110
110 -
 111
111 -
 112
112 -
 113
113 -
 114
114 -
 115
115 -
 116
116 -
 117
117 -
 118
118 -
119
-
120
-
121
-
122
-
123
-
124
-
125
-
126
-
127
-
128
-
129
-
130
-
131
-
132
-
133
-
134
-
135
-
136
-
137
-
138
-
139
-
140
-
141
-
142
-
143
-
144
-
145
-
146
-
147
-
148
-
149
-
150
-
151
-
152
-
153
-
154
-
155
-
156
-
157
-
158
-
159
-
160
-
161
-
162
-
163
-
164
-
165
-
166
-
167
-
168
-
169
-
170
-
171
-
172
-
173
-
174
-
175
-
176
-
177
-
178
-
179
-
180
-
181
-
182
-
183
-
184
-
185
-
186
-
187
-
188
-
189
-
190
-
191
-
192
-
193
-
194
-
195
-
196
-
197
-
198
-
199
-
200
-
201
-
202
-
203
-
204
-
205
-
206
-
207
-
208
-
209
-
210
-
211
-
212
-
213
-
214
-
215
-
216
-
217
-
218
-
219
-
220
-
221
-
222
-
223
-
224
-
225
-
226
-
227
-
228
-
229
-
230
-
231
-
232
-
233
-
234
-
235
-
236
-
237
-
238
-
239
-
240
-
241
-
242
-
243
-
244
-
245
-
246
-
247
-
248
-
249
-
250
-
251
-
252
-
253
-
254
-
255
-
256
-
257
-
258
-
259
-
260
-
261
-
262
-
263
-
264
-
265
-
266
-
267
-
268
-
269
-
270
-
271
-
272
-
273
-
274
-
275
-
276
-
277
-
278
-
279
-
280
 |
 |
