Kyocera KM-3035 IB-2x Quick Configuration Guide Rev 2.2 - Page 11
IB-2x Setup Utility Installation, Setting KPDL Emulation and AppleTalk Name and Zone, Installing - mac driver
 |
View all Kyocera KM-3035 manuals
Add to My Manuals
Save this manual to your list of manuals |
Page 11 highlights
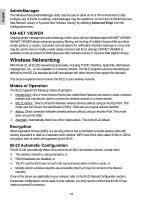
English A Macintosh Setup Utility is included on the CD-ROM (Kyocera Mita Network Library or Kyocera Mita Software Library) which allows the user to perform management tasks such as remotely configure KPDL emulation, set the AppleTalk name and zone, and set TCP/IP parameters. l The AppleTalk protocol must be active on your Macintosh computer to support printing to the IB-2x. IB-2x Setup Utility Installation 1. Load the CD-ROM (Kyocera Mita Network Library or Kyocera Mita Software Library) and double click the KM Network Library icon on the desktop. 2. Open the Utility folder. 3. Double click the IB-2x Installer. 4. Select the desired language and click OK. 5. Confirm the destination folder or browse to the desired folder. Click Next to begin copying the files. 6. Click Finish to exit the installer. Setting KPDL Emulation and AppleTalk Name and Zone 1. Open the IB Tools folder and double click Setup Utility to launch the utility. 2. The utility will search for all available IB-2x devices on the AppleTalk network (in the current zone) and display them in the Printer List. The Setup Utility may be configured to search in a different AppleTalk zone or to search for printers via TCP/IP. See the on-line IB-2x User's Manual for additional information on configuring searches. 3. Double click on the desired printer in the Printer List to open the device configuration window. 4. Click on the Set Emulation icon. Choose the appropriate KPDL option and click SET. 5. Click on the AppleTalk icon. Enter the desired Printer Name as it will be displayed in the Chooser. Enter the desired Zone Name to indicate the zone that the printer will appear in. An asterisk (*) indicates the printer will appear in the default zone. 6. Click SET to send the changes to the printer. 7. Setting the AppleTalk name or zone require a reset before they will take effect. Close the device configuration window and select Reset from the Setup menu. Installing PPDs and Configuring the Printer Macintosh support for Kyocera printers and copiers is provided by the LaserWriter driver included with the Macintosh Operating System and by installation of model specific PPD files. These instructions apply to Mac OS 8 and 9 only. 1. PPD files are installed from the CD-ROM (Kyocera Mita Software Library or Kyocera Mita Digital Library) provided with the printer. Insert the CD-ROM, open the appropriate language folder, and double click on the Installer program. 2. Once PPD installation is complete, select Chooser from the Apple menu to open the Chooser. 3. Select the LaserWriter 8 driver, the AppleTalk Zone (if any) and the IB-2x printer. 4. Click on Create. The driver will automatically select the appropriate PPD file and will display a dialog allowing selection of the installed printer options. 5. Select installed options as necessary and confirm that the list of installed options matches the printer configuration. Click on OK. A desktop printer for this model will be built on the desktop. Macintosh printing configuration is now complete. 12
-
 1
1 -
2
-
3
-
4
-
5
-
 6
6 -
 7
7 -
 8
8 -
 9
9 -
 10
10 -
 11
11 -
 12
12 -
 13
13 -
 14
14 -
 15
15 -
 16
16 -
17
-
18
-
19
-
20
-
21
-
22
-
23
-
24
-
25
-
26
-
27
-
28
-
29
-
30
-
31
-
32
-
33
-
34
-
35
-
36
-
37
-
38
-
39
-
40
-
41
-
42
-
43
-
44
-
45
-
46
-
47
-
48
-
49
-
50
-
51
-
52
-
53
-
54
-
55
-
56
-
57
-
58
-
59
-
60
-
61
-
62
-
63
-
64
-
65
-
66
-
67
-
68
-
69
-
70
-
71
-
72
-
73
-
74
-
75
-
76
-
77
-
78
-
79
-
80
-
81
-
82
-
83
-
84
-
85
-
86
-
87
-
88
-
89
-
90
-
91
-
92
-
93
-
94
-
95
-
96
-
97
-
98
-
99
-
100
-
101
-
102
-
103
-
104
-
105
-
106
-
107
-
108
-
109
-
110
-
111
-
112
-
113
-
114
-
115
-
116
-
117
-
118
-
119
-
120
-
121
-
122
-
123
-
124
-
125
-
126
-
127
-
128
-
129
-
130
-
131
-
132
-
133
-
134
-
135
-
136
-
137
-
138
-
139
-
140
-
141
-
142
-
143
-
144
-
145
-
146
-
147
-
148
-
149
-
150
-
151
-
152
-
153
-
154
-
155
-
156
-
157
-
158
-
159
-
160
-
161
-
162
-
163
-
164
-
165
-
166
-
167
-
168
-
169
-
170
-
171
-
172
-
173
-
174
-
175
-
176
-
177
-
178
-
179
-
180
-
181
-
182
-
183
-
184
-
185
-
186
-
187
-
188
-
189
-
190
-
191
-
192
-
193
-
194
-
195
-
196
-
197
-
198
-
199
-
200
-
201
-
202
-
203
-
204
-
205
 |
 |