Kyocera KM-3035 IB-2x Quick Configuration Guide Rev 2.2 - Page 13
IP Address Setup with the Printer Front Panel - copier manual
 |
View all Kyocera KM-3035 manuals
Add to My Manuals
Save this manual to your list of manuals |
Page 13 highlights
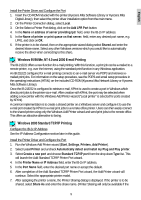
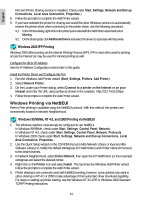
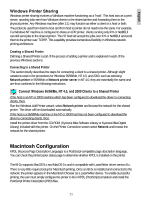
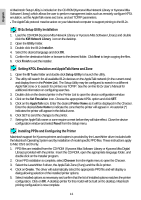
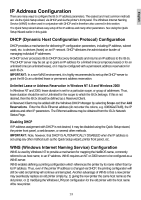
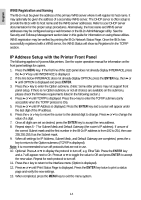
English WINS Registration and Naming The IB-2x must be given the address of the primary WINS server where it will register its host name. It may optionally be given the address of a secondary WINS server. The DHCP server is often setup to provide the IB-2x with its host name and the WINS server addresses. Refer to your DHCP server documentation for the proper setup procedures. Alternatively, the host name and WINS server addresses may be configured using a web browser or the IB-2x AdminManager utility. See the Security and Followup Management section later in this guide for information on using these utilities. WINS registration may be verified by printing the IB-2x Network Status Page. Once the IB-2x has successfully registered with a WINS server, the WINS Status will show as Registered in the TCP/IP section. IP Address Setup with the Printer Front Panel The following applies to Kyocera Mita printers. See the copier operation manual for information on the front panel settings for copiers. 1. Press the MENU key. If the first line of the LED panel does not already display INTERFACE, press the ∧ or ∨ key until INTERFACE is displayed. 2. If the line below INTERFACE does not already display OPTION, press the ENTER key, then ∧ or ∨ until OPTION is displayed and press ENTER. 3. Press the > key to enter the Option submenu. (Note: Some older printers may not support front panel setup. If there is no Option submenu or not all choices are available on the submenu, please check the firmware requirements listed in the following section.) 4. Press ∧ or ∨ until TCP/IP is displayed. Press the > key to enter the TCP/IP submenu (only accessible when the TCP/IP protocol is On). 5. Press ∧ or ∨ until IP Address is displayed. Press the ENTER key and a cursor will appear under the last digit of the IP address. 6. Press the < or > key to move the cursor to the desired digit to change. Press ∧ or ∨ to change the value of a digit. 7. Once all digits are set as desired, press the ENTER key to accept the new address. 8. Repeat steps 5 - 7 for Subnet Mask and Default Gateway (the router's IP address). If unsure of the correct Subnet mask and the first number in the IB-2x IP address is from 192 to 254, then use 255.255.255.0 as the Subnet mask. 9. When all settings for IP Address, Subnet Mask, and Default Gateway are completed, press the < key to return to the Option submenu (TCP/IP is displayed). Note: It is recommended to turn off protocols that are not in use. 10. Optional: Press ∧ or ∨ to display the protocol to turn off, e.g. EtherTalk. Press the ENTER key and a ? will appear next to On. Press ∧ or ∨ to toggle the value to Off and press ENTER to accept the new value. Repeat for each protocol to turn off. 11. Press the < key to return to the Interface menu (Option is displayed). 12. Press ∧ or ∨ until Print Status Page is displayed. Press the ENTER key twice to print a status page and verify the new settings. 13. When completed, press the MENU key to exit the menu system. 14
-
 1
1 -
2
-
3
-
4
-
5
-
6
-
7
-
 8
8 -
 9
9 -
 10
10 -
 11
11 -
 12
12 -
 13
13 -
 14
14 -
 15
15 -
 16
16 -
 17
17 -
 18
18 -
19
-
20
-
21
-
22
-
23
-
24
-
25
-
26
-
27
-
28
-
29
-
30
-
31
-
32
-
33
-
34
-
35
-
36
-
37
-
38
-
39
-
40
-
41
-
42
-
43
-
44
-
45
-
46
-
47
-
48
-
49
-
50
-
51
-
52
-
53
-
54
-
55
-
56
-
57
-
58
-
59
-
60
-
61
-
62
-
63
-
64
-
65
-
66
-
67
-
68
-
69
-
70
-
71
-
72
-
73
-
74
-
75
-
76
-
77
-
78
-
79
-
80
-
81
-
82
-
83
-
84
-
85
-
86
-
87
-
88
-
89
-
90
-
91
-
92
-
93
-
94
-
95
-
96
-
97
-
98
-
99
-
100
-
101
-
102
-
103
-
104
-
105
-
106
-
107
-
108
-
109
-
110
-
111
-
112
-
113
-
114
-
115
-
116
-
117
-
118
-
119
-
120
-
121
-
122
-
123
-
124
-
125
-
126
-
127
-
128
-
129
-
130
-
131
-
132
-
133
-
134
-
135
-
136
-
137
-
138
-
139
-
140
-
141
-
142
-
143
-
144
-
145
-
146
-
147
-
148
-
149
-
150
-
151
-
152
-
153
-
154
-
155
-
156
-
157
-
158
-
159
-
160
-
161
-
162
-
163
-
164
-
165
-
166
-
167
-
168
-
169
-
170
-
171
-
172
-
173
-
174
-
175
-
176
-
177
-
178
-
179
-
180
-
181
-
182
-
183
-
184
-
185
-
186
-
187
-
188
-
189
-
190
-
191
-
192
-
193
-
194
-
195
-
196
-
197
-
198
-
199
-
200
-
201
-
202
-
203
-
204
-
205
 |
 |