Kyocera KM-3035 IB-2x Quick Configuration Guide Rev 2.2 - Page 4
IB-2x Hardware Installation, Using the Quick Setup Wizard - mita copier
 |
View all Kyocera KM-3035 manuals
Add to My Manuals
Save this manual to your list of manuals |
Page 4 highlights
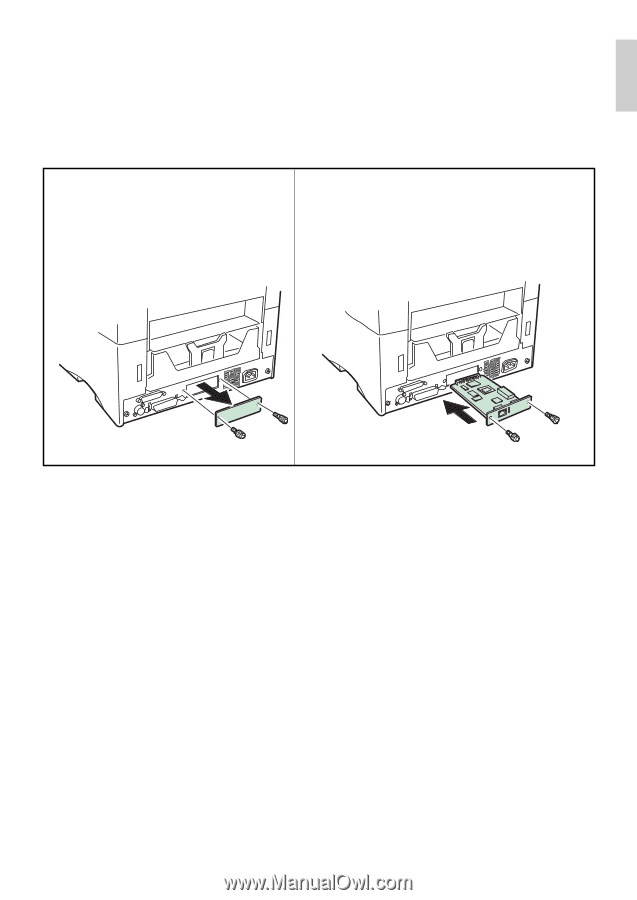
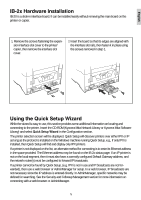
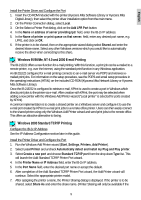
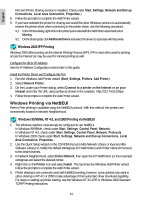
English IB-2x Hardware Installation IB-2X is a slide-in interface board. It can be installed easily without removing the main board on the printer or copier. 1. Remove the screws fastening the expansion interface slot cover to the printer/ copier, then remove the interface slot cover. 2. Insert the board so that its edges are aligned with the interface slot rails, then fasten it in place using the screws removed in step 1. Using the Quick Setup Wizard While the wizard is easy to use, this section provides some additional information on locating and connecting to the printer. Insert the CD-ROM (Kyocera Mita Network Library or Kyocera Mita Software Library) and select Quick Setup Wizard in the Configuration section. The printer selection screen will be displayed. Quick Setup will discover printers over either IPX or IP as long as the protocol is installed on the Windows machine running Quick Setup, e.g., if only IPX is installed, then Quick Setup will find and display only IPX printers. If a printer is not displayed on the list, an alternate method for connecting is to enter its Ethernet address in the space provided. The Ethernet address may be found on the IB-2x status page. If an IP printer is not on the local segment, then it must also have a correctly configured Default Gateway address, and the network router(s) must be configured to forward IP broadcasts. If a printer cannot be found by Quick Setup, (e.g. IPX is not in use and IP broadcasts are not forwarded), then use a web browser or AdminManager for setup. In a web browser, IP broadcasts are not necessary since the IP address is entered directly. In AdminManager, specific networks may be defined for searching. See the Security and Followup Management section for more information on connecting with a web browser or AdminManager. 5
-
 1
1 -
 2
2 -
 3
3 -
 4
4 -
 5
5 -
 6
6 -
 7
7 -
 8
8 -
 9
9 -
 10
10 -
11
-
12
-
13
-
14
-
15
-
16
-
17
-
18
-
19
-
20
-
21
-
22
-
23
-
24
-
25
-
26
-
27
-
28
-
29
-
30
-
31
-
32
-
33
-
34
-
35
-
36
-
37
-
38
-
39
-
40
-
41
-
42
-
43
-
44
-
45
-
46
-
47
-
48
-
49
-
50
-
51
-
52
-
53
-
54
-
55
-
56
-
57
-
58
-
59
-
60
-
61
-
62
-
63
-
64
-
65
-
66
-
67
-
68
-
69
-
70
-
71
-
72
-
73
-
74
-
75
-
76
-
77
-
78
-
79
-
80
-
81
-
82
-
83
-
84
-
85
-
86
-
87
-
88
-
89
-
90
-
91
-
92
-
93
-
94
-
95
-
96
-
97
-
98
-
99
-
100
-
101
-
102
-
103
-
104
-
105
-
106
-
107
-
108
-
109
-
110
-
111
-
112
-
113
-
114
-
115
-
116
-
117
-
118
-
119
-
120
-
121
-
122
-
123
-
124
-
125
-
126
-
127
-
128
-
129
-
130
-
131
-
132
-
133
-
134
-
135
-
136
-
137
-
138
-
139
-
140
-
141
-
142
-
143
-
144
-
145
-
146
-
147
-
148
-
149
-
150
-
151
-
152
-
153
-
154
-
155
-
156
-
157
-
158
-
159
-
160
-
161
-
162
-
163
-
164
-
165
-
166
-
167
-
168
-
169
-
170
-
171
-
172
-
173
-
174
-
175
-
176
-
177
-
178
-
179
-
180
-
181
-
182
-
183
-
184
-
185
-
186
-
187
-
188
-
189
-
190
-
191
-
192
-
193
-
194
-
195
-
196
-
197
-
198
-
199
-
200
-
201
-
202
-
203
-
204
-
205
 |
 |