Lexmark X4650 User's Guide - Page 21
Warning-Potential Damage, Use - installation
 |
UPC - 734646064088
View all Lexmark X4650 manuals
Add to My Manuals
Save this manual to your list of manuals |
Page 21 highlights
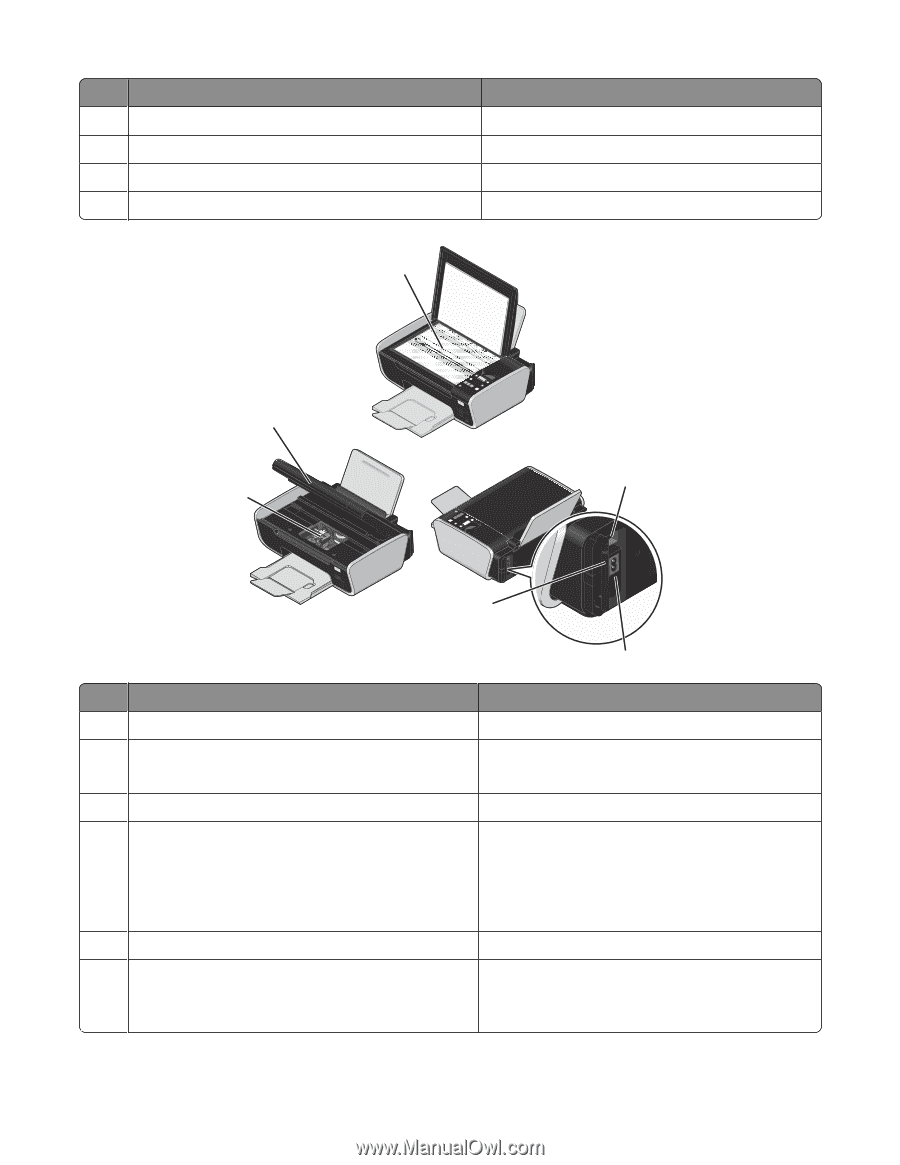
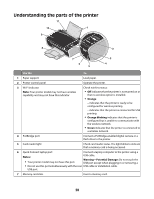
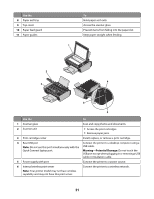
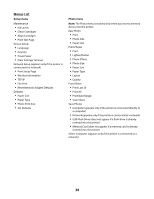
Use the 8 Paper exit tray 9 Top cover 10 Paper feed guard 11 Paper guides To Hold paper as it exits. Access the scanner glass. Prevent items from falling into the paper slot. Keep paper straight when feeding. 1 2 3 WI F I PRINTING 4 WI F I PRINTING 6 5 Use the To 1 Scanner glass Scan and copy photos and documents. 2 Scanner unit • Access the print cartridges. • Remove paper jams. 3 Print cartridge carrier Install, replace, or remove a print cartridge. 4 Rear USB port Connect the printer to a desktop computer using a Note: Do not use this port simultaneously with the USB cable. Quick Connect laptop port. Warning-Potential Damage: Do not touch the USB port except when plugging in or removing a USB cable or installation cable. 5 Power supply with port Connect the printer to a power source. 6 Internal wireless print server Connect the printer to a wireless network. Note: Your printer model may not have wireless capability and may not have this print server. 21
-
 1
1 -
2
-
3
-
4
-
5
-
6
-
7
-
8
-
9
-
10
-
11
-
12
-
13
-
14
-
15
-
 16
16 -
 17
17 -
 18
18 -
 19
19 -
 20
20 -
 21
21 -
 22
22 -
 23
23 -
 24
24 -
 25
25 -
 26
26 -
27
-
28
-
29
-
30
-
31
-
32
-
33
-
34
-
35
-
36
-
37
-
38
-
39
-
40
-
41
-
42
-
43
-
44
-
45
-
46
-
47
-
48
-
49
-
50
-
51
-
52
-
53
-
54
-
55
-
56
-
57
-
58
-
59
-
60
-
61
-
62
-
63
-
64
-
65
-
66
-
67
-
68
-
69
-
70
-
71
-
72
-
73
-
74
-
75
-
76
-
77
-
78
-
79
-
80
-
81
-
82
-
83
-
84
-
85
-
86
-
87
-
88
-
89
-
90
-
91
-
92
-
93
-
94
-
95
-
96
-
97
-
98
-
99
-
100
-
101
-
102
-
103
-
104
-
105
-
106
-
107
-
108
-
109
-
110
-
111
-
112
-
113
-
114
-
115
-
116
-
117
-
118
-
119
-
120
-
121
-
122
-
123
-
124
-
125
-
126
-
127
-
128
-
129
-
130
-
131
-
132
-
133
-
134
-
135
-
136
-
137
-
138
-
139
-
140
-
141
-
142
-
143
-
144
 |
 |