Lexmark X4650 User's Guide - Page 40
Installing the printer on other computers, Wireless Setup menu, TCP/IP menu, Using Windows - driver
 |
UPC - 734646064088
View all Lexmark X4650 manuals
Add to My Manuals
Save this manual to your list of manuals |
Page 40 highlights
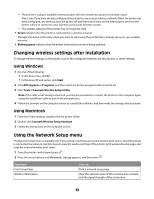
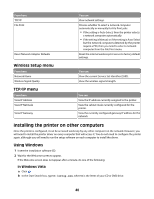
From here TCP/IP File Print Reset Network Adapter Defaults Wireless Setup menu From here Network Name Wireless Signal Quality TCP/IP menu From here View IP Address View IP Netmask View IP Gateway You can View network settings. Choose whether to select a network computer automatically or manually for File Print jobs. • If the setting is Auto Select, then the printer selects a network computer automatically. • If the setting is Manual, or if the setting is Auto Select but the network computers detected by the printer require a PIN, then you need to select a network computer from the File Print menu. Reset the internal wireless print server to factory default settings. You can View the current Service Set Identifier (SSID). View the wireless signal strength. You can View the IP address currently assigned to the printer. View the subnet mask currently configured for the printer. View the currently configured gateway IP address for the network. Installing the printer on other computers Once the printer is configured, it can be accessed wirelessly by any other computer on the network. However, you will need to install the printer driver on every computer that will access it. You do not need to configure the printer again, although you will need to run the setup software on each computer to install the driver. Using Windows 1 Insert the installation software CD. 2 Wait for the Welcome screen to appear. If the Welcome screen does not appear after a minute, do one of the following: In Windows Vista a Click . b In the Start Search box, type D:\setup.exe, where D is the letter of your CD or DVD drive. 40
-
 1
1 -
2
-
3
-
4
-
5
-
6
-
7
-
8
-
9
-
10
-
11
-
12
-
13
-
14
-
15
-
16
-
17
-
18
-
19
-
20
-
21
-
22
-
23
-
24
-
25
-
26
-
27
-
28
-
29
-
30
-
31
-
32
-
33
-
34
-
 35
35 -
 36
36 -
 37
37 -
 38
38 -
 39
39 -
 40
40 -
 41
41 -
 42
42 -
 43
43 -
 44
44 -
 45
45 -
46
-
47
-
48
-
49
-
50
-
51
-
52
-
53
-
54
-
55
-
56
-
57
-
58
-
59
-
60
-
61
-
62
-
63
-
64
-
65
-
66
-
67
-
68
-
69
-
70
-
71
-
72
-
73
-
74
-
75
-
76
-
77
-
78
-
79
-
80
-
81
-
82
-
83
-
84
-
85
-
86
-
87
-
88
-
89
-
90
-
91
-
92
-
93
-
94
-
95
-
96
-
97
-
98
-
99
-
100
-
101
-
102
-
103
-
104
-
105
-
106
-
107
-
108
-
109
-
110
-
111
-
112
-
113
-
114
-
115
-
116
-
117
-
118
-
119
-
120
-
121
-
122
-
123
-
124
-
125
-
126
-
127
-
128
-
129
-
130
-
131
-
132
-
133
-
134
-
135
-
136
-
137
-
138
-
139
-
140
-
141
-
142
-
143
-
144
 |
 |