Lexmark X4650 User's Guide - Page 98
Aligning print cartridges, Cleaning the print cartridge nozzles
 |
UPC - 734646064088
View all Lexmark X4650 manuals
Add to My Manuals
Save this manual to your list of manuals |
Page 98 highlights
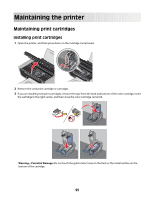
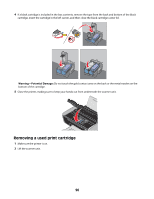
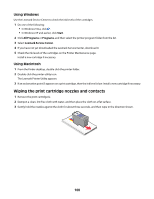
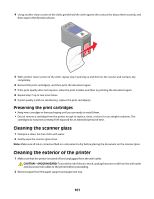
Lexmark's warranty does not cover damage caused by non-Lexmark ink or print cartridges. Aligning print cartridges Using the printer control panel 1 Load plain Letter-size paper. 2 From the printer control panel, press , and then press . 3 Press the arrow buttons until Align Cartridges appears, and then press . An alignment page prints. Using Windows 1 Load plain Letter-size paper. 2 Do one of the following: • In Windows Vista, click . • In Windows XP and earlier, click Start. 3 Click All Programs or Programs, and then select the printer program folder from the list. 4 From the printer folder, click Maintenance Œ Align Cartridges. 5 Click Print. 6 Follow the instructions on the computer screen. Using Macintosh 1 Load plain Letter-size paper. 2 From the Finder desktop, double-click the printer folder. 3 Double-click the printer utility icon. 4 From the Maintenance tab, click Print Alignment Page. 5 Follow the instructions on the computer screen. If you aligned the cartridges to improve print quality, print your document again. If print quality has not improved, then clean the print cartridge nozzles. Cleaning the print cartridge nozzles Using the printer control panel 1 Load plain Letter-size paper. 2 From the printer control panel, press , and then press . 3 Press the arrow buttons until Clean Cartridges appears, and then press . A page prints, forcing ink through the print cartridge nozzles to clean them. 4 Print the document again to verify that the print quality has improved. 98
-
 1
1 -
2
-
3
-
4
-
5
-
6
-
7
-
8
-
9
-
10
-
11
-
12
-
13
-
14
-
15
-
16
-
17
-
18
-
19
-
20
-
21
-
22
-
23
-
24
-
25
-
26
-
27
-
28
-
29
-
30
-
31
-
32
-
33
-
34
-
35
-
36
-
37
-
38
-
39
-
40
-
41
-
42
-
43
-
44
-
45
-
46
-
47
-
48
-
49
-
50
-
51
-
52
-
53
-
54
-
55
-
56
-
57
-
58
-
59
-
60
-
61
-
62
-
63
-
64
-
65
-
66
-
67
-
68
-
69
-
70
-
71
-
72
-
73
-
74
-
75
-
76
-
77
-
78
-
79
-
80
-
81
-
82
-
83
-
84
-
85
-
86
-
87
-
88
-
89
-
90
-
91
-
92
-
 93
93 -
 94
94 -
 95
95 -
 96
96 -
 97
97 -
 98
98 -
 99
99 -
 100
100 -
 101
101 -
 102
102 -
 103
103 -
104
-
105
-
106
-
107
-
108
-
109
-
110
-
111
-
112
-
113
-
114
-
115
-
116
-
117
-
118
-
119
-
120
-
121
-
122
-
123
-
124
-
125
-
126
-
127
-
128
-
129
-
130
-
131
-
132
-
133
-
134
-
135
-
136
-
137
-
138
-
139
-
140
-
141
-
142
-
143
-
144
 |
 |