Panasonic PV-GS29 Digital Video Camera - English/ Spanish - Page 21
SETTING DATE AND TIME, USING THE VIEWFINDER/LCD MONITOR, Before Using, About Date/Time
 |
UPC - 037988980123
View all Panasonic PV-GS29 manuals
Add to My Manuals
Save this manual to your list of manuals |
Page 21 highlights
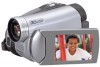
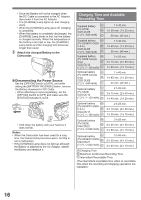
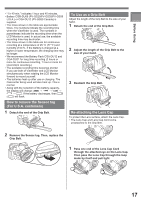
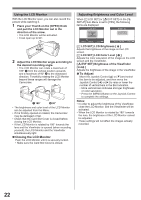
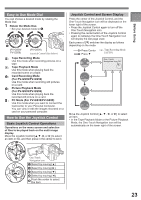
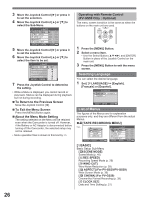
Before Using • The power will not turn off if the LCD Monitor is closed and the Viewfinder is retracted. • The [STATUS] Indicator 2 automatically goes off and the power turns off. (If Quick Start is set to [ON] (p. 34), the unit goes into Quick Start standby mode and the [STATUS] Indicator lights Green.) • Even if the LCD Monitor is closed or the Viewfinder is retracted while recording on a tape, the power does not turn off. (The Viewfinder stays lit up.) 3 Open the LCD Monitor or extend the Viewfinder again. • The [STATUS] Indicator lights Red and turn on the power. Setting Date and Time When the Camcorder is turned on for the first time, [SET DATE AND TIME] will appear. Select [YES] and set the date and time. • If the screen shows the incorrect Date/Time, then adjust it. SET DATE AND TIME YES NO SETUP ENTER EXIT • Set to Tape/Card Recording Mode. 3 Press the Joystick Control to finish setting the date and time. • The clock operation starts from [00] second. • If the built-in battery is weak, the [ ] Indication flashes. In this case, charge the built-in battery. • The clock uses the 12-hour system. „ About Date/Time • The Date and Time function are driven by a built-in lithium battery. • Make sure to check the time before recording because the built-in clock is not very accurate. „ Recharging the built-in lithium battery If [ ] or [--] is appears when the Camcorder is turned on, then the built-in lithium battery has run down. Use the steps below to charge the battery. When the battery is inserted for the first time after charging, [SET DATE AND TIME] will appear. Select [YES] and set the date and time. Connect the AC adaptor to the Camcorder or place the battery on the Camcorder, and the built-in lithium battery will be recharged. Leave the camera as is for approx. 24 hours, and the battery will drive the date and time for approx. 6 months. (Even if the [OFF/ON] Switch is set to [OFF], the battery is still being recharged.) Using the Viewfinder/LCD Monitor Using the Viewfinder Before using the Viewfinder, adjust the field of view so that the displays inside the Viewfinder become clear and easy to read. 1 Pull the Viewfinder. (PV-GS39/ (PV-GS29) PV-GS59) 1 Set [ BASIC] >> [ CLOCK SET] >> [YES]. CLOCK SET JAN .01.2006 12:00AM SETUP SET ENTER EXIT 2 Move the Joystick Control [◄] or [►] to select the item to be set. Then move the Joystick Control [▲] or [▼] to set the desired value. • Year will cycle in the order shown below. 2000, 2001, ..., 2089, 2000, ... • The Viewfinder will be activated. 2 Adjust by turning the Eyepiece Corrector Knob. • You can adjust the brightness of the Viewfinder from the Menu. 21
-
 1
1 -
2
-
3
-
4
-
5
-
6
-
7
-
8
-
9
-
10
-
11
-
12
-
13
-
14
-
15
-
 16
16 -
 17
17 -
 18
18 -
 19
19 -
 20
20 -
 21
21 -
 22
22 -
 23
23 -
 24
24 -
 25
25 -
 26
26 -
27
-
28
-
29
-
30
-
31
-
32
-
33
-
34
-
35
-
36
-
37
-
38
-
39
-
40
-
41
-
42
-
43
-
44
-
45
-
46
-
47
-
48
-
49
-
50
-
51
-
52
-
53
-
54
-
55
-
56
-
57
-
58
-
59
-
60
-
61
-
62
-
63
-
64
-
65
-
66
-
67
-
68
-
69
-
70
-
71
-
72
-
73
-
74
-
75
-
76
-
77
-
78
-
79
-
80
-
81
-
82
-
83
-
84
-
85
-
86
-
87
-
88
-
89
-
90
-
91
-
92
 |
 |