Panasonic PV-GS29 Digital Video Camera - English/ Spanish - Page 53
Editing Mode, Recording From A Tape Onto A Card (for Pv-gs39/pv-gs59), Audio Dubbing (pv-gs59 Only)
 |
UPC - 037988980123
View all Panasonic PV-GS29 manuals
Add to My Manuals
Save this manual to your list of manuals |
Page 53 highlights
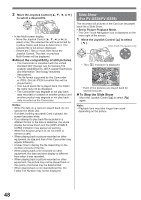
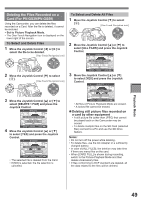
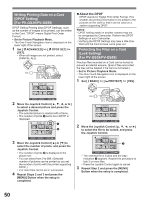
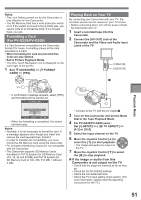
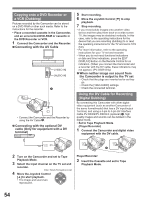
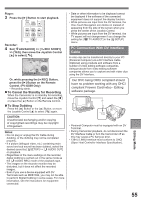
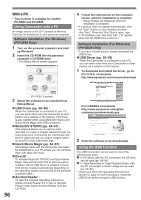
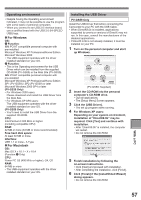
Editing Mode Recording from a Tape onto a Card (For PV-GS39/PV-GS59) Still pictures can be recorded on the Memory Card from scenes that have already been recorded on a cassette. 1 Set the Mode Dial to Tape Playback Mode. • The One-Touch Navigation icon is displayed on the lower right of the screen. [One-Touch Navigation icon] 2 Press the [AUDIO DUB] Button on the Remote Control. • The [ ] Indication appears. 3 To start Audio Dubbing, press the [ ] Button on the Remote Control. Or, move the Joystick Control [▲] to select [ ]. • The [ ] Indication appears. • Talk into the microphone. SP 3h59m59s29f R 2:00 2 Insert a tape which already has recorded contents and a card. 3 Move the Joystick Control [▲] to start playback and set the Camcorder to Still Playback Mode at the scene you wish to record, and press the [PHOTO SHOT] Button. • Audio will not be recorded. Note: • If you press the [PHOTO SHOT] Button without pausing, blurred pictures may be recorded. Audio Dubbing (PV-GS59 Only) You can add music or narration to the recorded Cassette. • If the tape recorded in the [16bit] Mode is dubbed with the Audio Dubbing function, the original sound is erased. (If you wish to preserve the original sound, use the [12bit] Mode when recording.) • Audio Dubbing cannot be performed on a recording made in LP Mode. (p. 29) • Set to Tape Playback Mode. 1 Find a scene that you want to add sound to, and press the [ ] Button on the Remote Control. 12:34:56AM JAN 2 2006 4 Press the [ ] Button on the Remote Control to stop audio dubbing. Or, move the Joystick Control [▲] to select [ ] again. • The Camcorder is in the Still Playback Mode again. „ Before Recording with Audio Dubbing • Set to Tape Recording Mode • When you want to preserve the original sound taken during recording, set [ ADVANCED] >> [ AUDIO REC] >> [12bit] to take pictures. (When set [16bit], the sounds taken during recording are erased after recording with audio dubbing.) • Set [ BASIC] >> [ REC SPEED] >> [SP] to take pictures. „ To Play Back the Sound Recorded by 12bit Audio Dubbing Set [ SETUP] >> [ 12bit AUDIO] >> [ST1], [ST2] or [MIX]. ST1: ST2: MIX: It plays back only the original sound. It plays back only the sound added by Audio Dubbing. It plays back both the original sound and the sound added by Audio Dubbing simultaneously. • During Audio Dubbing, it is automatically set to [ST2]. Notes: • The blank section of a tape cannot be dubbed. • Sounds sent through the DV terminal cannot be dubbed. • If a tape has a non-recorded portion when the tape is dubbed, images and sounds may be disturbed when this portion of the tape is played back. • In the case of importing data recorded with Audio Dubbing to a PC using the PC's software, only the original sound (ST1) may be imported, depending on the software. Editing Mode 53
-
 1
1 -
2
-
3
-
4
-
5
-
6
-
7
-
8
-
9
-
10
-
11
-
12
-
13
-
14
-
15
-
16
-
17
-
18
-
19
-
20
-
21
-
22
-
23
-
24
-
25
-
26
-
27
-
28
-
29
-
30
-
31
-
32
-
33
-
34
-
35
-
36
-
37
-
38
-
39
-
40
-
41
-
42
-
43
-
44
-
45
-
46
-
47
-
 48
48 -
 49
49 -
 50
50 -
 51
51 -
 52
52 -
 53
53 -
 54
54 -
 55
55 -
 56
56 -
 57
57 -
 58
58 -
59
-
60
-
61
-
62
-
63
-
64
-
65
-
66
-
67
-
68
-
69
-
70
-
71
-
72
-
73
-
74
-
75
-
76
-
77
-
78
-
79
-
80
-
81
-
82
-
83
-
84
-
85
-
86
-
87
-
88
-
89
-
90
-
91
-
92
 |
 |
