Panasonic PV-GS29 Digital Video Camera - English/ Spanish - Page 50
Writing Printing Data On A Card (dpof Setting) (for Pv-gs39/pv-gs59)
 |
UPC - 037988980123
View all Panasonic PV-GS29 manuals
Add to My Manuals
Save this manual to your list of manuals |
Page 50 highlights
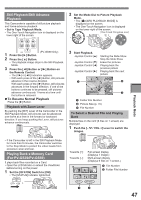
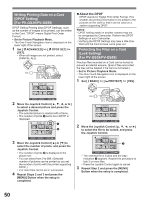
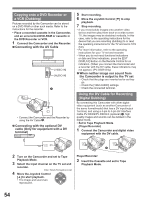
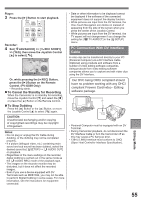
Writing Printing Data on a Card (DPOF Setting) (For PV-GS39/PV-GS59) DPOF Setting Printing data (DPOF Settings), such as the number of images to be printed, can be written to the Card. "DPOF" means Digital Print Order Format. • Set to Picture Playback Mode. • The One-Touch Navigation icon is displayed on the lower right of the screen. 1 Set [ ADVANCED] >> [ DPOF SET] >> [SET]. • When all images are not printed, select [CANCEL ALL]. DPOF SET „ About the DPOF DPOF stands for Digital Print Order Format. This enables the printing information to be added to the pictures on the card so that it can be used on a system supporting DPOF. Notes: • DPOF setting made on another camera may not be recognized by Camcorder. Perform the DPOF Settings on your Camcorder. • Verifying the DPOF Settings may take a little time. Wait until the Card Access Lamp goes out. Protecting the Files on a Card (Lock Setting) (For PV-GS39/PV-GS59) Precious files recorded on a Card can be locked to prevent accidental erasure. (Even if files are locked, the files will be deleted if the Card is formatted.) • Set to Picture Playback Mode. • The One-Touch Navigation icon is displayed on the lower right of the screen. 1 Set [ BASIC] >> [ PROTECT] >> [YES]. SETUP ENTER EXIT 2 Move the Joystick Control or ►] to select a desired picture and press the Joystick Control. • The selected picture is marked with a frame. • The number of prints 1 set to be in DPOF is displayed. DPOF SET 2 1 2 2 SETUP ENTER EXIT 3 Move the Joystick Control [▲] or [▼] to select the number of prints, and press the Joystick Control. • The number of prints 2 is displayed in the picture set. • You can select from 0 to 999. (Selected number of pictures can be printed as you set the number of prints with the printer supporting DPOF.) • 2 or more files can be set in succession. 4 Repeat Steps 2 and 3 and press the [MENU] Button when the setup is completed. PROTECT SETUP ENTER EXIT 2 Move the Joystick Control or ►] to select the file to be locked, and press the Joystick Control. PROTECT 1 SETUP ENTER EXIT • The selected file is locked and the [ ] Indication 1 appears. Repeat this procedure to lock 2 or more files. • Press the Joystick Control again to cancel. 3 Repeat Step 2 and press the [MENU] Button when the setup is completed. 50
-
 1
1 -
2
-
3
-
4
-
5
-
6
-
7
-
8
-
9
-
10
-
11
-
12
-
13
-
14
-
15
-
16
-
17
-
18
-
19
-
20
-
21
-
22
-
23
-
24
-
25
-
26
-
27
-
28
-
29
-
30
-
31
-
32
-
33
-
34
-
35
-
36
-
37
-
38
-
39
-
40
-
41
-
42
-
43
-
44
-
 45
45 -
 46
46 -
 47
47 -
 48
48 -
 49
49 -
 50
50 -
 51
51 -
 52
52 -
 53
53 -
 54
54 -
 55
55 -
56
-
57
-
58
-
59
-
60
-
61
-
62
-
63
-
64
-
65
-
66
-
67
-
68
-
69
-
70
-
71
-
72
-
73
-
74
-
75
-
76
-
77
-
78
-
79
-
80
-
81
-
82
-
83
-
84
-
85
-
86
-
87
-
88
-
89
-
90
-
91
-
92
 |
 |
