Panasonic PV-GS29 Digital Video Camera - English/ Spanish - Page 57
With a PC, Operating environment, Installing the USB Driver, For Windows, For Macintosh
 |
UPC - 037988980123
View all Panasonic PV-GS29 manuals
Add to My Manuals
Save this manual to your list of manuals |
Page 57 highlights
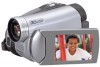
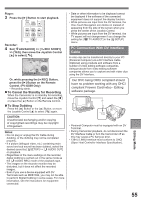
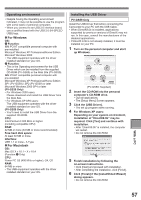
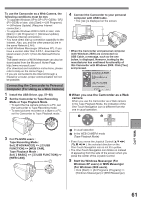
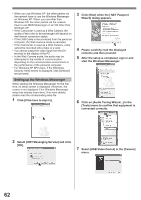
Operating environment • Despite having the Operating environment indicated, it may not be possible to use the program with some types of personal computers. • When you connect to an USB 2.0 interface board, use a certified board with the USB 2.0 (HI-SPEED USB) logo. „ For Windows OS: 1 Function: IBM PC/AT compatible personal computer with pre-installed: Microsoft Windows XP Professional/Home Edition Microsoft Windows 2000 • The USB equipment operates with the driver installed standard on your OS. 2 Function: • This is the Operating environment for the USB Driver which can be installed from the supplied CD-ROM (PV-GS59) or the Web Site (PV-GS39). IBM PC/AT compatible personal computer with pre-installed: Microsoft Windows XP Professional/Home Edition SP1 (PV-GS59) / SP2 (PV-GS39) or later Microsoft Windows 2000 SP4 or later (PV-GS39 Only) • For Windows 2000 users: Please download and install the USB Driver from the Web Site. • For Windows XP SP2 users: The USB equipment operates with the driver installed standard on your OS. (PV-GS59 Only) • You'll need to install the USB Driver from the supplied CD-ROM. CPU: Intel Pentium ll 300 MHz or higher (including compatible CPU) RAM: 32 MB or more (64 MB or more recommended) Free hard disk space: At least 30 MB or more Interface: USB 1.1 or more - A Type „ For Macintosh OS: Mac OS X v 10.1 - X v 10.4 (Function 1 Only) CPU: Power PC G3 (400 MHz or higher), G4, G5 RAM: 64 MB or more • The USB equipment operates with the driver installed standard on your OS. Installing the USB Driver PV-GS59 Only Install the USB Driver first before connecting the Camcorder to your PC with the USB Cable. • When DirectX9.0b is installed, applications supported by previous versions of DirectX may not run. In this case, consult the manufacturers of the disabled applications. • If DirectX 9.0b is not already installed, it must be installed on your PC. 1 Turn on the personal computer and start up Windows. [PV-GS59: Supplied] 2 Insert the CD-ROM into the personal computer's CD-ROM drive. • Quit all applications. • The [Setup Menu] Screen appears. 3 Click the [USB Driver]. • The set up program starts running. 4 For Windows XP users: Depending on your system environment, installation of "DirectX9.0b" may be required. Click [Yes] and continue with installation. • After "DirectX9.0b" is installed, the computer will restart. • Do not remove the CD-ROM. 5 Finish installation by following the on-screen instructions. • Click [Next] and proceed with installation. • After completing the installation, click [Finish]. 6 Click [Finish] if the [InstallShiled Wizard] dialog appears. • Do not remove the CD-ROM. With a PC 57
-
 1
1 -
2
-
3
-
4
-
5
-
6
-
7
-
8
-
9
-
10
-
11
-
12
-
13
-
14
-
15
-
16
-
17
-
18
-
19
-
20
-
21
-
22
-
23
-
24
-
25
-
26
-
27
-
28
-
29
-
30
-
31
-
32
-
33
-
34
-
35
-
36
-
37
-
38
-
39
-
40
-
41
-
42
-
43
-
44
-
45
-
46
-
47
-
48
-
49
-
50
-
51
-
 52
52 -
 53
53 -
 54
54 -
 55
55 -
 56
56 -
 57
57 -
 58
58 -
 59
59 -
 60
60 -
 61
61 -
 62
62 -
63
-
64
-
65
-
66
-
67
-
68
-
69
-
70
-
71
-
72
-
73
-
74
-
75
-
76
-
77
-
78
-
79
-
80
-
81
-
82
-
83
-
84
-
85
-
86
-
87
-
88
-
89
-
90
-
91
-
92
 |
 |