Panasonic PV-GS29 Digital Video Camera - English/ Spanish - Page 41
RECORDING IN NATURAL COLORS (WHITE BALANCE), Recording Mode, To Resume Automatic Adjustment
 |
UPC - 037988980123
View all Panasonic PV-GS29 manuals
Add to My Manuals
Save this manual to your list of manuals |
Page 41 highlights
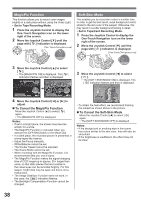
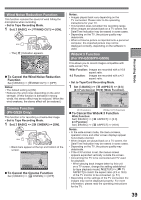
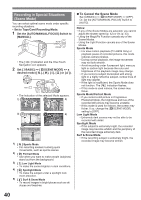
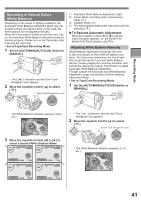
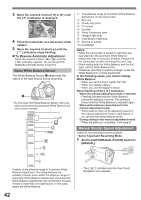
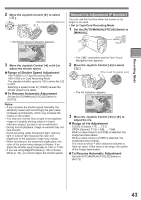
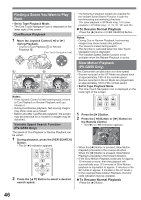
Recording Mode Recording in Natural Colors (White Balance) Depending on the scene or lighting conditions, the Automatic White Balance Adjustment Mode may not be able to bring out natural colors. In this case, the white balance can be adjusted manually. When the Camcorder is turned on with the Lens Cap on, the Automatic White Balance Adjustment may not function properly. Please turn on the Camcorder after removing the Lens Cap. • Set to Tape/Card Recording Mode. 1 Set the [AUTO/MANUAL/FOCUS] Switch to [MANUAL]. • The [ ] Indication and the One-Touch Navigation icon appears. 2 Move the Joystick Control [▲] to select [ ]. [One-Touch Navigation icon] WB IRIS SHTR 5/5 NEXT 1) Automatic White Balance Adjustment [ ] 2) Indoor Mode (recording under incandescent lamp) [ ] 3) Outdoor Mode [ ] 4) The white balance setting that was previously set manually [ ] „ To Resume Automatic Adjustment Move the Joystick Control [◄] or [►] until the [ ] Indication appears. Or, set the [AUTO/ MANUAL/FOCUS] Switch to [AUTO]. Adjusting White Balance Manually White Balance Adjustment recognizes the color of light and adjusts so that white will appear pure white. The Camcorder determines the hue of light that comes through the Lens and White Balance Sensor, thereby judging the recording condition, and selects the closest hue setting. This function is called Automatic White Balance Adjustment. For light outside the functional Auto White Balance Adjustment range, use the Manual White Balance Adjustment Mode. • Set to Tape/Card Recording Mode. 1 Set the [AUTO/MANUAL/FOCUS] Switch to [MANUAL]. • The White Balance indication appears. ([ ] etc.) SP 3h59m59s29f R 2:00 ► 12:34:56AM JAN 2 2006 WB WB < > BACK 100 3 Move the Joystick Control [◄] or [►] to select a desired White Balance Mode. 1) ► SP 3h59m59s29f R 2:00 SP 3h59m59s29f 2) R 2:00 ► 12:34:56AM JAN 2 2006 WB WB < > BACK 100 3) ► SP 3h59m59s29f R 2:00 12:34:56AM JAN 2 2006 WB WB < > BACK 100 SP 3h59m59s29f 4) R 2:00 ► 12:34:56AM JAN 2 2006 WB WB < > BACK 100 12:34:56AM JAN 2 2006 WB WB < > BACK 100 • The [ ] Indication and the One-Touch Navigation icon appears. 2 Move the Joystick Control [▲] to select [ ]. [One-Touch Navigation icon] WB IRIS SHTR 5/5 NEXT • The White Balance indication appears. ([ ] etc.) SP 3h59m59s29f R 2:00 ► 12:34:56AM JAN 2 2006 WB WB < > BACK 100 41
-
 1
1 -
2
-
3
-
4
-
5
-
6
-
7
-
8
-
9
-
10
-
11
-
12
-
13
-
14
-
15
-
16
-
17
-
18
-
19
-
20
-
21
-
22
-
23
-
24
-
25
-
26
-
27
-
28
-
29
-
30
-
31
-
32
-
33
-
34
-
35
-
 36
36 -
 37
37 -
 38
38 -
 39
39 -
 40
40 -
 41
41 -
 42
42 -
 43
43 -
 44
44 -
 45
45 -
 46
46 -
47
-
48
-
49
-
50
-
51
-
52
-
53
-
54
-
55
-
56
-
57
-
58
-
59
-
60
-
61
-
62
-
63
-
64
-
65
-
66
-
67
-
68
-
69
-
70
-
71
-
72
-
73
-
74
-
75
-
76
-
77
-
78
-
79
-
80
-
81
-
82
-
83
-
84
-
85
-
86
-
87
-
88
-
89
-
90
-
91
-
92
 |
 |