Panasonic PV-GS29 Digital Video Camera - English/ Spanish - Page 33
Recording Yourself, Recording With The Built-in Led Video Light, Recording Mode
 |
UPC - 037988980123
View all Panasonic PV-GS29 manuals
Add to My Manuals
Save this manual to your list of manuals |
Page 33 highlights
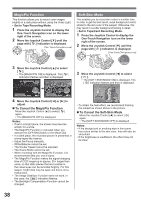
Notes: • Even if the [ SHTR EFFECT] is set to [ON], the Shutter Effect cannot be recorded on the picture. • When the color of the screen changes or blurs, adjust the shutter speed manually to 1/60 or 1/100. • Photoshot Recording results in slightly inferior image quality. • For the number of still pictures to be recorded on a card, refer to page 32. • The sound cannot be recorded. • While data is being recorded on a card, do not operate the Mode Dial. • When the Access Lamp is lit, do not insert or remove a card. • Another product may degrade or not play back data recorded on this Camcorder. • If set [ PICT. QUALITY] >> [ ], mosaic-pattern noise may appear on a playback image depending on the picture content. RapidFire Consecutive Photoshot The still pictures can be recorded on a Card at regular intervals. 1 Set [ ADVANCED] >> [ BURST MODE] >> [ON]. Notes: • One more still picture may be recorded after you release the [PHOTO SHOT] Button. • If the Self-timer Function is set, the Camcorder records up to 10 still pictures continuously. • Intervals between recording pictures may become longer depending on the card. We recommend using a Panasonic SD Memory Card. • When using the card formatted by other equipment or a card that was recorded and erased repeatedly, the intervals between recording pictures may become longer. If so, back up your important data on a PC, and format your card with this Camcorder. Recording Yourself You can record yourself while viewing the LCD Monitor. You can record persons in front of the camera while presenting them the image. The image is horizontally flipped as if you see a mirror image. (The image to be recorded is the same as that recording.) • Extend the Viewfinder to see the picture while recording. • Set to Tape/Card Recording Mode. 1 Rotate the LCD Monitor towards the lens side. Recording Mode • The [ ] Indication appears. 12:34:56AM JAN 2 2006 100 2 Press and hold the [PHOTO SHOT] Button. • When [ON] is selected, the still pictures can be recorded in approximately 0.5 second intervals until the [PHOTO SHOT] Button is released or 10 pictures are recorded. „ To Stop the RapidFire Consecutive Photoshot in Progress Release the [PHOTO SHOT] Button. • A vertically oriented display appears on the Viewfinder screen, this is normal and not indicative of any trouble. • When the LCD Monitor is rotated towards the lens side, the One-Touch Navigation icon will not be displayed even if you press the center of the Joystick Control. Recording with the Built-in LED Video Light To brighten the natural colors in a scene. Gain Up mode works with the Built-in Video Light to enhance the light's brightness. • Set to Tape/Card Recording Mode. 1 Press the [LIGHT] Button. 1 • The Built-in LED Video Light lights and the Gain Up mode is set to on. • Gain Up mode will be brighter than when only the Video Light is on, however, washed out images will appear. 33
-
 1
1 -
2
-
3
-
4
-
5
-
6
-
7
-
8
-
9
-
10
-
11
-
12
-
13
-
14
-
15
-
16
-
17
-
18
-
19
-
20
-
21
-
22
-
23
-
24
-
25
-
26
-
27
-
 28
28 -
 29
29 -
 30
30 -
 31
31 -
 32
32 -
 33
33 -
 34
34 -
 35
35 -
 36
36 -
 37
37 -
 38
38 -
39
-
40
-
41
-
42
-
43
-
44
-
45
-
46
-
47
-
48
-
49
-
50
-
51
-
52
-
53
-
54
-
55
-
56
-
57
-
58
-
59
-
60
-
61
-
62
-
63
-
64
-
65
-
66
-
67
-
68
-
69
-
70
-
71
-
72
-
73
-
74
-
75
-
76
-
77
-
78
-
79
-
80
-
81
-
82
-
83
-
84
-
85
-
86
-
87
-
88
-
89
-
90
-
91
-
92
 |
 |