Samsung SC-D383 User Manual (ENGLISH) - Page 38
enregistrement de base, basic recording
 |
View all Samsung SC-D383 manuals
Add to My Manuals
Save this manual to your list of manuals |
Page 38 highlights
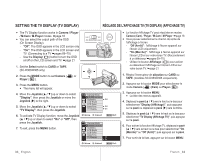
basic recording INSERTING / EJECTING A CASSETTE • When inserting a tape or closing the cassette compartment, do not apply excessive force, as it may cause a malfunction. • Do not use any tape other than DV cassettes. 1. Connect a power source and slide the OPEN switch. • The cassette compartment cover opens automatically. Ⱝ 2. Inserting a Cassette: Insert a tape into OPEN the cassette compartment with the tape window facing outward and the protection tab toward the top. Ejecting a Cassette: Remove the cassette tape, which is automatically ejected by pulling the cassette out. ⰱ 3. Press the area marked PUSH on the cassette compartment cover until it clicks into place. • The cassette is loaded automatically. 4. Close the cassette compartment cover. VARIOUS RECORDING TECHNIQUES In some situations different recording techniques may be required. Ⱝ 1. General recording. 2. Downward recording. • Making a recording with a top view of the LCD screen. 3. Upward recording. • Making a recording viewing the LCD ⰱ screen from below. 4. Self recording. • Making a recording viewing the LCD screen from the front. Please rotate the LCD screen carefully as excessive rotation may cause damage to the inside of the hinge that connects the LCD screen to the camcorder. 34_ English enregistrement de base INSERTION/ÉJECTION D'UNE CASSETTE • Ne forcez pas lorsque vous insérez une cassette ou fermez le compartiment à cassette ; cela risquerait en effet d'entraîner un dysfonctionnement. • Utilisez uniquement des cassettes DV. 1. Raccordez votre appareil une source d'alimentation et faites glisser l'interrupteur OPEN. Ⱟ • Le couvercle du compartiment à cassette s'ouvre automatiquement. 2. Insertion d'une cassette : insérez une cassette dans le compartiment, la fenêtre de la cassette devant être orientée vers l'extérieur et le volet de protection vers le haut. Éjection d'une cassette : la cassette est ⰳ automatiquement éjectée dès que vous exercez une pression vers l'extérieur. 3. Appuyez sur le couvercle du compartiment à cassette marquée PUSH jusqu'à ce que vous entendiez un déclic. • La cassette est chargée automatiquement. 4. Fermez le couvercle du compartiment à cassette. TECHNIQUES D'ENREGISTREMENT Ⱟ Il est possible que la technique d'enregistrement doive être adaptée à la situation. 1. Enregistrement classique 2. Enregistrement descendant. • Réalisez une prise de vue en contrôlant la scène sur l'écran LCD orienté vers le haut. ⰳ 3. Enregistrement en hauteur • Réalisez une prise de vue en contrôlant la scène sur l'écran LCD orienté vers le bas. 4. Enregistrement automatique • Enregistrez-vous en contrôlant la scène sur l'écran LCD orienté vers l'avant. Faites pivoter l'écran LCD avec délicatesse car une rotation excessive peut endommager l'intérieur de la charnière qui relie l'écran LCD au caméscope. French _34
-
 1
1 -
2
-
3
-
4
-
5
-
6
-
7
-
8
-
9
-
10
-
11
-
12
-
13
-
14
-
15
-
16
-
17
-
18
-
19
-
20
-
21
-
22
-
23
-
24
-
25
-
26
-
27
-
28
-
29
-
30
-
31
-
32
-
 33
33 -
 34
34 -
 35
35 -
 36
36 -
 37
37 -
 38
38 -
 39
39 -
 40
40 -
 41
41 -
 42
42 -
 43
43 -
44
-
45
-
46
-
47
-
48
-
49
-
50
-
51
-
52
-
53
-
54
-
55
-
56
-
57
-
58
-
59
-
60
-
61
-
62
-
63
-
64
-
65
-
66
-
67
-
68
-
69
-
70
-
71
-
72
-
73
-
74
-
75
-
76
-
77
-
78
-
79
-
80
-
81
-
82
-
83
-
84
-
85
-
86
-
87
-
88
-
89
-
90
-
91
-
92
-
93
-
94
-
95
-
96
-
97
-
98
-
99
-
100
-
101
-
102
-
103
-
104
-
105
-
106
-
107
-
108
-
109
-
110
-
111
-
112
 |
 |
