Samsung SC-D383 User Manual (ENGLISH) - Page 75
Voice
 |
View all Samsung SC-D383 manuals
Add to My Manuals
Save this manual to your list of manuals |
Page 75 highlights
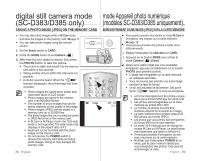
USING THE VOICE+ FUNCTION UTILISATION DE LA FONCTION VOICE+ • The Voice+ function works only in Player mode. ➥ page 18 • When you want to play back or record a tape-recorded movie on other AV device, you can transfer the voice sound incoming from the internal microphone of your camcorder, instead of the audio signals on a prerecorded tape. • La fonction Voice+ n'apparaît qu'en mode Player. ➥ page 18 • Lorsque vous souhaitez lire ou enregistrer un film enregistré sur un autre périphérique AV, vous pouvez transférer les données sonores provenant du microphone interne du caméscope au lieu des signaux audio de la cassette préenregistrée. 1. Connect the provided Audio/ 1. Branchez le câble Audio/Vidéo Video cable to the AV Jack of fourni sur la prise AV du the camcorder. TV caméscope. 2. Connect the other end of the cable 2. Branchez l'autre extrémité du câble to the VCR/DVD Recorder/TV by sur l'enregistreur DVD/magnétoscope/ matching the colors of the terminals. téléviseur en respectant les couleurs 3. Set the Select switch to TAPE. AV DV des bornes. (SC-D383/D385 only) AV Jack 3. Réglez l'interrupteur de sélection sur TAPE 4. Press the MODE button to set (modèles SC-D383/D385 uniquement) Player ( ). POWER MODE 4. Appuyez sur le bouton MODE pour 5. Insert the tape you wish to play CHG sélectionner le mode Player ( ). back in this camcorder. 5. Insérez la cassette que vous 6. Press the Recording start/stop VCR souhaitez lire dans le caméscope. button on a point where you want 6. Appuyez sur le bouton Début/fin during the playback. d'enregistrement au point de votre • Voice+ ( ) indicator is displayed on the screen and Audio/Video Cable choix pendant la lecture. • Le témoin Voice+ ( ) s'affiche "VOICE+" will flicker on the à l'écran et "VOICE+" clignote screen for a while. • Sound incoming from the internal microphone will be transferred to the quelques instants à l'écran. • Le son provenant du microphone interne est transmis au périphérique AV connected AV device, instead of the pre-recorded sound on the tape. connecté au lieu du son préenregistré sur la cassette. 7. To cancel the function, press the Recording start/stop button again. 7. Pour annuler la fonction, appuyez à nouveau sur le bouton Début/fin d'enregistrement. • Voice+ is available only when the Audio/Video cable is connected. If a different cable (DV or USB cable (SC-D383/D385 only)) is connected, Voice+ function MIX[1+2] SP 0:00:20:23 60min • La fonction VOICE+ n'est disponible que lorsque le câble Audio/Vidéo est connecté. Si un autre câble est branché (câble DV ou USB (SC-D383/D385 uniquement)), il est may not operate properly. • If you move the Joystick (S/T/W/X) when you operate Voice+ function, Voice+ function will be S 16BIt possible que la fonction Voice+ ne fonctionne pas correctement. • Si vous déplacez le pavé (S/T/W/X) lors de l'utilisation de la fonction Voice+, cette dernière est désactivée. deactivated. • During the Voice+ process, the MENU and PHOTO • Pendant le traitement Voice+, les fonctions des boutons AV In MENU et PHOTO ne fonctionnent pas. button functions do not work. • The Voice+ function does not affect the original sound on the recorded tape. • Sound is transferred from the internal microphone on this camcorder to the connected AV device, when using the Voice+ function. So make sure that this microphone is not blocked. • Adjust the sound volume on the connected external device. (TV, etc.) 12:00 1.JAN.2008 MIX[1+2] SP 0:00:20:23 60min S 16Bit Voice+ • La fonction VOICE+ n'affecte aucunement la bande son originale de la cassette enregistrée. • La fonction Voice+ permet de transférer le son du microphone interne du caméscope vers le périphérique AV connecté. Veillez donc à bien dégager le microphone. • Réglez le volume sonore sur le périphérique externe connecté. (téléviseur, etc.). • Une réaction acoustique peut se produire à proximité d'un haut-parleur de périphérique externe ; veillez donc à • Howling may occur near the speaker of an external device, please keep the camcorder at a distance from the external device. maintenir une certaine distance entre le caméscope et le AV In périphérique externe. • Avant de procéder au branchement, assurez-vous que le • Before connecting, make sure that the volume on the 12:00 1.JAN.2008 external device is turned down. Forgetting this may volume du périphérique externe est éteint. Dans le cas contraire, les haut-parleurs du périphérique externe cause howling from the external device's speakers. risquent d'émettre un bruit extrêmement fort. 71_ English French _71
-
 1
1 -
2
-
3
-
4
-
5
-
6
-
7
-
8
-
9
-
10
-
11
-
12
-
13
-
14
-
15
-
16
-
17
-
18
-
19
-
20
-
21
-
22
-
23
-
24
-
25
-
26
-
27
-
28
-
29
-
30
-
31
-
32
-
33
-
34
-
35
-
36
-
37
-
38
-
39
-
40
-
41
-
42
-
43
-
44
-
45
-
46
-
47
-
48
-
49
-
50
-
51
-
52
-
53
-
54
-
55
-
56
-
57
-
58
-
59
-
60
-
61
-
62
-
63
-
64
-
65
-
66
-
67
-
68
-
69
-
 70
70 -
 71
71 -
 72
72 -
 73
73 -
 74
74 -
 75
75 -
 76
76 -
 77
77 -
 78
78 -
 79
79 -
 80
80 -
81
-
82
-
83
-
84
-
85
-
86
-
87
-
88
-
89
-
90
-
91
-
92
-
93
-
94
-
95
-
96
-
97
-
98
-
99
-
100
-
101
-
102
-
103
-
104
-
105
-
106
-
107
-
108
-
109
-
110
-
111
-
112
 |
 |
