Brother International HE-800B Instruction Manual - English - Page 14
Installing the control box, clearance between the base of
 |
View all Brother International HE-800B manuals
Add to My Manuals
Save this manual to your list of manuals |
Page 14 highlights
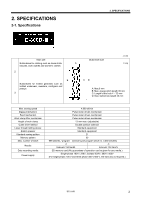
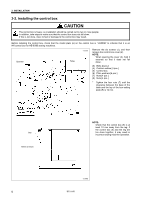
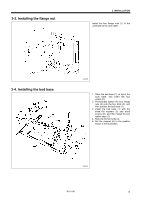
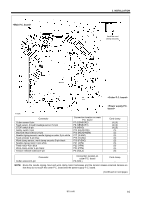
3. INSTALLATION 3-2. Installing the control box CAUTION The control box is heavy, so installation should be carried out by two or more people. In addition, take steps to make sure that the control box does not fall down. If this is not done, injury to feet or damage to the control box may result. Before installing the control box, check that the model plate (a) on the control box is "HX800B" to indicate that it is an HX-control box for HE-800B sewing machines. Operator Table 4735M Remove the six screws (1), and then remove the control box cover (2). NOTE: When opening the cover (2), hold it securely so that it does not fall down. (3) Bolts [4 pcs.] (4) Cushion collars [4 pcs.] (5) Control box (6) Plain washers [4 pcs.] (7) Nuts [4 pcs. ] (8) Nuts [4 pcs. ] * Tighten the four nuts (7) until the clearance between the base of the table and the top of the box setting plate (9) is 14 mm. Leg 10mm or more NOTE: Check that the control box (5) is at least 10 mm away from the leg. If the control box (5) and the leg are too close together, it may result in incorrect sewing machine operation. 4736M 5 HE-800B
-
 1
1 -
2
-
3
-
4
-
5
-
6
-
7
-
8
-
 9
9 -
 10
10 -
 11
11 -
 12
12 -
 13
13 -
 14
14 -
 15
15 -
 16
16 -
 17
17 -
 18
18 -
 19
19 -
20
-
21
-
22
-
23
-
24
-
25
-
26
-
27
-
28
-
29
-
30
-
31
-
32
-
33
-
34
-
35
-
36
-
37
-
38
-
39
-
40
-
41
-
42
-
43
-
44
-
45
-
46
-
47
-
48
-
49
-
50
-
51
-
52
-
53
-
54
-
55
-
56
-
57
-
58
-
59
-
60
-
61
-
62
-
63
-
64
-
65
-
66
-
67
-
68
-
69
-
70
-
71
-
72
-
73
-
74
-
75
-
76
-
77
-
78
-
79
-
80
-
81
-
82
-
83
-
84
-
85
-
86
-
87
-
88
-
89
-
90
-
91
-
92
-
93
-
94
-
95
-
96
-
97
-
98
-
99
-
100
-
101
-
102
-
103
-
104
-
105
-
106
 |
 |
