Brother International HE-800B Instruction Manual - English - Page 88
Reduce the needle bar play, or replace the parts., needle bar play
 |
View all Brother International HE-800B manuals
Add to My Manuals
Save this manual to your list of manuals |
Page 88 highlights
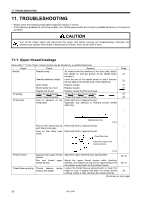
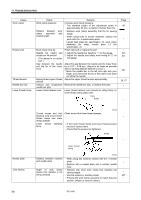
11. TROUBLESHOOTING Cause Work clamp Rotary hook Thread tension Needle bar play Lower thread clamp Check Work clamp pressure Relation between work clamp assembly and sewing length Blunt rotary hook tip Needle bar height and needle bar lift amount (The gauge is an option part.) Gap between the needle and the tip of the rotary hook Zigzag thread upper thread tension Vertical and longitudinal needle bar play Lower thread retainer cam Remedy Increase work clamp pressure. * The standard height of the adjustment screw is approximately 30 mm, so tighten it further than this. ・Replace work clamp assembly that fits for sewing length. ・When using knits or woven materials, replace the parts with the -3 specification parts: Length feed plate (for specification -3), work clamp assembly (for knits), needle plate 1.2 (for specification -3) Polish with buff or replace the part. 1. Adjust the needle bar height to "1" on the gauge. 2. Adjust the needle and rotary hook timing to "2" on the gauge. Adjust the gap between the needle and the rotary hook tip to 0.01 - 0.08 mm. (Adjust to as large as possible without causing skipped stitches to occur.) * Move the needle bar to the left and right with your finger, and check that the tip of the rotary hook does not strike the needle. Adjust the upper thread tension appropriately. Reduce the needle bar play, or replace the parts. Lower thread retainer cam should be sitting firmly on lower thread clamp plate roller. Cam Roller Page 66 * * 64* 65* 66* 26, 27 * * Needle plate Joint sewing 3998Q Thread scraps and dust Clean around the lower thread presser. blocking area around lower thread clamp and lower * thread presser Lower thread clamping ・If the lower thread clamp and lower thread presser force are bent, replace them. ・Check that the screws are tightened. Screw * Lower thread clamp 3999Q Relation between material ・When using knit material, replace with the -3 needle and needle plate plate. * ・Replace with a needle plate with a smaller needle hole. Angle of work clamp ・Replace with short work clamp that matches the means that material is not sewing length. * being clamped. ・Use the accessory auxiliary sheet. 68* ・Process the work clamp assembly to match the joint * section. (Attach or remove rubber.) 79 HE-800B
-
 1
1 -
2
-
3
-
4
-
5
-
6
-
7
-
8
-
9
-
10
-
11
-
12
-
13
-
14
-
15
-
16
-
17
-
18
-
19
-
20
-
21
-
22
-
23
-
24
-
25
-
26
-
27
-
28
-
29
-
30
-
31
-
32
-
33
-
34
-
35
-
36
-
37
-
38
-
39
-
40
-
41
-
42
-
43
-
44
-
45
-
46
-
47
-
48
-
49
-
50
-
51
-
52
-
53
-
54
-
55
-
56
-
57
-
58
-
59
-
60
-
61
-
62
-
63
-
64
-
65
-
66
-
67
-
68
-
69
-
70
-
71
-
72
-
73
-
74
-
75
-
76
-
77
-
78
-
79
-
80
-
81
-
82
-
 83
83 -
 84
84 -
 85
85 -
 86
86 -
 87
87 -
 88
88 -
 89
89 -
 90
90 -
 91
91 -
 92
92 -
 93
93 -
94
-
95
-
96
-
97
-
98
-
99
-
100
-
101
-
102
-
103
-
104
-
105
-
106
 |
 |
