Brother International MFC-7400C Users Manual - English - Page 159
User Defined Paper Size, Orientation, Copies, Collate, and in order.
 |
View all Brother International MFC-7400C manuals
Add to My Manuals
Save this manual to your list of manuals |
Page 159 highlights
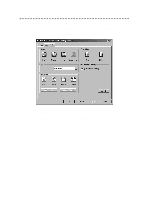
User Defined Paper Size The printer can handle any paper size within the following range: Minimum 3.5 x 5 inches Maximum 8.5 x 14 inches (90 x 127 mm) (216 x 355.6 mm) In this option, you can specify a custom paper size and save it by following this procedure: 1 Measure the paper size you want to use. 2 Select User Defined... in the paper size option. 3 Enter a unique name for your paper in the Custom Paper Size Name box. 4 Select either inch or mm for the unit of measure. 5 Type in the length and width. 6 Click the Save button to store the size. If necessary, you can delete a preset size by choosing the Delete button. Your Windows application software may override this setting. Make sure you have set the proper paper size in your application software. In addition, check the margin settings when you select the smallest paper size. If they are too large, it may result in nothing being printed. Orientation Print orientation may be Portrait or Landscape. Portrait orientation means the page is taller than it is wide when you view the printed text upright. Landscape orientation means the page is wider than it is tall when you view the printed text upright. Copies The Copies selection tells Windows how many copies you want to print from a software application. Note This setting is independent of the "copies selection" that may be available within the print menus of your software application. Do not use the two selections simultaneously! Collate In multiple page jobs that are uncollated, several copies of Page 1 are printed followed by several copies of Page 2, followed by several copies of Page 3, etc. For example, for 2 copies of a 3 page document, the MFC prints Page 1, Page 1, Page 2, Page 2, Page 3, and Page 3 in order. P R I N T E R D R I V E R S E T T I N G S 16 - 3
-
 1
1 -
2
-
3
-
4
-
5
-
6
-
7
-
8
-
9
-
10
-
11
-
12
-
13
-
14
-
15
-
16
-
17
-
18
-
19
-
20
-
21
-
22
-
23
-
24
-
25
-
26
-
27
-
28
-
29
-
30
-
31
-
32
-
33
-
34
-
35
-
36
-
37
-
38
-
39
-
40
-
41
-
42
-
43
-
44
-
45
-
46
-
47
-
48
-
49
-
50
-
51
-
52
-
53
-
54
-
55
-
56
-
57
-
58
-
59
-
60
-
61
-
62
-
63
-
64
-
65
-
66
-
67
-
68
-
69
-
70
-
71
-
72
-
73
-
74
-
75
-
76
-
77
-
78
-
79
-
80
-
81
-
82
-
83
-
84
-
85
-
86
-
87
-
88
-
89
-
90
-
91
-
92
-
93
-
94
-
95
-
96
-
97
-
98
-
99
-
100
-
101
-
102
-
103
-
104
-
105
-
106
-
107
-
108
-
109
-
110
-
111
-
112
-
113
-
114
-
115
-
116
-
117
-
118
-
119
-
120
-
121
-
122
-
123
-
124
-
125
-
126
-
127
-
128
-
129
-
130
-
131
-
132
-
133
-
134
-
135
-
136
-
137
-
138
-
139
-
140
-
141
-
142
-
143
-
144
-
145
-
146
-
147
-
148
-
149
-
150
-
151
-
152
-
153
-
 154
154 -
 155
155 -
 156
156 -
 157
157 -
 158
158 -
 159
159 -
 160
160 -
 161
161 -
 162
162 -
 163
163 -
 164
164 -
165
-
166
-
167
-
168
-
169
-
170
-
171
-
172
-
173
-
174
-
175
-
176
-
177
-
178
-
179
-
180
-
181
-
182
-
183
-
184
-
185
-
186
-
187
-
188
-
189
-
190
-
191
-
192
-
193
-
194
-
195
-
196
-
197
-
198
-
199
-
200
-
201
-
202
-
203
-
204
-
205
-
206
-
207
-
208
-
209
-
210
-
211
-
212
-
213
-
214
-
215
-
216
-
217
-
218
-
219
-
220
-
221
-
222
-
223
-
224
-
225
-
226
-
227
-
228
-
229
-
230
-
231
-
232
-
233
-
234
-
235
-
236
-
237
-
238
-
239
-
240
-
241
-
242
-
243
-
244
-
245
-
246
-
247
-
248
-
249
-
250
-
251
-
252
 |
 |
