Brother International MFC 9420CN Users Manual - English - Page 132
Paper jams - paper jam a1
 |
UPC - 012502614074
View all Brother International MFC 9420CN manuals
Add to My Manuals
Save this manual to your list of manuals |
Page 132 highlights
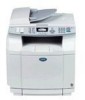
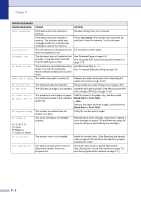
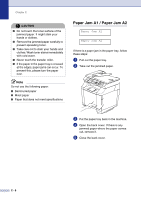
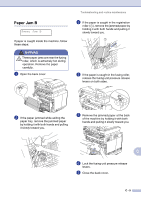
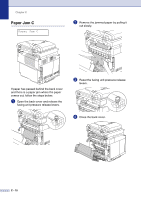
Paper jams If paper jams inside the machine, the machine will stop. One of the following LCD messages will appear to tell you where to find the jammed paper. C B A1 A2 Troubleshooting and routine maintenance WARNING The fusing unit and the parts around it are hot! Never touch the shaded areas shown below. Paper Jam A1 Paper jam in the standard paper tray (TRAY1) Paper Jam A2 Paper jam in the optional lower tray (TRAY2) Paper Jam B Paper jam inside the machine. Paper Jam C Paper jam where the paper comes out of the machine. Paper may jam in the paper tray, inside the machine, at the back cover, or where the paper comes out of the machine. Check where the jam is and follow the instructions on the next few pages to remove the jammed paper. If the error message still appears on the LCD after you remove the jammed paper, there may be more paper jammed somewhere else. Please check the machine thoroughly. After you have followed the instructions, the machine will resume printing automatically. After a paper jam has occurred, data usually stays in the machine's memory. After removing the jammed paper, and the next printed page is stained with toner, print several test pages before restarting your print job. C C - 7
-
 1
1 -
2
-
3
-
4
-
5
-
6
-
7
-
8
-
9
-
10
-
11
-
12
-
13
-
14
-
15
-
16
-
17
-
18
-
19
-
20
-
21
-
22
-
23
-
24
-
25
-
26
-
27
-
28
-
29
-
30
-
31
-
32
-
33
-
34
-
35
-
36
-
37
-
38
-
39
-
40
-
41
-
42
-
43
-
44
-
45
-
46
-
47
-
48
-
49
-
50
-
51
-
52
-
53
-
54
-
55
-
56
-
57
-
58
-
59
-
60
-
61
-
62
-
63
-
64
-
65
-
66
-
67
-
68
-
69
-
70
-
71
-
72
-
73
-
74
-
75
-
76
-
77
-
78
-
79
-
80
-
81
-
82
-
83
-
84
-
85
-
86
-
87
-
88
-
89
-
90
-
91
-
92
-
93
-
94
-
95
-
96
-
97
-
98
-
99
-
100
-
101
-
102
-
103
-
104
-
105
-
106
-
107
-
108
-
109
-
110
-
111
-
112
-
113
-
114
-
115
-
116
-
117
-
118
-
119
-
120
-
121
-
122
-
123
-
124
-
125
-
126
-
 127
127 -
 128
128 -
 129
129 -
 130
130 -
 131
131 -
 132
132 -
 133
133 -
 134
134 -
 135
135 -
 136
136 -
 137
137 -
138
-
139
-
140
-
141
-
142
-
143
-
144
-
145
-
146
-
147
-
148
-
149
-
150
-
151
-
152
-
153
-
154
-
155
-
156
-
157
-
158
-
159
-
160
-
161
-
162
-
163
-
164
-
165
-
166
-
167
-
168
-
169
-
170
-
171
-
172
-
173
-
174
-
175
-
176
-
177
-
178
-
179
-
180
-
181
-
182
-
183
-
184
-
185
-
186
-
187
-
188
-
189
-
190
-
191
-
192
-
193
-
194
-
195
 |
 |