Brother International MFC 9420CN Users Manual - English - Page 141
Improving the print quality, Menu/Set - check toner level
 |
UPC - 012502614074
View all Brother International MFC 9420CN manuals
Add to My Manuals
Save this manual to your list of manuals |
Page 141 highlights
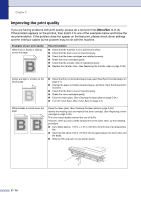
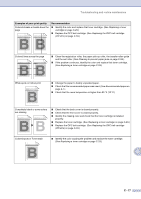
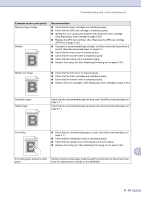
Chapter C Improving the print quality If you are having problems with print quality, please do a test print first (Menu/Set, 4, 2, 3). If the problem appears on the printout, then match it to one of the examples below and follow the recommendation. If the problem does not appear on the test print, please check driver settings and the interface cables as the problem may not lie with the machine. Examples of poor print quality White lines or bands or ribbing across the page ABCDEFGHIJKLMNOPQRSTUVWXYZ. 0123456789. abcdefghijklmnopqrstuvwxyz. ABCDEFGHIJKLMNOPQRSTUVWXYZ. 0123456789. abcdefghijklmnopqrstuvwxyz. ABCDEFGHIJKLMNOPQRSTUVWXYZ. 0123456789. abcdefghijklmnopqrstuvwxyz. ABCDEFGHIJKLMNOPQRSTUVWXYZ. 0123456789. abcdefghijklmnopqrstuvwxyz. Recommendation ■ Check that the machine is on a solid level surface. ■ Check that the back cover is closed properly. ■ Check that the toner cartridges are installed properly. ■ Shake the toner cartridges gently. ■ Check that the transfer roller is installed properly. ■ Replace the transfer roller. (See Replacing the transfer roller on page C-39.) Colors are light or unclear on the whole page ABCDEFGHIJKLMNOPQRSTUVWXYZ. 0123456789. abcdefghijklmnopqrstuvwxyz. ABCDEFGHIJKLMNOPQRSTUVWXYZ. 0123456789. abcdefghijklmnopqrstuvwxyz. ABCDEFGHIJKLMNOPQRSTUVWXYZ. 0123456789. abcdefghijklmnopqrstuvwxyz. ABCDEFGHIJKLMNOPQRSTUVWXYZ. 0123456789. abcdefghijklmnopqrstuvwxyz. ■ Check that the recommended paper was used. (See Recommended paper on page 2-1.) ■ Change the paper to freshly unpacked paper, and then check that the problem is solved. ■ Check that the back cover is closed properly. ■ Shake the toner cartridges gently. ■ Clean the laser glass. (See Cleaning the laser glass on page C-24.) ■ Turn off Toner Save. (See Toner Save on page 3-7.) White streaks or bands down the page ABCDEFGHIJKLMNOPQRSTUVWXYZ. 0123456789. abcdefghijklmnopqrstuvwxyz. ABCDEFGHIJKLMNOPQRSTUVWXYZ. 0123456789. abcdefghijklmnopqrstuvwxyz. ABCDEFGHIJKLMNOPQRSTUVWXYZ. 0123456789. abcdefghijklmnopqrstuvwxyz. ABCDEFGHIJKLMNOPQRSTUVWXYZ. 0123456789. abcdefghijklmnopqrstuvwxyz. ABCDEFGHIJKLMNOPQRSTUVWXYZ. 0123456789. abcdefghijklmnopqrstuvwxyz. ABCDEFGHIJKLMNOPQRSTUVWXYZ. 0123456789. abcdefghijklmnopqrstuvwxyz. ABCDEFGHIJKLMNOPQRSTUVWXYZ. 0123456789. abcdefghijklmnopqrstuvwxyz. ABCDEFGHIJKLMNOPQRSTUVWXYZ. 0123456789. abcdefghijklmnopqrstuvwxyz. Clean the laser glass. (See Cleaning the laser glass on page C-24.) Identify the missing color and replace that toner cartridge. (See Replacing a toner cartridge on page C-29.) The toner has probably reached the end of its life. However, when you see a white vertical line on the toner roller, try the following procedure. ■ Cut a sheet approx. 1.97 in. x 1.97 in. (50 mm x 50 mm) out of a transparency film. ■ Insert the film about 2.54 in. (10 mm) into the gap between the toner roller and the blade. ■ Slide the film and pull it out as shown below. C - 16
-
 1
1 -
2
-
3
-
4
-
5
-
6
-
7
-
8
-
9
-
10
-
11
-
12
-
13
-
14
-
15
-
16
-
17
-
18
-
19
-
20
-
21
-
22
-
23
-
24
-
25
-
26
-
27
-
28
-
29
-
30
-
31
-
32
-
33
-
34
-
35
-
36
-
37
-
38
-
39
-
40
-
41
-
42
-
43
-
44
-
45
-
46
-
47
-
48
-
49
-
50
-
51
-
52
-
53
-
54
-
55
-
56
-
57
-
58
-
59
-
60
-
61
-
62
-
63
-
64
-
65
-
66
-
67
-
68
-
69
-
70
-
71
-
72
-
73
-
74
-
75
-
76
-
77
-
78
-
79
-
80
-
81
-
82
-
83
-
84
-
85
-
86
-
87
-
88
-
89
-
90
-
91
-
92
-
93
-
94
-
95
-
96
-
97
-
98
-
99
-
100
-
101
-
102
-
103
-
104
-
105
-
106
-
107
-
108
-
109
-
110
-
111
-
112
-
113
-
114
-
115
-
116
-
117
-
118
-
119
-
120
-
121
-
122
-
123
-
124
-
125
-
126
-
127
-
128
-
129
-
130
-
131
-
132
-
133
-
134
-
135
-
 136
136 -
 137
137 -
 138
138 -
 139
139 -
 140
140 -
 141
141 -
 142
142 -
 143
143 -
 144
144 -
 145
145 -
 146
146 -
147
-
148
-
149
-
150
-
151
-
152
-
153
-
154
-
155
-
156
-
157
-
158
-
159
-
160
-
161
-
162
-
163
-
164
-
165
-
166
-
167
-
168
-
169
-
170
-
171
-
172
-
173
-
174
-
175
-
176
-
177
-
178
-
179
-
180
-
181
-
182
-
183
-
184
-
185
-
186
-
187
-
188
-
189
-
190
-
191
-
192
-
193
-
194
-
195
 |
 |
