Brother International PT-9700PC Users Manual - English and Spanish - Page 16
Connecting the printer
 |
View all Brother International PT-9700PC manuals
Add to My Manuals
Save this manual to your list of manuals |
Page 16 highlights
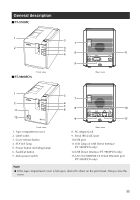
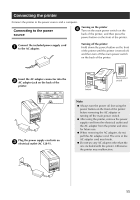
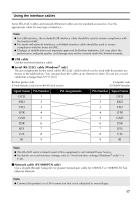
Connecting the printer Connect the printer to the power source and a computer. Connecting to the power source Turning on the printer 4 Turn on the main power switch on the back of the printer, and then press the power button on the front of the printer. Connect the included power supply cord 1 to the AC adapter. Turning off the printer Hold down the power button on the front of the printer until the printer is turned off, and then turn off the main power switch on the back of the printer. Insert the AC adapter connector into the 2 AC adapter jack on the back of the printer. DC IN 24V DC IN 24V Plug the power supply cord into an 3 electrical outlet (AC 120 V). STATUS Power button Main power STATUS switch Note ● Always turn the power off first using the power button on the front of the printer before removing the AC adapter or turning off the main power switch. ● After using the printer, remove the power supply cord from the electrical outlet and the AC adapter from the printer and store for future use. ● When removing the AC adapter, do not pull the AC adapter cord. The wire in the AC adapter cord may break. ● Do not use any AC adapter other than the one included with the printer. Otherwise the printer may malfunction. DC IN 24V 15
-
 1
1 -
2
-
3
-
4
-
5
-
6
-
7
-
8
-
9
-
10
-
 11
11 -
 12
12 -
 13
13 -
 14
14 -
 15
15 -
 16
16 -
 17
17 -
 18
18 -
 19
19 -
 20
20 -
 21
21 -
22
-
23
-
24
-
25
-
26
-
27
-
28
-
29
-
30
-
31
-
32
-
33
-
34
-
35
-
36
-
37
-
38
-
39
-
40
-
41
-
42
-
43
-
44
-
45
-
46
-
47
-
48
-
49
-
50
-
51
-
52
-
53
-
54
-
55
-
56
-
57
-
58
-
59
-
60
-
61
-
62
-
63
-
64
-
65
-
66
-
67
-
68
-
69
-
70
-
71
-
72
-
73
-
74
-
75
-
76
-
77
-
78
-
79
-
80
-
81
-
82
-
83
-
84
-
85
-
86
-
87
-
88
-
89
-
90
-
91
-
92
-
93
-
94
-
95
-
96
-
97
-
98
-
99
-
100
-
101
-
102
-
103
-
104
-
105
-
106
-
107
-
108
-
109
-
110
-
111
-
112
-
113
-
114
-
115
-
116
-
117
-
118
 |
 |
